The Ultimate Divi Modules UI Bundle, available in the Divi Marketplace, is a third-party product boasting over 5,550 styles, 35 pre-made layout packs, 82 elements, and 11 multipurpose Divi Webkit tools, making it the fastest-selling UI bundle on the Divi Marketplace. Customizing its layouts and modules within the UI bundle is as straightforward as tweaking any other Divi module or layout. Plus, the UI bundle easily integrates with Divi Cloud. Given its seamless integration and enhanced styles, it’s a robust web design solution for kickstarting your website.
Let’s dive deep into the functionality of Ultimate Divi Modules UI Bundle Files. I’ll guide you through each step, from downloading and importing/exporting to adding it to the cloud. It promises to be an insightful journey.
Accessing the Ultimate Divi Modules UI Bundle: Navigating Zip Files
Once you’ve purchased the Ultimate Divi Modules UI Bundle, go to your Customer Dashboard in your Elegant Themes Account. Here, you can easily download the bundle. It will be saved on your PC as ‘ElementThemeSubmit‘. Within this, choose the ‘UI Module Mega Bundle’ option. This will present you with two zip files. The first contains the main product files and is labeled ‘Ultimate-Divi-Modules-UI-Bundle.zip‘. The second is named ‘Ultimate-Divi-Modules-UI-Bundle Supplementary Product Files.zip‘.
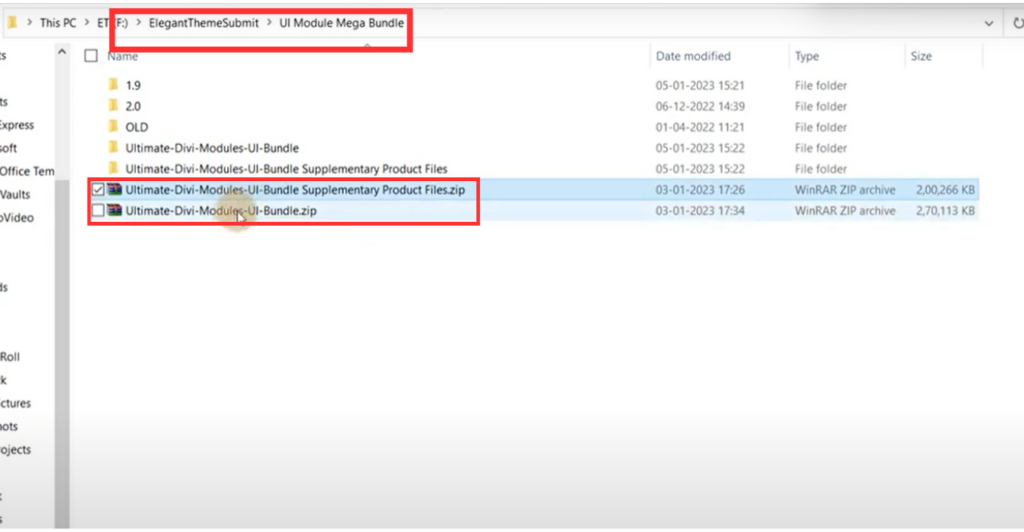
Accessing Ultimate Divi Module UI Bundle Zip Files
Extract both files.
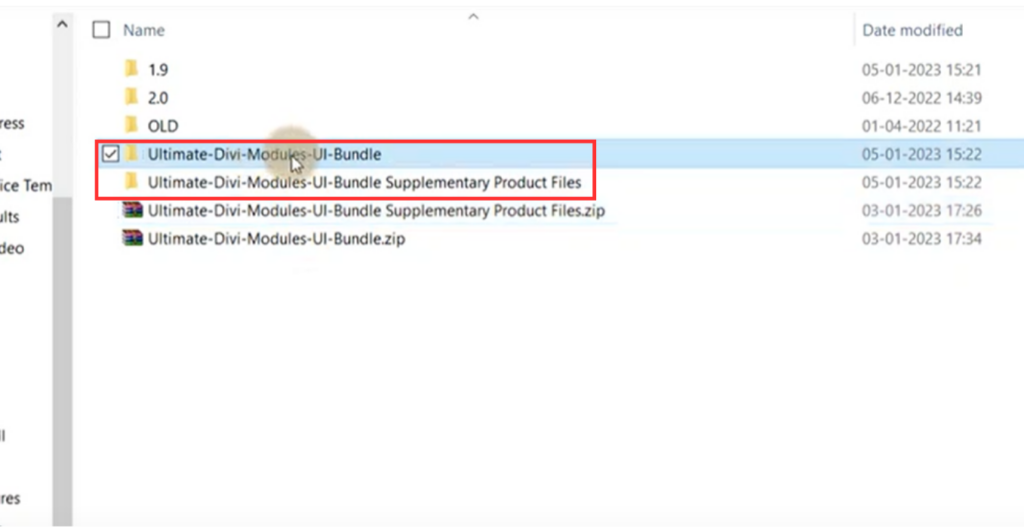
Extracting Ultimate Divi Module UI Bundle
From layout designs to module styles — whether it’s ‘About Us’ styles, team designs, footer layouts, ‘Contact Us’ section styles, or content carousel designs — the Ultimate Divi Modules UI Bundle has it all. All the files are in JSON format, which you can effortlessly import into the WordPress dashboard.
Let’s examine how to import a Module style into the WordPress dashboard. Given that the Ultimate Divi Modules UI Bundle Files offer over 5,550 styles, we won’t delve into each one. We’ll explore different styles but let’s first take a closer look at the Ultimate-Divi-Modules-UI-Bundle folder.
Ultimate-Divi-Modules-UI-Bundle: Category Insights
Inside the Ultimate-Divi-Modules-UI-Bundle folder, you’ll discover module category styles organized in their corresponding folders. With the UI Bundle offering numerous styles for each category, it’s a massive convenience for an agency delivering websites using Divi to choose from a diverse array of styles based on their preferences. Listed below are all the categories available in the Ultimate-Divi-Modules-UI-Bundle folder.

Exploring Divi’s UI Bundle: Category Insights
Here’s a glimpse into a few categories, so you know your options when building a website.
Team Styles in Divi Explored
Team styles come with 75 different designs, ensuring that the names, bios, positions, and images of your team members are presented to your preference. Ranging from default designs to hover effects and animation styles, there are a bunch of choices for your webpage. These Ultimate Divi Modules UI Bundle styles incorporate dynamic overlays with social icons, varied text placements, rounded images, bar styles, and more. Here are a few examples to showcase the versatility these styles provide to web designers.

Navigating style 5’s Icon Hover Effect in the Team styles

Divi UI’s Elegant Style 74 Overlap
Styles 5 and 74 offer contrasting designs. Style 5 features a dark hover effect with a blue border displaying social icons, while Style 74 presents a more chic look, with the bio overlay overlapping the display image.

Unfolding Divi’s Style 15

Engaging Elegance: Divi’s Dynamic Style 30
Styles 15 and 30 offer distinct designs. Style 15 has a bio overlay that conceals the team member’s image on hover, making it ideal for focusing on the member’s information. Conversely, Style 30 displays a member’s photo within two diagonally positioned ovals, each oriented in opposite diagonal directions. This layout is likely to attract creative designers or innovative companies, adding dynamism to the web design and enhancing user engagement.
Read More: Discover exciting image modules and more
About Us & Intro Style
The ‘About Us & Intro’ section offers 64 styles, each incorporating a mix of modules like buttons, images, headings, counters, and more. Each style has its unique presentation. You have the choice to change the color scheme to align with your site’s palette or any custom color selection.
A well-designed About Us section can foster a stronger bond with visitors, offering an interactive and contemporary feel. Learn more about the Divi Theme Builder’s best practices for engaging websites. The Ultimate Divi Modules UI Bundle pre-made ‘About Us’ section provides just that – instead of designing the whole section from the ground up, both seasoned and newcomers can save time by selecting a style that closely matches your web style.
Here are a few examples to illustrate the available designs.

About Us Style 15: Square Imagery and Stats Fusion

Ultimate About Us Section: Discover Divi’s Style 45
In this Divi ‘About Us‘ bundle, Style 15 and Style 45 employ two unique approaches to connect with the audience. Style 15 positions text on the right and an image on the left, using a square format for the picture. It features distinct numerical indicators to represent the number of projects completed, the count of employees, and customer data.
Conversely, style 45 flips the layout, placing text on the left and the image on the right, opting for a circular image format. Instead of numbers, it embraces a methodical approach with a ‘Read More’ button. Both designs showcase the versatility the Ultimate Divi Modules UI Bundle offers to cater to different design demands.

Quote-Ready About Us: Divi Modules’ Style 61 Unleashed
Style 61 displays a contact form for a quote in the About Us section. It’s a strategic design choice to encourage visitors to take action right away. As users read your company’s achievements and expertise in the About Us section, they’re immediately presented with a clear CTA through a quote form. It increases the likelihood of improving conversion.
Similarly, the bundle includes Divi Footer layouts, Image Hover styles, Pricing Table styles, Contact Form layouts, button styles, and even some Info Banners styles catering to specific needs. Now that we’ve explored different styles, let’s discuss how to import these styles into your WordPress Dashboard.
Importing JSON module files to your WordPress Dashboard
Nearly all the files have a similar import method. For your understanding, I’ll demonstrate by importing some JSON files of All Woo Modules into my WordPress Dashboard.
Log into your WordPress dashboard. Navigate to ‘Divi‘ on the sidebar, and then select ‘Divi Library‘ from the dropdown menu.

Accessing Divi Library
A ‘Layouts‘ page will appear, displaying a list of all downloaded styles, if any exist. On this page, you’ll find an Import & Export option on the right in the left corner of the page. Click on it.

Divi Layouts Page: Import & Export Guide
After clicking on ‘Import & Export,’ a popup window titled ‘Import & Export Layouts‘ will appear. Choose the ‘Import‘ option from this window.

Dive into Layouts’ “Import & Export” Features
Upon accessing the Import tab, you can upload any JSON file either by dragging and dropping it directly from the folder or by clicking ‘CHOOSE FILE‘.

Uploading JSONs: Divi’s Import Methods
Importing All Woo Modules Category
Now, you can browse through the Ultimate Divi Modules UI Bundle folder. Within the UI bundle, you’ll discover the All Woo Modules category among all the different module categories.

Divi UI Bundle: Navigating All Woo Modules Category
The ‘All Woo Modules’ will direct you to a sub-categories folder, each containing an individual style folder for every WooCommerce Module Style. Whether it’s Product Carousel Style, Block Carousel Style, Woo Header Style Pages, Trending Slider Style, or Woo Product Sidebar View Style, there’s an abundance of individual styles within each Ultimate Divi Modules UI Bundle category. The Divi UI Module is arguably the biggest design collection ever made.
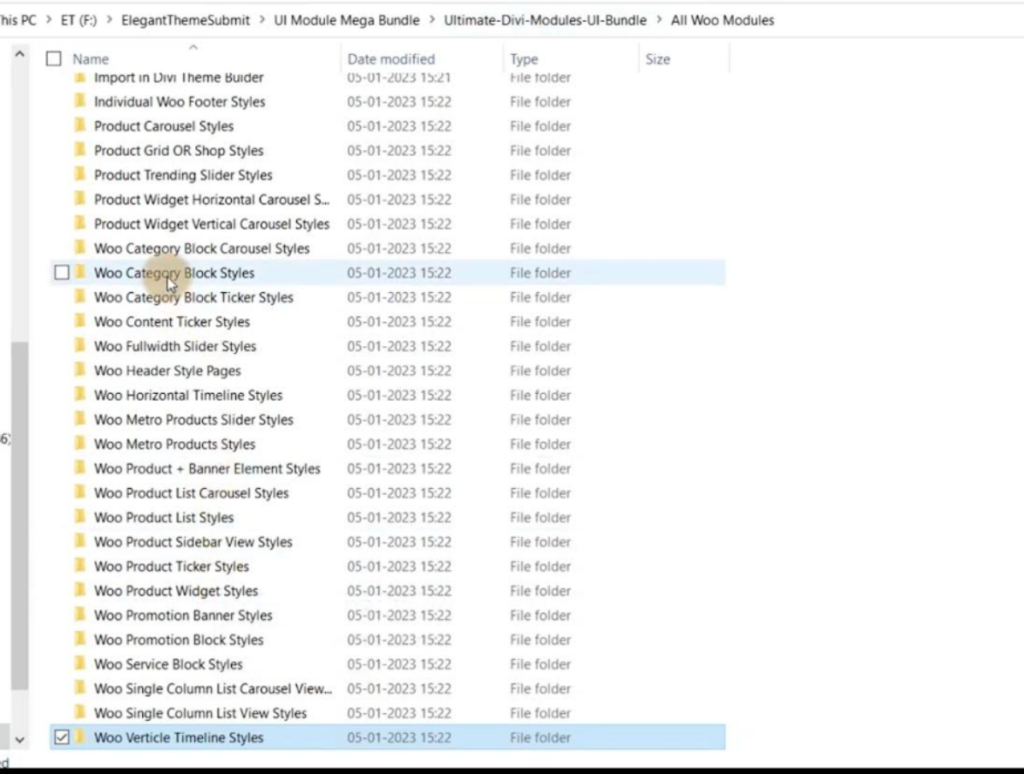
Diving into Divi’s Diverse All Woo Module Styles
Though you’ll find consistent settings for every module style with each following the same steps of instruction. To get familiar with instructions, let’s explore the options in Woo Verticle Timeline Styles, which offer 10 styles.

Access Woo Vertical Timeline Folder
Two Ways to Import Divi Timeline Styles
Upon entering the Ultimate Divi Modules UI Bundle timeline folder, you can play around with two methods.
- Firstly, you can import individual JSON files for each timeline style. Instead of downloading the entire set, this option allows you to select and download only the specific layout(s) you need, streamlining the process and reducing website load.
- Alternatively, you can choose to import all the JSON files, from V1 to V10, simultaneously. This action will bring in all 10 unique styles in a single click, a particularly useful feature for agency owners catering to diverse website requirements.

Tailored or Total: Divi UI Import Flexibility
Ultimate Divi Modules UI Bundle Download Choices: Full Set or Single
You have the option to select the entire set or delve into the ‘Individual Woo Vertical Timeline Style’ folder to choose a specific design. For this example, let’s opt to download the complete set of 10 designs. Upon selection, the download will commence. A progress bar will indicate the download percentage. Typically, individual files take 2-3 minutes, while the complete Ultimate Divi Modules UI Bundle style set might require a few more minutes.

Track Timeline Style’s Full Set Download: Progress Bar
After downloading your module style, it will appear on the Layouts Page. You can scroll down to locate it, or click on ‘All Categories‘, then scroll to the ‘DP Woo Vertical Timeline Style‘ option. After selecting it, click ‘Filter‘, and all the Ultimate Divi Modules UI Bundle’s timeline styles will be displayed.

Divi Layouts: How to Access Timeline Style’s Downloaded Styles
Importing Downloaded Module Styles to the Webpage
To display the module styles on your website, create a new page. Navigate to your WordPress Dashboard, select Pages, then click Add New.

Setting up the New Page
When the new page appears, enter a page name. After naming the page, you can enable the builder by clicking ‘Use The Divi Builder‘.

Enabling ‘Use the Divi Builder’
When the Divi Builder loads, click the blue ‘+’ sign to add a section. Since we’re importing a pre-made module from the Layouts, select Add From Library.
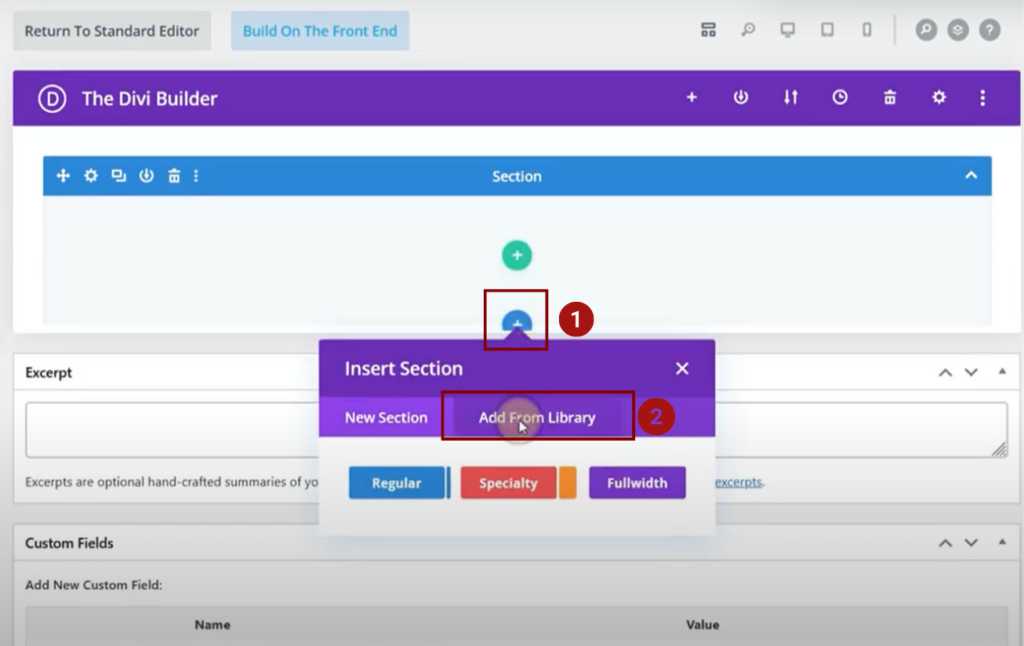
Importing Divi Layouts: Adding From Library
This action will open the library showcasing pre-made modules and layouts. You’ll see a collection of all previously downloaded categories. Click ‘Add From Library‘ and navigate to ‘DP Post Vertical Timeline Style.’
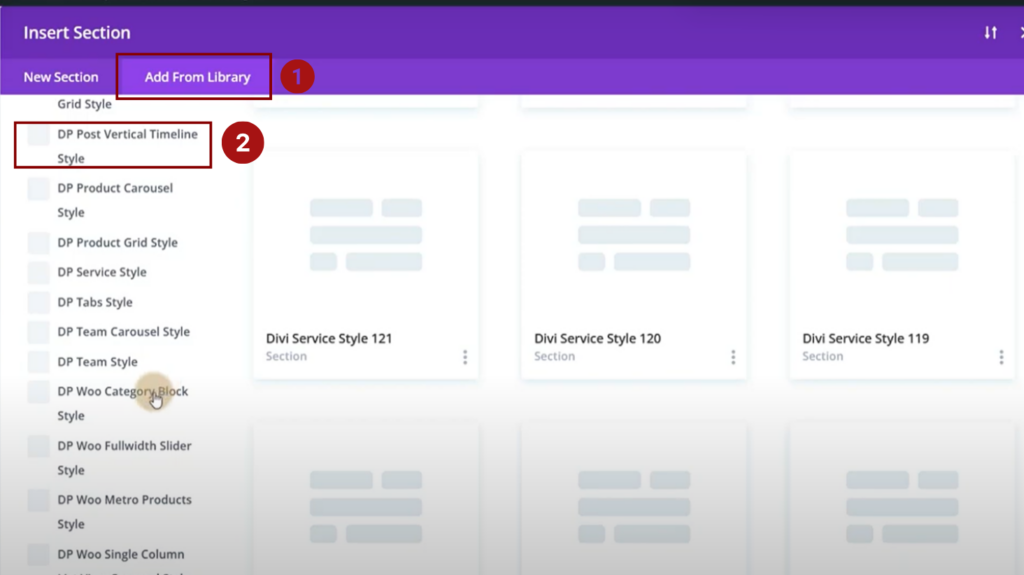
Using Ultimate Divi Modules UI Bundle’s Timeline Styles from the Library
After selecting that, all the associated designs will appear in the window. Choose any style from the array of module designs.
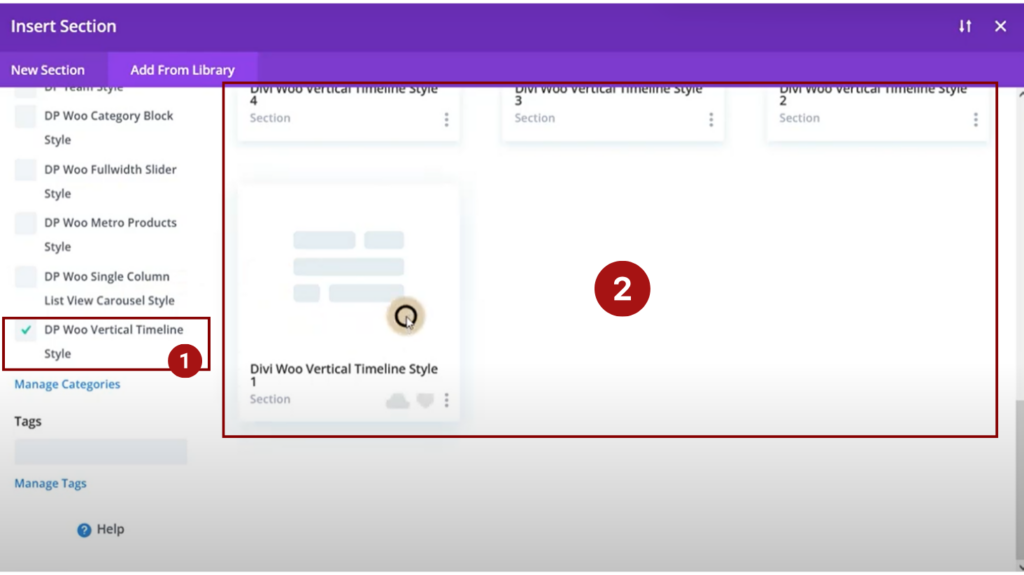
Browse and Choose: DP Post Vertical Timeline Style
Now, after you’ve chosen the module style, a popup will appear. Click ‘Use This Section‘. Congratulations! Your Module style has been imported.
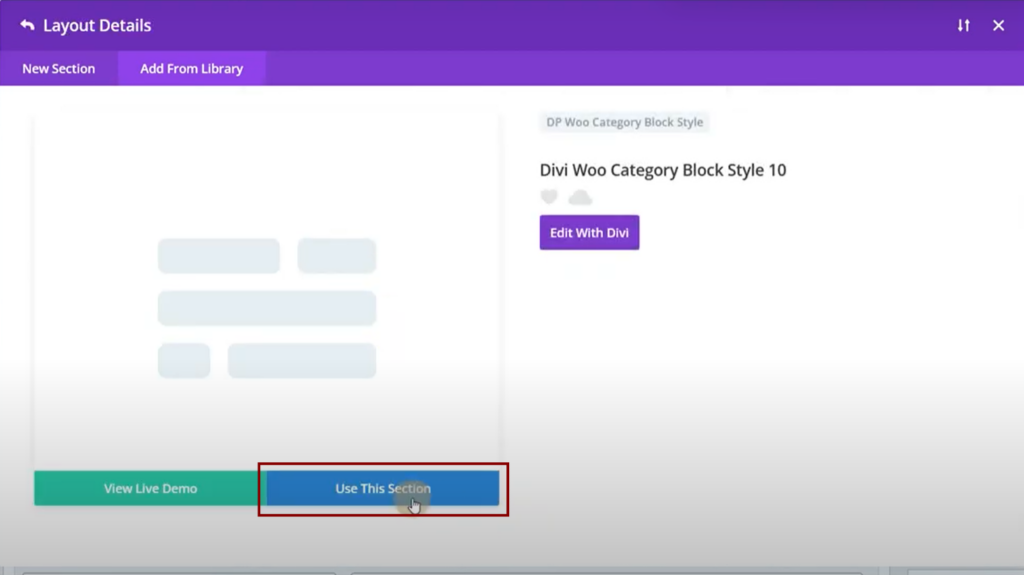
Deploying DP Post Vertical Timeline Module Style
The Divi Style will be displayed on your page. Depending on the chosen style, it may include elements like CSS code, JS Code, images, pricing tags, carts, headers, and much more.

Diverse Elements of Divi UI Style Showcase
You can customize this like any other Divi module, having complete control over the settings. From colors to images to writing style, you have full authority over the aesthetics and vibe of your website. To implement changes, or simply to view how the style appears on the webpage, click ‘View Page’. There, you can see the display of the Ultimate Divi Modules UI Bundle’s Woo Vertical Timeline Style.

A Glimpse at Divi’s Woo Vertical Timeline Layout
Similarly, you can import all other module categories using the same steps.
Important Notes For Carousel
You may notice three additional text files: ‘Important Notes for Carousel,’ ‘Short Description Code,’ and ‘Cart Button Code.’ As the names suggest, these text documents contain pieces of code that you need to integrate to make the respective modules work properly. For now, let’s walk through the process of integrating the Carousel Code into the Divi Theme.

Carousel in Divi UI: Code Integration
Carousel Module Code Integration
Upon opening ‘IMPORTANT NOTE FOR CAROUSEL‘, you’ll find two methods for integrating the code into your Divi Theme.
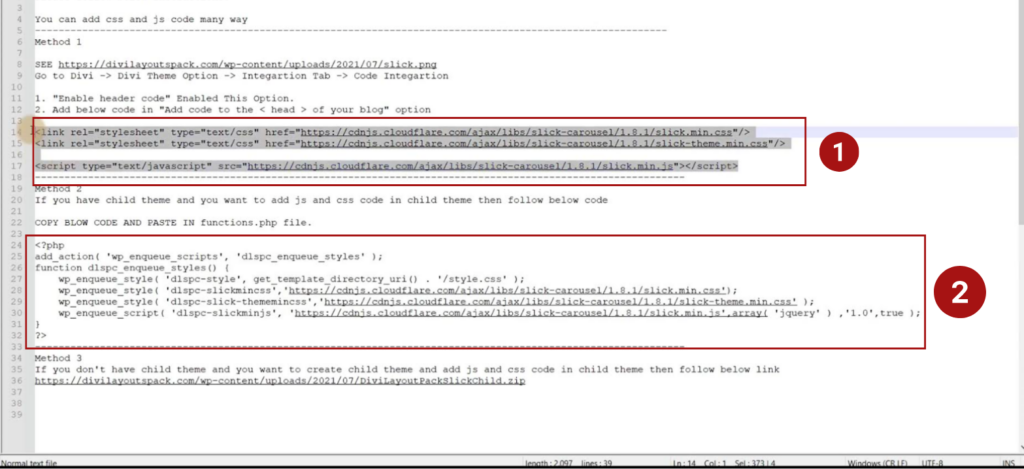
Divi UI Carousel Code: Integration Methods
Method 1: First, select the highlighted piece of code provided in method 1 and navigate to your WordPress Dashboard. On the sidebar, click on ‘Divi’ to display its menu. From this menu, choose ‘Theme Options‘. This will bring up the Divi Theme Options page. From here, go to the Integration tab. Ensure you enable the header code for the code to function correctly.
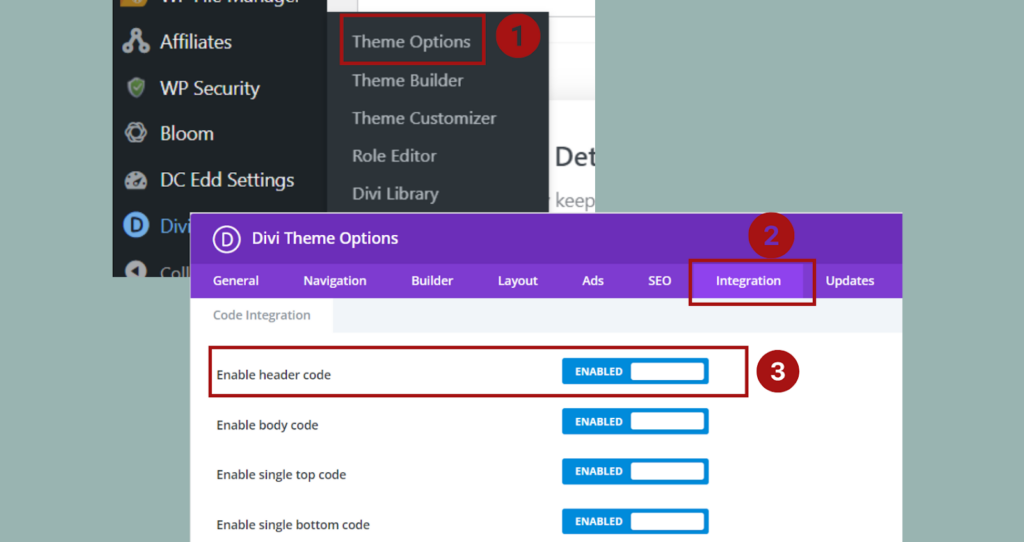
Integrating Code via Theme Options
Scroll down to the ‘Add code to the <head> of your blog‘ section. Paste the copied code into the provided black box. Once done, click on ‘Save Changes‘. After that, follow the previously explained method to import any Woo Carousel Style into your WordPress site.
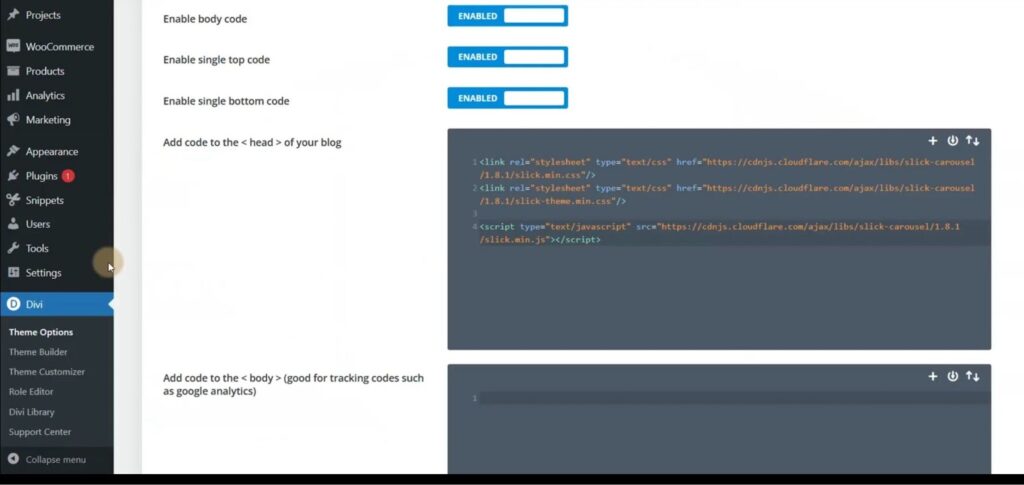
Embedding Carousel Code in Divi’s header
Method 2: If you’re using a child theme, this method allows you to paste the copied code directly into your Theme File Editor. Navigate to ‘Appearance’ in your Divi WordPress settings and select ‘Theme File Editor‘ from the menu. On the right-hand side, choose the ‘Theme Functions’ or ‘functions.php‘ option. Insert the code from method 2 here, but make sure to exclude the ‘<?php’ and ‘?>’ tags from the code.
Continue with the steps outlined above to import any carousel module style.
Header and Footer Layout Styles
To import Ultimate Divi Modules UI Bundle’s Header and Footer files, you can either select individual JSON files or choose a single JSON file that contains all the header and footer styles from the respective folders. After importing, delete the pre-existing global header and footer before integrating a new style header or footer into your website.
Let’s explore how to use a Footer Layout Style as an example. After importing the JSON style file from the Ultimate-Divi-Modules-UI-Bundle folder, your next step is to showcase the designs on your webpage.
Navigate to WordPress Dashboard > Divi > Theme Builder. Here, you’ll see headers, body, and footers for the default website template as well as for each page. For our example, we’ll modify the footer style for the entire website template. Before applying the Divi Footer Style, ensure you delete the current Global Footer by clicking on the trash icon next to the Global Footer option.
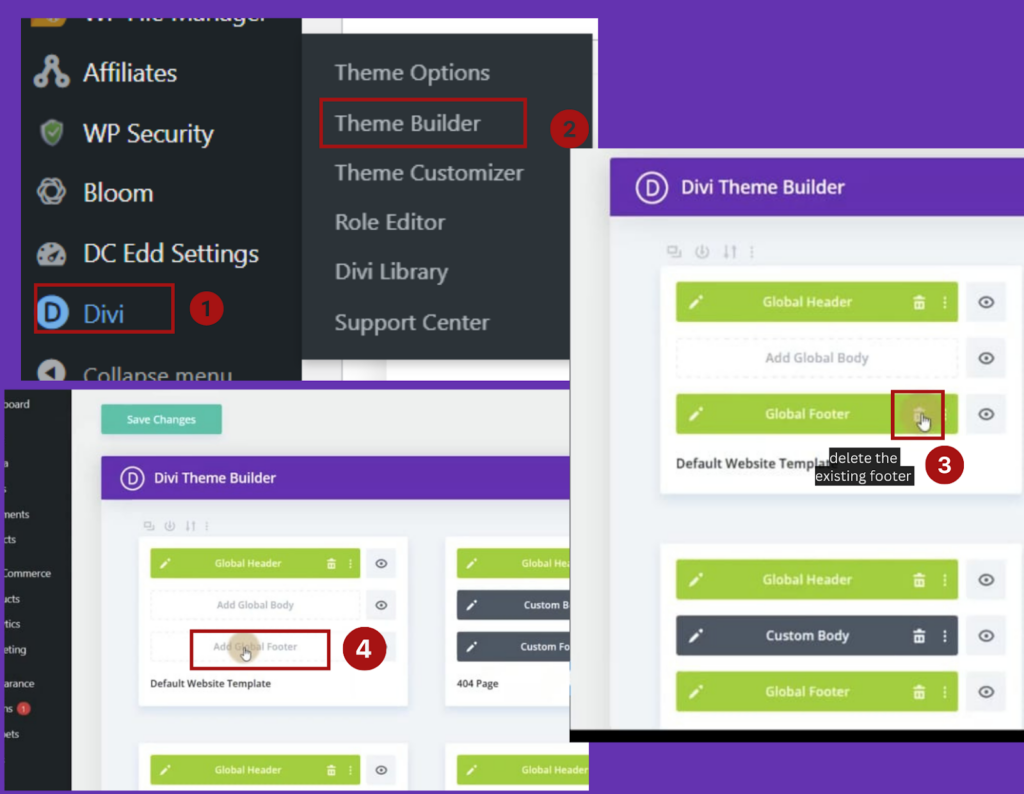
Divi Theme Builder: Modifying Global Footer Style
After deletion, click ‘Add Global Footer‘. A popup will appear. From this, choose the ‘Build Global Footer‘ option. Another popup will emerge. Following this, the process is similar to adding any other module or section. Click on ‘Add From Library‘. Either use the search bar to find the footer or scroll through the list of categories to locate footer styles. Select the desired footer and then click ‘Use This Section’. The layout will then be incorporated into your webpage.
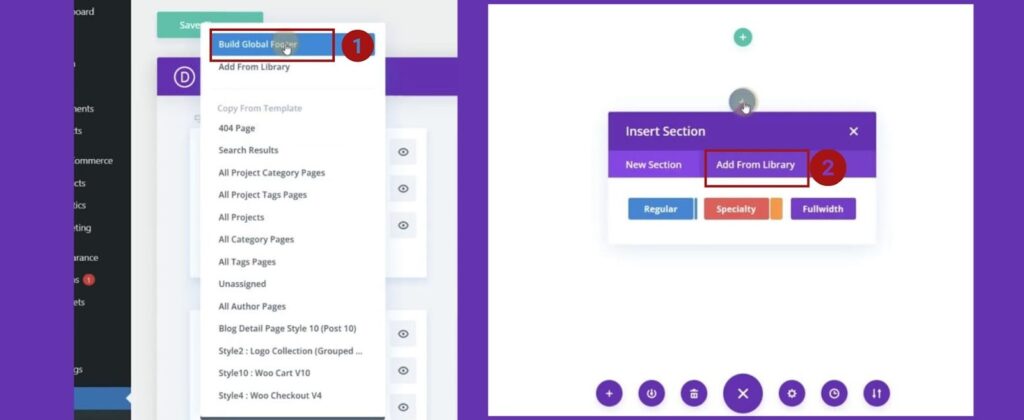
Divi Theme Builder: Inserting Your Chosen Footer Layout
Here I’m displaying Divi Footer Style 13 Section 1. It’s an elegant layout with multiple sections and modules.

Showcasing Ultimate Divi Modules UI Bundle’ss Elegant Footer Style 13
Importing all modules at once
Instead of importing module styles individually from each category, you have the option to import all module styles simultaneously using a few JSON files. Considering there are over 5,000 module styles, importing all at once can significantly save time. Navigate to the Supplementary Product Files, where you’ll find an ‘All JSON Files’ folder.
Within the Ultimate Divi Modules UI Bundle supplementary folder are 21 JSON files encompassing 5,000+ module styles all at once. By importing these JSON files, you can swiftly integrate all the module designs onto your website. This is a significant time-saver for agencies using Divi to initiate their website design.
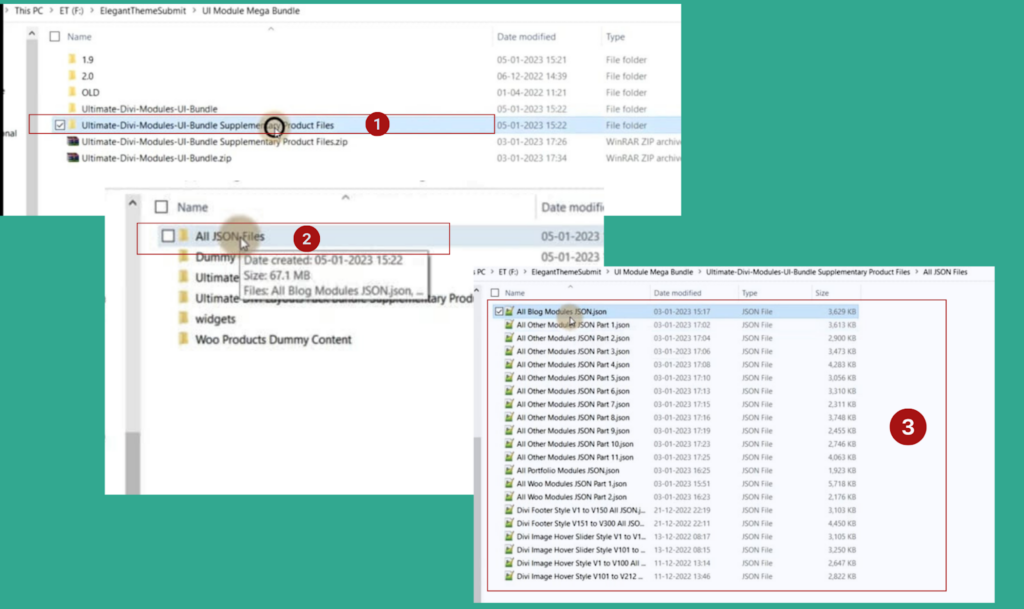
Bulk Importing: 5,000+ Divi Module Styles
Layouts in Ultimate Divi Modules UI Bundle
The Ultimate Divi Modules UI Bundle offers 35 layout packs. From the 24-page Painter Services layouts to the brand-new 22-page Digital Agency design layout to sections on Politics, Cleaning Services, and more, you can find an array of layout styles. These include a diverse range of pages such as the ‘About Us’ page, the 404 page, services pages, testimonials, and many more.

Ultimate Divi Modules UI Bundle Bundle: 35 Comprehensive Layout Packs
Beyond service and skill website layouts, the Ultimate Divi Modules UI Bundle also provides several WooCommerce layouts for your digital business. These layouts serve as excellent starting points for your website design, saving you both time and effort without breaking the bank.

Ultimate Divi Modules UI Bundle’s Ready-to-Use WooCommerce Layouts with Header & Footer
Importing Layouts
To integrate Ultimate Divi Modules UI Bundle layouts into your WordPress site, follow these straightforward steps. First, navigate to the Ultimate Divi bundle’ supplementary folder. There, you’ll encounter the ‘Ultimate Divi Layout Pack Bundle’ option. Within this folder, you’ll find a list of all the layout folders. Each of these folders contains two JSON files.
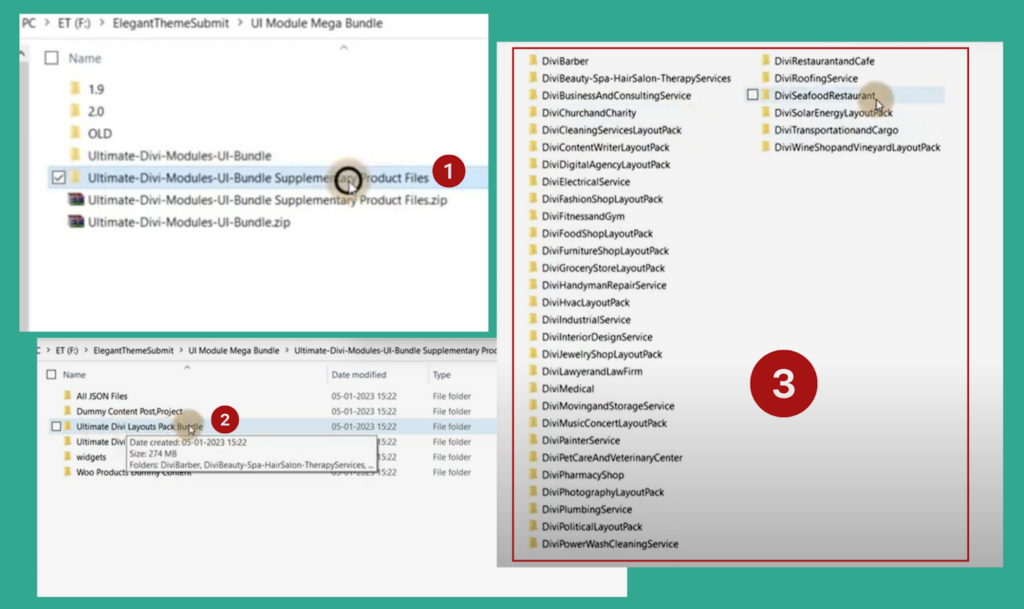
Integrating Ultimate Divi Modules UI Bundle Layouts: A Simple Guide
For this tutorial, I’ll demonstrate how to import layouts using the Divi Fitness and Gym example. Like every layout pack, DiviFitnessandGym contains two JSON files. The file ‘DiviBuilderLayouts_All_DiviFitness.JSON‘ includes layout pages, while ‘DiviThemeBuilderTemplates_DiviFitness.JSON‘ holds the templates. We’ll import both of them into their designated areas.

Integrating Divi Fitness: Layouts and Templates
Following the steps outlined above, navigate to Divi > Divi Library > Import & Export. Choose the file ‘DiviBuilderLayouts_All_DiviFitness‘. After importing, verify it by selecting ‘Layouts‘ from the ‘All Types‘ dropdown and clicking ‘Filter‘. Here, you’ll see all the pages, from the Homepage to the Blog, FAQs, and Contact Us pages; every page will be listed.

Unfolding All Ultimate Divi Modules UI Bundle Fitness Layout Pages
To import the Ultimate Divi Modules UI Bundle’s template file, navigate to Divi > Theme Builder. To import the template for the layout you’ve downloaded, you first need to remove the existing pages. Click the delete icon in the upper right corner of the page. When the popup appears, select the ‘reset’ option.
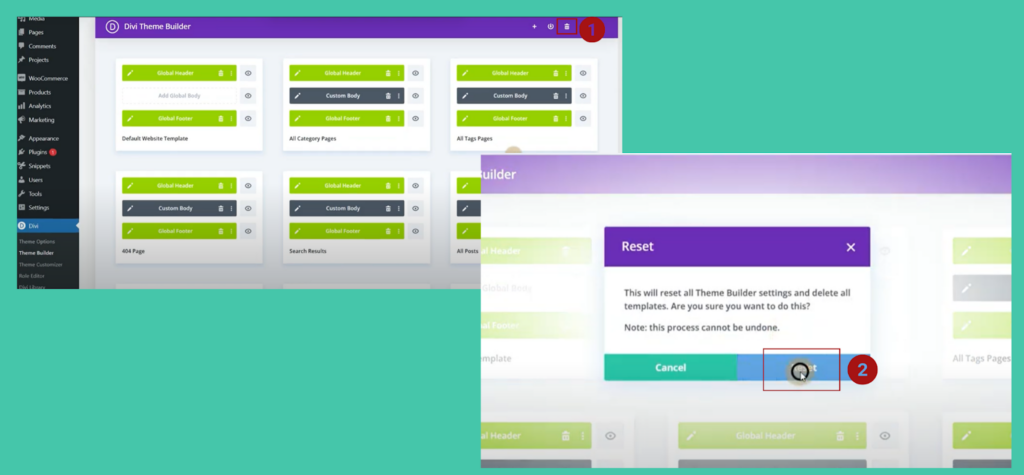
Reset Before Divi Layout Import
After resetting the template, click the double arrow (portability) icon in the top right corner of the page. Navigate to the Import tab, select the DiviThemeBuilderTemplates_DiviFitness.JSON template, and click ‘Import Divi Theme Builder Templates‘. After the progress bar is completed, the Ultimate Divi Modules UI Bundle templates for the fitness and gym layout will appear.
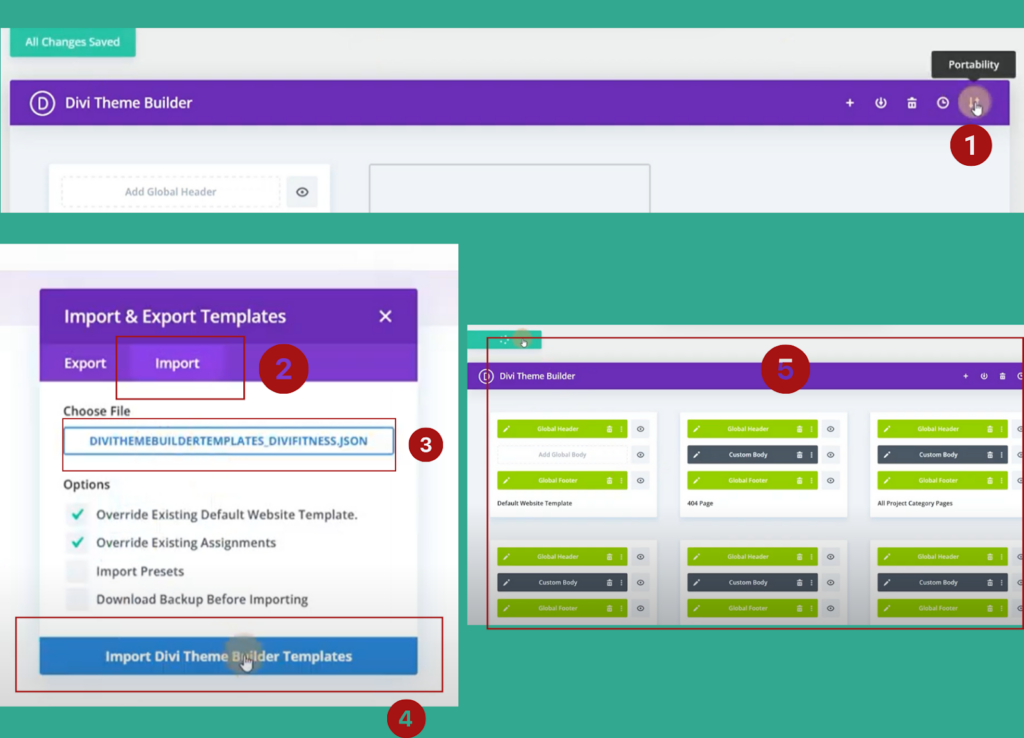
Importing Divi’s Gym Layout Templates
To display content in the sidebar and other widget-ready areas of your website, you need to add widgets. To import widgets, navigate to the ‘Ultimate Divi Layout Pack Bundle Supplementary Product Files‘ folder and open the ‘DiviFitnessandGym_sup‘ folder. Inside, you’ll locate the ‘widgets.wie‘ file for import.

Importing Widgets: Notepad to Plugin
To import a file with the .wie extension, you’ll need a suitable plugin. For this demonstration, I’ve downloaded the Widgets Importer and Exporter plugin. Once activated, click on copy and paste to enable a block of code. Return to the ‘widgets.wie’ file, right-click, and choose ‘Edit with Notepad‘. Copy the entire code segment and paste it into the plugin’s code input area. Finally, select the ‘widgets‘ option. This action will successfully import all Ultimate Divi Modules UI Bundle widgets, including those for the sidebar and footer.

Importing Footer & Sidebar Widgets via Widgets Importer & Exporter
The final step involves activating the layout you’ve just imported. First, create a new page and name it ‘Home Page’ or another name of your choice. Then, enable the “Use Divi Theme Builder” option. Click the ‘+’ icon in the Divi Theme Builder bar, navigate to “Your Saved Layouts“, and select ‘Home’ to import your site’s homepage. Afterward, click “Use This Layout“, and your homepage will be displayed. You can add additional pages using the same procedure.
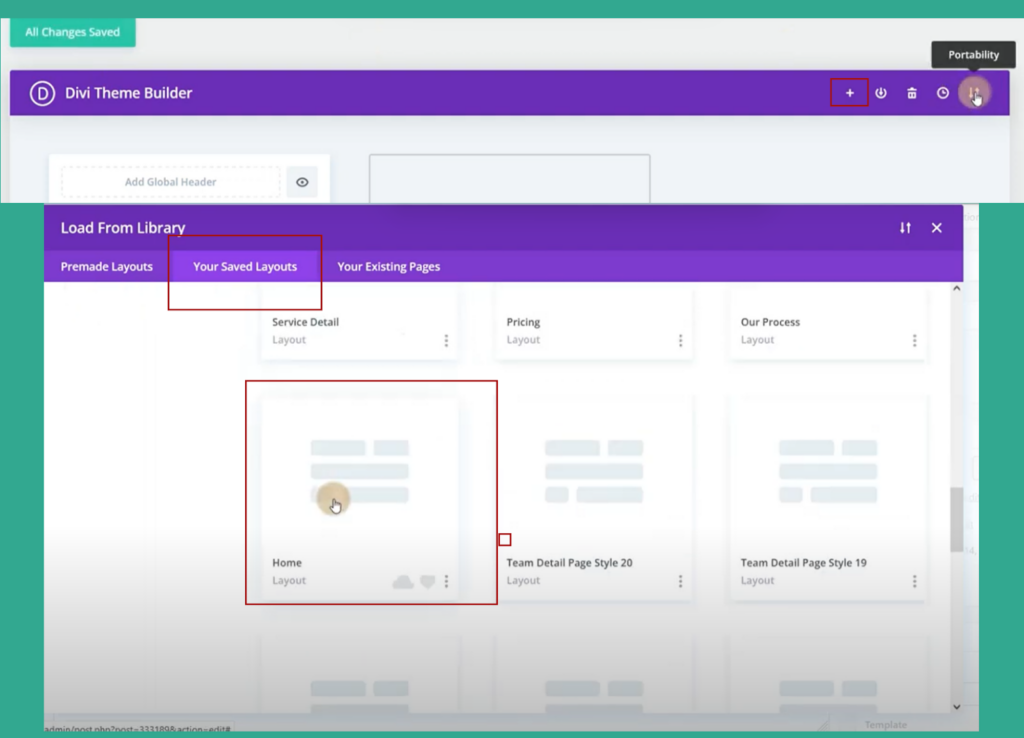
Activating Saved Layouts in Divi Builder
Now comes a glimpse of the Fitness and Gym layout’s appearance. I’m very excited. Are you?

Fitness and Gym: Hero Section Debut

Exploring Ultimate Divi Modules UI Bundle’s Fitness Layout Sections
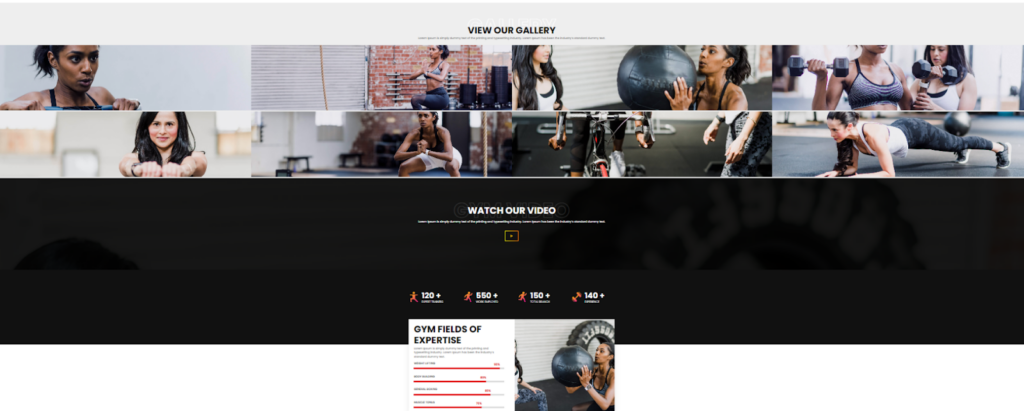
Exploring Fitness and Gym Layout
Dive into the Multipurpose Divi Webkit Series
The Ultimate Divi Module Bundle doesn’t stop here, it has now launched the Multipurpose Divi Webkit Series. This bundle now boasts 11 newly launched webkits, enhancing your design arsenal. Each of these webkits, like the Handyman Repair Services or the Construction Solutions Service, offers a multitude of section styles and detailed page designs. For instance, the Multipurpose Construction Solutions Service webkit alone presents over 110 section styles and 4 detailed pages.

Divi Webkit Series: the Ultimate Divi Modules UI Bundle Expanded
Importing the Multipurpose Divi Webkit Files
Importing the webkit files is simple. Navigating to the supplementary folder of your UI module bundle, you’ll find the ‘Ultimate Multipurpose Divi Webkit‘ folder. It encompasses everything from business webkits to specialized ones like Handyman Repair Services. You don’t have to start from scratch; each webkit delivers a rich collection of section styles – think of dedicated styles for ‘About Us’, ‘CTA’, ‘Footer’, and more, empowering you to personalize your site just the way you envision it.
In the supplementary folder, you’ll find essential files like widgets.wie and posts.xml. Follow the steps discussed above to import the widgets.wie file. If you navigate to the pages folder, there are more in-store: options to import specific page styles into the Divi theme builder. From the blog page to the service page, import into the Divi theme builder. This setup ensures that while you focus on crafting a remarkable website, the technicalities remain hassle-free.
Here comes the interesting part – importing your Divi UI modules and layouts to the Divi Cloud to gain access to every element of your web designing tool in a manageable way.
Integrating the Ultimate Divi Modules UI Bundle with the Divi Cloud
With over 5000+ styles, it can be overwhelming to navigate through all the options. Not only do they take up space, but they also make navigation challenging. The Ultimate Divi Modules UI Bundle allows you to save your modules, layouts, and webkits to the Divi Cloud. However, you’ll need a Divi Cloud Membership to save your layouts and styles to the cloud.
To integrate, create a new page and click the ‘+’ sign. In the upper right-hand corner, select the ‘Sign In To Divi Cloud’ option and enter your login details.

Signing in to Your Divi Cloud
Select the module or layout styles from the UI Module Mega Bundle folder and drag them into the library. Then, choose “Import to Cloud“.

Drag, Drop, and Import to Cloud
Once it’s imported, go to “Add from Library” and select “My Divi Cloud” listed on the left sidebar. Each imported style and layout will have a blue cloud icon next to it, indicating a successful import. This same process applies to layouts and websites. After saving your layouts, you can view them in the “My Divi Cloud” section.

Navigating Your Divi Cloud Imports
Divi Cloud organizes your cloud items into categories, folders, and favorites. By managing the complete UI Bundle in the cloud, you can streamline your work with ease.
Pricing
Get your hands on this fastest-selling ultimate UI module for only $29 and unlock 5000+ module styles, 35 layout packs, 82 elements, and 11 multipurpose Divi webkits. You’ll only pay once for this valuable bundle and enjoy lifetime access.
Here’s the good news: if you have a Divi VIP membership, you can avail yourself an extra 10% off the Ultimate Divi Modules UI Bundle. Moreover, the support team for the Ultimate Divi Modules UI Bundle is incredible and guarantees a fast response. Reach out to them anytime, and they’ll offer prompt solutions and guidance.
Additionally, if you purchase the Ultimate Divi Modules UI Bundle today, you can explore it risk-free – thanks to a 30-day money-back guarantee.

Divi VIP? Save More on the Ultimate Divi Modules UI Bundle!
Final Verdict
For the final words, I’m convinced that the Ultimate Divi Modules UI Bundle is an invaluable asset for your web design toolbox. It stands as one of the most popular third-party products in the Divi Marketplace, encompassing a wide range of module designs, section styles, and pre-made layouts. You have the flexibility to mix and match these components to craft stunning websites. I trust this will elevate your experience beyond the constraints of the default builder and get you a head start on developing diverse Divi projects.
We’ve only scratched the surface of what’s included in this UI bundle. Touted as the most expansive design collection ever crafted, it certainly provides great value for your investment. In this blog, I’ve outlined methods to import modules, layouts, and webkits, highlighting the wide functionalities on offer. I hope that this introduction ignites your creativity, pushing your designs to new heights. With all the steps laid out, you’re now well-equipped to delve into the Ultimate Divi Modules UI Bundle and unleash the true potential of your design.




0 Comments