Welcome to our guide on taking your Divi Theme website to the next level with eye-catching fade-in effects! This blog post is your go-to resource for learning how to seamlessly incorporate fade-in animations into different parts of the Divi Theme. Whether you’re aiming to add a touch of class to your text when users hover over it, create a cool fade-in effect for images and buttons as visitors scroll down your page, or showcase a module with a subtle fade-in transition, we’ve got the steps and techniques covered. Together, we’ll explore how to master the fade-in features of the Divi Theme, making your website not only visually stunning but also engaging for your audience. Let’s embark on this journey into the world of Divi Theme Fade-In Mastery, discovering how to enhance text, images, modules, and buttons for a more dynamic and visually pleasing user experience.
Alright, let’s kick off our step-by-step journey by diving into the first section: Divi Theme Text Fade-In On Hover. In this part, we’ll be exploring the details of how to create a fade-in effect specifically for text when users hover over it. So, let’s get started!
Divi Theme Text Fade-in On Hover
Unlocking the potential of the Divi theme’s modules and effects can bring a fresh wave of creativity to your website. In this guide, we’ll be harnessing the power of the Divi theme’s blurb module to craft a captivating text fade-in hover effect. By putting in a bit of effort, you can achieve visually striking results that elevate both the appearance and user experience of your site.
Our focus will be on creating text that undergoes a transformation when you hover over it, seamlessly changing opacity and gracefully fading in. The beauty of this is that no additional plugins are needed – we’ll be making use of the built-in hover feature of the Divi theme to bring our text hover fade-in effect to life. As we go along, we’ll also add some styling to enhance the overall impact of the hover effect. It’s a straightforward process, but the end result is a visually appealing and attention-grabbing effect that can add a touch of magic to your website.
You can do this with any text module but we will use the blurb module, remove the image and the body text from the blurb module and just keep the title text. Navigate to the Design tab, then go to the title text section. Customize the title text by choosing your preferred design elements such as font-family, color, and font size. If you’d like to adopt our design choices, we’re currently using the Aguafina Script Font with a font size set to 25 pixels, title text color as white as our section background color is set to black and text alignment as center. Make these adjustments to give your title text the look and feel you desire, it is shown in the image below:
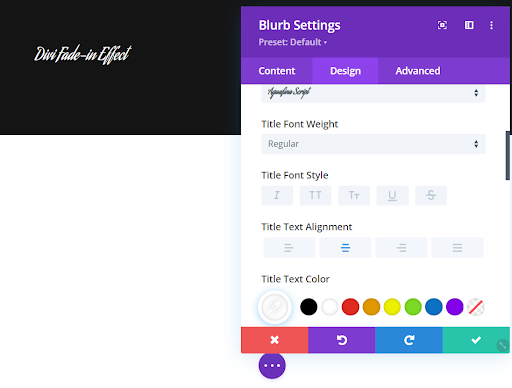
Blurb Setting
Read More: How to Make Your Custom Footer in Divi: Step-by-Step Guide
Now, let’s apply the fade-in effect to your text. First, close the tab where you were working on the title text. Head over to the filter tab, and there you’ll find the opacity setting. Hover over it, and you’ll notice two icons appearing – one for the default state (desktop icon) and another for the hover state (arrow icon). Click on the desktop icon and set the opacity to 25%. Then, click on the arrow icon and set the opacity to 100%. This is illustrated in the image below:
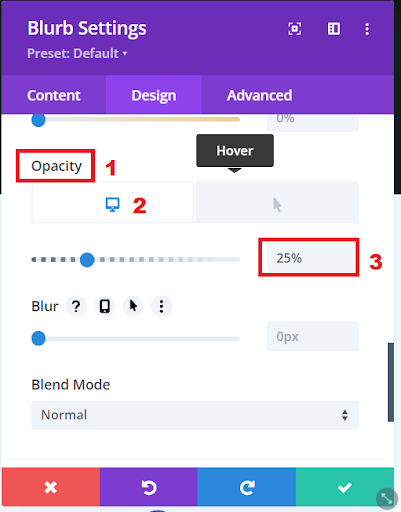
Default State Opacity Settings
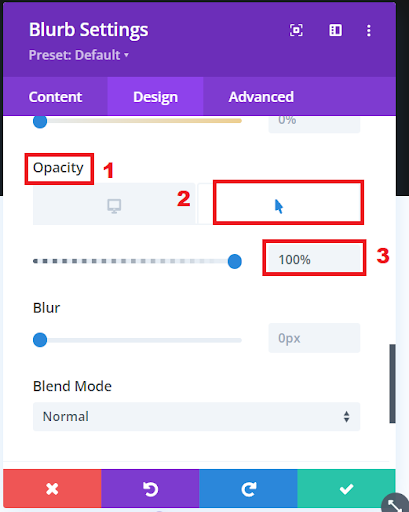
Hover Over Opacity Settings
Read More: 8 Best Divi Child Themes and Landing Pages for Social Media Agencies (Free and Premium)
By default, the transition time from the regular desktop state to the hover over state is set at 300 milliseconds. However, if you’d like to adjust the speed—either slowing it down or speeding it up—you can head over to the Advanced tab. Once there, locate the Transitions tab, where you’ll find settings that allow you to customize the transition time according to your preferences. It’s a simple tweak that lets you control how quickly or slowly the transition happens for a more personalized user experience.
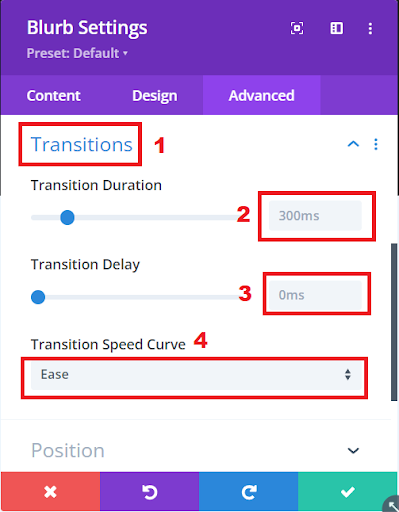
Transition Settings
In wrapping up this section on “Divi Theme Text Fade In On Hover,” we’ve unveiled a simple yet powerful technique to bring your text elements to life. The subtle elegance of the fade-in effect on hover not only adds a touch of flair to your content but also engages your visitors in a unique way. As we navigate through the other sections of this blog Adding Divi Theme Fade-in effect to Text, Images, Modules and Buttons, keep exploring the diverse possibilities and refining your skills. Each section contributes to a more dynamic and visually appealing website, ensuring your audience is captivated at every interaction.
In our next section, let’s delve into the captivating realm of adding a fade-in effect from images to text and buttons with the Divi Theme, all triggered by the seamless scroll of your web page. This powerful visual enhancement not only adds a touch of creativity to your Divi website but also ensures a smooth and engaging user experience. Let’s explore the wonders of Divi Theme Image to Text and Button Fade-In on Page Scroll.
Read More: 8 Best Divi Child Themes & Layouts for SEO Agencies in 2024
Divi Theme Image To Text And Button Fade In On Page Scroll
Welcome to the next section of our journey into Divi Theme Fade-In Mastery! In this section, we’ll unravel the enchanting world of Divi Theme Image to Text and Button Fade-In on Page Scroll. Picture this: as your visitors scroll through your web page, images gracefully transition into text, and buttons come to life with a subtle fade-in effect. It’s not just the visual appeal we’re after; we’re enhancing the user experience, creating a seamless and captivating journey through your content. Join us as we explore the intricacies of implementing this dynamic feature, step by step. By the end of this section, you’ll be well-equipped to infuse your website with a touch of magic, ensuring that every scroll tells a captivating story. Let’s dive into the art of Image to Text and Button Fade-In on Page Scroll with Divi Theme!
We’re going to explore the scroll effect built into the Divi theme to craft a section featuring a module that gracefully fades in as you scroll up the page. The beauty of the Divi theme lies in its user-friendly approach to creating custom scroll effects with almost any module you fancy.
In this segment, our focus is on crafting a scroll effect that brings about a gradual fade-in. Specifically, we’ll use the Divi call-to-action module, initially tucked away at the bottom of the viewport, and watch it emerge gradually over an image set as the column background. As you scroll upward, the module becomes fully visible and holds its position at around 50% of the viewport. This visibility persists as you continue scrolling, reaching the top of the viewport.
The best part? No need for coding today – everything unfolds seamlessly using the built-in features of the Divi theme. So, join along and discover how effortlessly you can create a captivating image with a module on top, fading in as the page gracefully scrolls upward with Divi.
To kick things off, let’s spice up your Divi Theme layout by adding a row to the section with three columns. We’ll be throwing in a call-to-action module, removing the background color, as our text and button color is white so it will vanish, so leave it as it is.
Read More: How To Use AI To Improve WordPress SEO
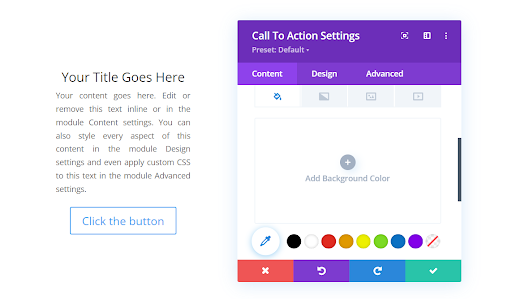
Call to Action Button settings
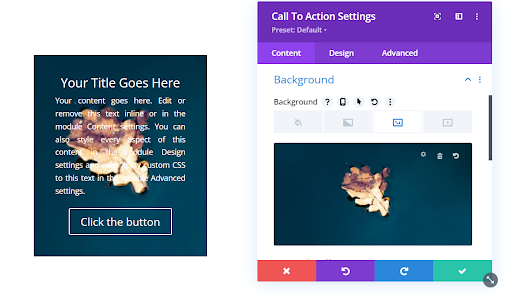
Now, let’s set a background image for your column. Navigate to the row settings and find the column where you’ve placed the Call to Action module. Open the column settings and upload a background image of your choice.
Design tab Call to Action button settings
Let’s customize the module according to our preferences. First, we want to create a uniform look by matching the background color of our module with the background color of our row. To do this, you’ll notice that the image disappears when we make this change. Head over to the “Content” tab, scroll down to “Background Color,” and choose white from the options. This simple adjustment will help create a seamless and cohesive appearance. To bring it back go to the design tab, look for the text tab and make the text dark.
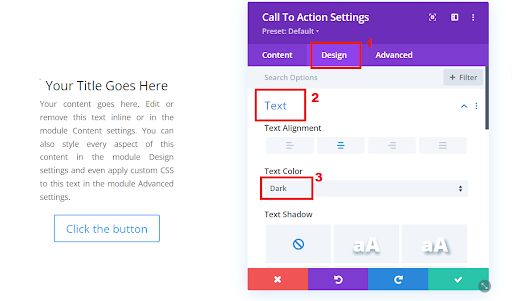
Call to Action button text settings
Read More: Divi AI vs ChatGPT | From Content to Web Development & More
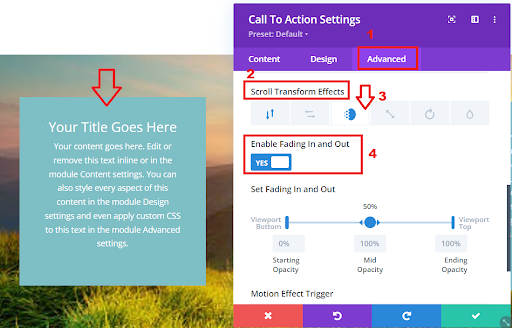
Now, let’s bring the scroll effect to life, and it’s surprisingly easy to achieve exactly what we’re aiming for. We want to create a neat transition where, as you scroll down, the image smoothly fades out while the text gracefully fades in. Here’s what you do: go to the “Advance” tab, and scroll down to find the “Scroll Effects” section. Look for “Fade In” and “Fade Out” effects. Click on the button to enable this feature, and you’re all set!
Call to Action button scroll effect
To get our desired effect, follow the simple steps outlined in the image below. By making these changes, you’ll achieve the desired outcome effortlessly.
As we wrap up this second part of our journey through Divi Theme Fade-In Mastery, we’ve dived into the fascinating world of Image to Text and Button Fade-In on Page Scroll. Just imagine the delightful experience your website visitors will have as they smoothly scroll through your page, seeing images transform into text and buttons gently making their entrance with a subtle fade-in effect.
In this segment, we’ve made it easy to understand how to use Divi’s built-in scroll effects. We’ve focused on creating an attractive module that gracefully appears as you scroll up. The beauty of the Divi theme is its user-friendly nature, allowing you to enhance the overall user experience without the complexity of coding.
By strategically placing a call-to-action module within a column featuring a background image, we’ve crafted a scroll effect where the module gradually reveals itself during an upward scroll. The module becomes fully visible, keeping its position at around 50% of the screen, resulting in a smooth and captivating transition.
What’s truly special is that you don’t need to be a coding expert – everything unfolds seamlessly using the Divi theme’s built-in features. Just follow these simple steps, and you can add a touch of magic to your website, ensuring each scroll tells an engaging story.
As you put these techniques into action and witness the enchantment on your Divi-powered site, remember that this journey doesn’t stop here. Keep exploring, experimenting, and let your creative side shine as you continue mastering the art of Divi Theme Fade-In Effects. Here’s to building a website that not only looks fantastic but also captivates your audience with every scroll through your compelling content!
Read More: 25 Best Free Divi Layouts in 2024
Divi Theme Module Fade In On Page Scroll Effect
Welcome to the next part of our dive into Divi Theme Fade-In tricks! In this section, we’re exploring the “Divi Theme Module Fade In On Page Scroll Effect.” Imagine making your website more interesting by adding modules that smoothly appear as visitors scroll down, giving your content a cool and dynamic vibe.
We’ll go through the easy steps of creating a fade-in effect for modules using the Divi theme. From cool visuals to a user-friendly setup, come along as we learn how to bring modules to life with a gentle fade-in as you scroll. By the end, you’ll know how to spice up your Divi website with eye-catching module fade-ins, making it more fun and appealing for your visitors. Let’s jump into the world of the Divi Theme Module Fade In On Page Scroll Effect!
Read More: How to Learn Graphic Design in 2024
Insert a row with three columns and add three call to action modules to it, as it will work with any module but we will be using the Call to Action module in this example.
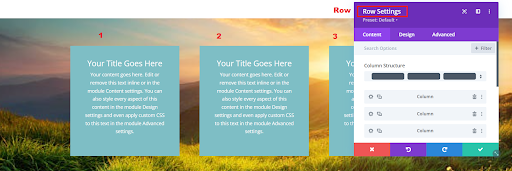
Row Settings
Give padding to the row from top and bottom as 100 pixels to make it look perfect.
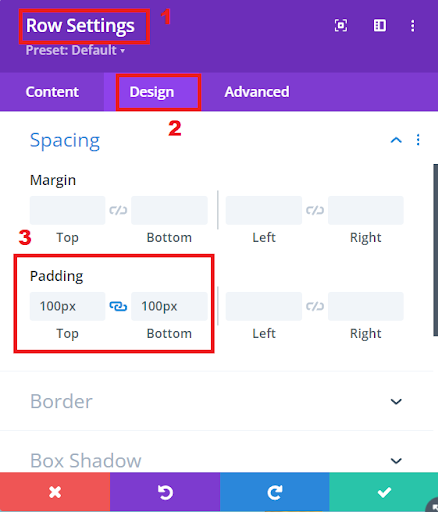
Giving padding to the row
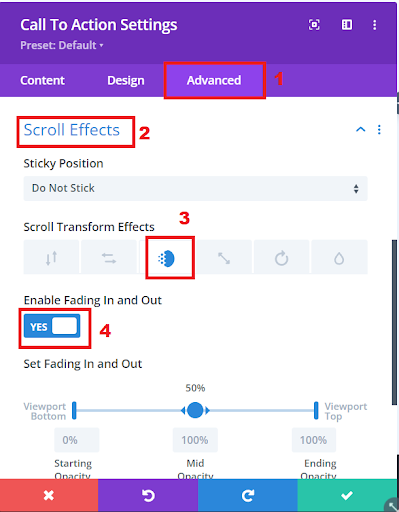
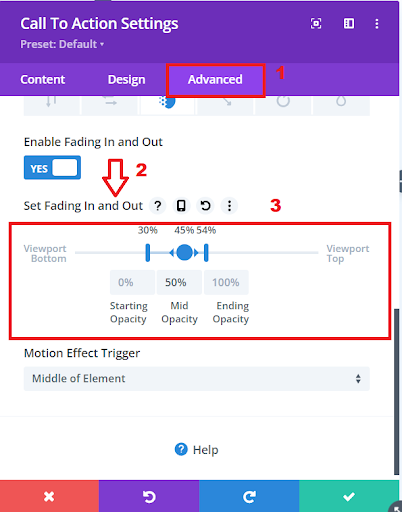
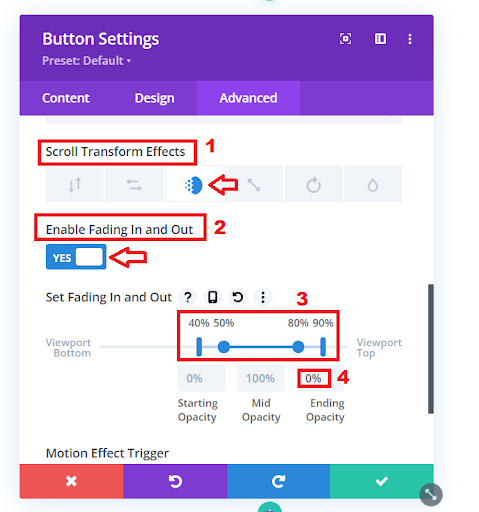
Currently, when we scroll up and down, the module stays static without any animation. Let’s change that and add a smooth fade-in effect. First, go back to one of our modules, then navigate to the Advanced settings. Scroll all the way down until you see Scroll Effects. Look for the options labeled Fade-In’ and ‘Fade-Out – these are the effects we’re going to use. Toggle the switch that says Enable Fading In and Out. You’ll notice a small scale at the bottom, as shown in the image below, indicating that the fading effect is now active.
Call to Action button scroll effect
Apply the following viewport settings as shown in the image below.
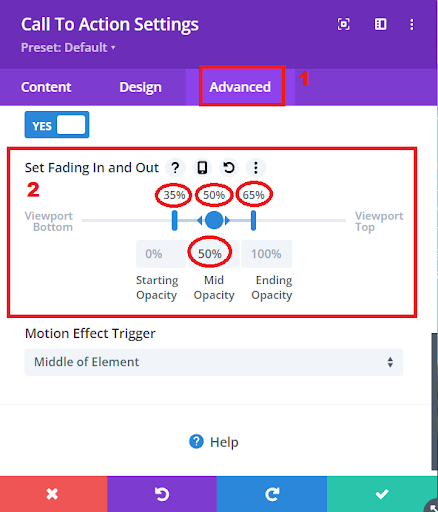
Fading in and out Settings
Read More: How To Make A Divi Sidebar Menu
Instead of dealing with each item separately, we’ll simplify the process. Just right-click on the module itself, and a menu will pop up. Select “Extend Call to Action Style” because we want this style for all the Call to Action modules in this row. Once you’ve made your selection, hit the “Extend” button, and you’re good to go!
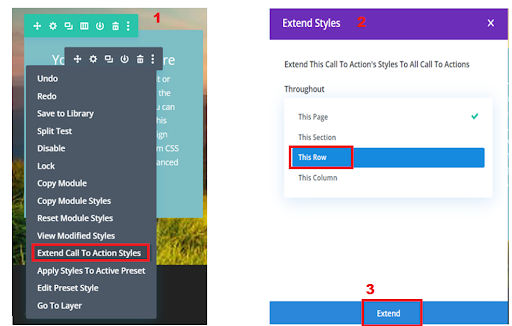
Extending Call To Action Styles
Read More: How To Make A Divi Sidebar Menu
As you scroll down, these modules gradually appear, fading in until they’re completely visible. It’s a neat little effect to have on your site, catching people’s attention as things start to fade in.
We’ve unveiled the magic of the “Divi Theme Module Fade In On Page Scroll Effect,” transforming your website into a dynamic and engaging space. By following the straightforward steps outlined in this section, you’ve learned how to infuse life into your content with a gentle fade-in effect for modules. From creating a visually appealing layout with three call-to-action modules to activating the fade-in effect through the Divi theme’s advanced settings, we’ve covered it all.
Now, as visitors scroll through your site, these modules gracefully emerge, capturing attention and adding an extra layer of sophistication. Remember, the key lies in the subtle yet impactful details, and the fade-in effect accomplishes just that. Your Divi website is now equipped with an eye-catching feature that enhances user experience and makes your content more memorable. Here’s to elevating your website with the charm of the Divi Theme Module Fade In On Page Scroll Effect!
In the upcoming section, we’re immersing ourselves in the enchanting realm of the “Divi Theme Button Fade In Scroll Effect.” Envision your website’s buttons gracefully revealing themselves as users scroll through your content, introducing a touch of refinement and interaction. Throughout this blog post, we’ll walk you through the steps to achieve this smooth and visually captivating effect using Divi’s versatile toolkit.
Buttons serve a dual purpose – beyond functionality, they present opportunities to guide your audience and incite action. By introducing a subtle fade-in scroll effect, you not only elevate your site’s aesthetics but also craft a more immersive and memorable user journey. Join us as we unveil the techniques and configurations required to seamlessly implement the Divi Theme Button Fade In Scroll Effect. Enhance your website’s visual allure and user engagement with this effortlessly impactful addition. Let’s dive in and ensure your buttons leave a stylish and lasting impression!
Read More: 18 Best Free Divi Plugins
Divi Theme Button Fade In Scroll Effect
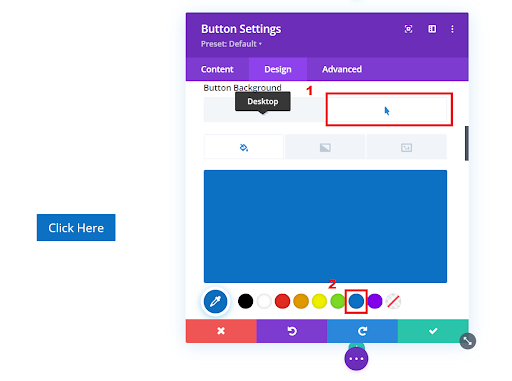
Let’s kick things off by creating a fresh start on your Divi-powered website. Begin by adding a new row and incorporating a button module. Feel free to unleash your creativity in designing it, but if you’re looking to match our suggested style, go for a vibrant purple background with crisp white text.
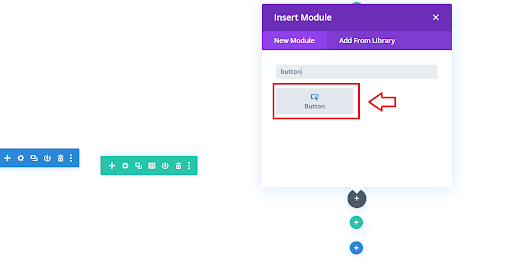
Inserting Button Module
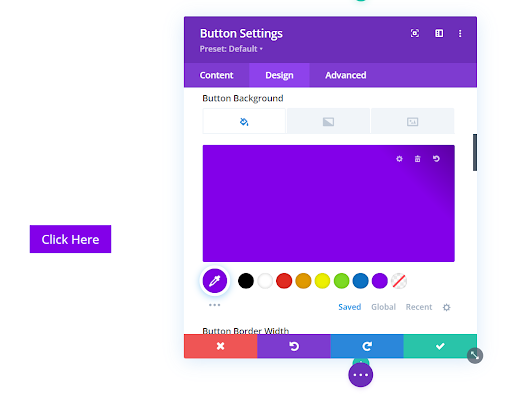
Changing Button Background Color
As you craft your button module within the new row, consider adding an extra layer of interactivity by incorporating a hover state. This feature allows you to elevate the user experience with a subtle color transition. Start with the initial design we discussed – a purple background with white text. Now, envision a dynamic change: as users hover over the button, watch the background seamlessly transform into a cool shade of blue.
Changing Button Background Color on Hover Over State
As you fine-tune the aesthetics of your button module, let’s add a touch of elegance with rounded corners. Set the button border radius to a comfortable 30 pixels. This subtle adjustment contributes to a softer and more inviting look, creating a seamless blend with the overall design.

Button Border Radius
Read More: Mastering Divi Mobile Menu: A Step-by-Step Guide to Personalizing and Styling
Let’s create a subtle scroll effect for our button, and the best part is, there’s no coding involved – it’s an inbuilt feature of the Divi theme. Here’s what we’ll do:
- Navigate to the “Advanced” tab.
- Scroll down to the bottom to find the “Scroll Effects” section.
- Look for the “Fade In” and “Fade Out” options – these are the ones we’ll be using.
- Toggle the switch button to enable the fade-in and fade-out feature.
Now, a little bar appears, allowing us to control how the transition happens. No coding required; it’s all in the Divi theme settings. Refer to the image below for a visual guide.
Button Scroll Effects
As we conclude the Divi Theme Button Fade-In Scroll Effect, you’ve transformed a simple button into a dynamic and engaging element for your website. Starting with the creation of a vibrant button featuring a purple background and crisp white text, we then added a hover state, introducing a delightful color transition as users interact with the button. The subtle elegance was further enhanced by rounding the corners with a 30-pixel border radius, creating a seamless and inviting design.
Taking advantage of Divi’s built-in features, we seamlessly incorporated a scroll effect to our button without delving into any coding complexities. Navigating to the “Advanced” tab and utilizing the “Fade In” and “Fade Out” options, we effortlessly controlled the transition, making the button visually appealing as users scroll through your website.
With these techniques, your Divi-powered button not only stands out in terms of design but also offers an interactive and polished user experience. Embrace these enhancements, experiment with variations, and watch as your website captivates visitors with its professionally crafted and engaging buttons.
Read More: Divi Theme: Purchase, Installation, and Setup Guide
Conclusion
As we reach the conclusion of our comprehensive guide on “Adding Divi Theme Fade-in Effect to Text, Images, Modules, and Buttons,” you’ve embarked on a journey to transform your Divi-powered website into a visually stunning and engaging platform. From the elegance of text fading in on hover to the enchanting transition of images, modules, and buttons on page scroll, you’ve mastered the art of Divi Theme Fade-In effects.
By exploring each section meticulously, you’ve gained valuable insights into leveraging the built-in features of the Divi theme, enhancing both aesthetics and user experience. Whether you were customizing text, creating captivating page scroll effects for images and buttons, or infusing modules with a graceful fade-in, you’ve acquired the skills to make your website stand out effortlessly.
Remember, the key to a captivating website lies not just in its functionality but in the subtleties that enhance user interaction. By implementing these fade-in effects, you’ve added a touch of magic to your Divi-powered site, ensuring that every scroll tells a compelling story.
As you continue your journey in mastering Divi Theme Fade-In Effects, let creativity be your guide. Experiment with variations, explore new possibilities and let your website evolve into a dynamic showcase of visual appeal. Here’s to building a website that not only looks fantastic but also captivates your audience with every scroll through your compelling content.
Read More: Divi Logo Guide: Resize, Reset, and Style Like a Pro


0 Comments