If you want a simple, effective website that communicates all the important information in one place, choose a one-page website. This is an effective way of keeping the attention of your online audience in this day of information overload.
One-page websites have become increasingly popular among start-up businesses, freelancers, and companies that deliver a single service or purpose. It has sections containing essential elements like company information, product, CTA, pricing details, contact form, and more, all on a single page.
The good news? It’s all bread and butter to design a one-page website with Divi. Divi, a product by Elegant Themes, comes with an in-built single-page navigation option that enables you to set up your one-page website in just a few simple steps.
In this tutorial, I’ll show you how to create a one-page website with Divi, enable sidebar navigation, and design a single-page menu using anchor links to link different sections on a webpage.
Setting up a Homepage for your one-page Divi Website
Let’s begin by creating a new page on your Divi website. To create a new page, go to Pages > Add New. Let’s call this new page ‘On-page Website’.
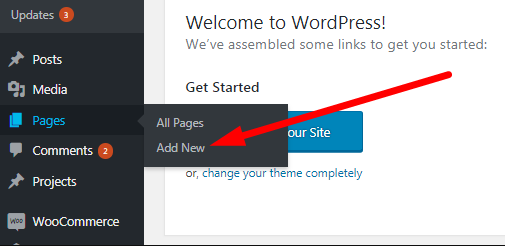
Adding a New Page
The next step is to set the ‘On-page Website’ page as your homepage. Go to Settings > Readings and select your newly-created page from the Homepage option.
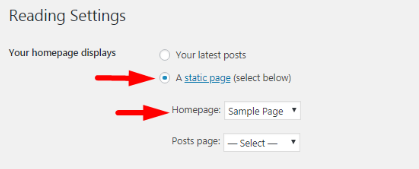
Homepage Setup for a One-page Website
Once you have your homepage set, go back to the ‘On-page Website’ page and enable “Use Divi Builder”. You can build your website all from scratch using a Divi Builder or make adjustments to a premade layout, it’s up to you how you want to design your single-page website. Check this out to learn how to design a website using Divi Visual Builder.
Now that you’ve strategically designed all the essential sections for your one-page Divi website, the next step is enabling single page navigation.
Enabling Divi’s Single-Page Navigation
To enable Single Page Navigation for your Divi website, go back to ‘All Pages’ from your WordPress Dashboard and edit the ‘On-page Website’ page. You’ll find the Divi Page Settings on the top right with an option ‘Dot Navigation’. By default, this option is ‘off’. Toggle it to ‘on’ to activate the Single Page navigation and update the page. Click on ‘view page’ to review the settings. You’ll notice a beautiful side navigation bar has been added to the right side of your homepage.
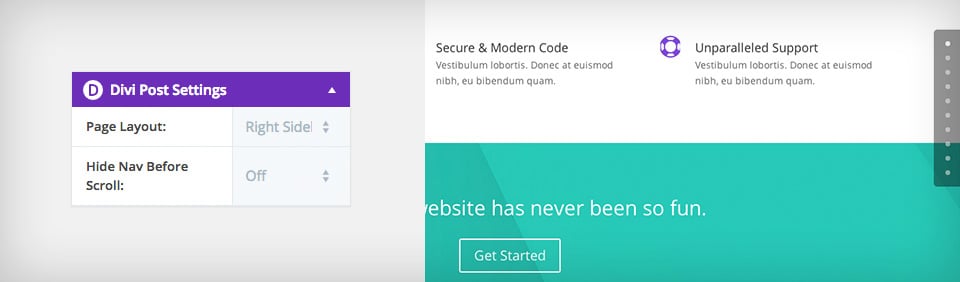
Activating Single Page Navigation in Divi
This dot navigation bar is comprised of small dots or circles, with each indicating a separate Divi section. Visitors can click the dots to reach any section of the webpage, making it easier to understand and navigate long-format pages.
Furthermore, Divi automatically links the Dot Navigation bar to each section of the page, making it easily accessible. Upon adding a new section, you’ll notice a new dot appearing in the navigation bar for that respective section.
Anchor Links and a Custom Menu for One-Page Websites
To help your visitors navigate the long-scrolling webpage conveniently, you can add a header menu for one-page navigation. This means the menu will be linked to specific sections of the page instead of different pages. When you click an option, it will take you to the respective section of the page, creating a smooth scrolling effect.
Now the question is: How to create a one-page navigation menu? To achieve this, we’ll first create anchors using Custom CSS ID for each section.
Adding the CSS ID for Anchor Links
To add sections to your menu, each section on your webpage needs a custom CSS ID. For example, to anchor the link to the “Discover Unlimited Beauty” section in your one-page header menu, first enable the visual builder. Then, go to the Advanced Settings tab in the Section Settings. Here you’ll find a CSS ID option. Enter a unique CSS ID (a unique name for each section without spaces) in the provided bar and save it.
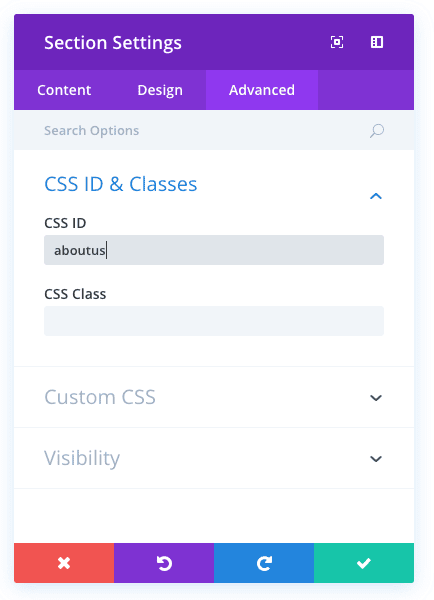
Create Unique CSS IDs for Sections
Similarly, assign each section on your one-page Divi website a unique CSS ID. Once you’ve given ID, adding anchor links to your menu is no longer a complex task.
Creating and Linking Menu to the CSS ID
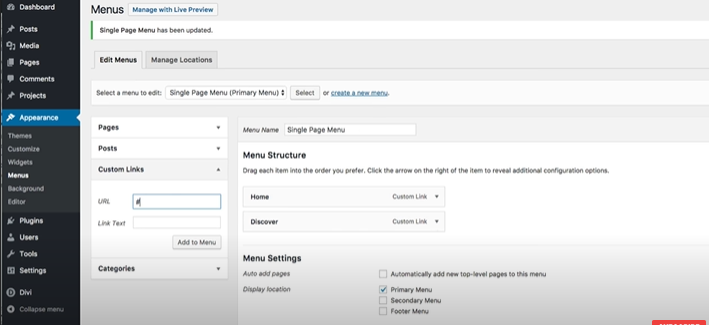
To build a custom navigation menu, go to the WordPress Dashboard. Navigate to the ‘Appearance’ page, create a new menu, and link this menu to the homepage header. Once linked, you can add your custom links to the header menu.
Start by creating custom anchor links using the ‘Custom Links’ tab on the right-hand side of the page. This contains two fields: URL and Link Text. First, assign the URL by entering the # symbol. Now, type the CSS ID you assigned earlier to your section after the # symbol.
In our example, I’ll use #discover in the URL to link the ‘Discover unlimited beauty’ section to the navigation menu. Next comes entering the Link Text. Link Text is the name that will appear on the menu for the respective section. Let’s name it ‘Discover’ to display in the menu.
Read More: A few different ways to make navigation menus with Divi
Designing Menu Links with Custom CSS IDs
Repeat this process to link all the sections of your page to the menu.
After saving your work, go back to your Divi website’s homepage and refresh the settings to view the menu. Click any option in the menu and you’ll be scrolled down to the respective section.
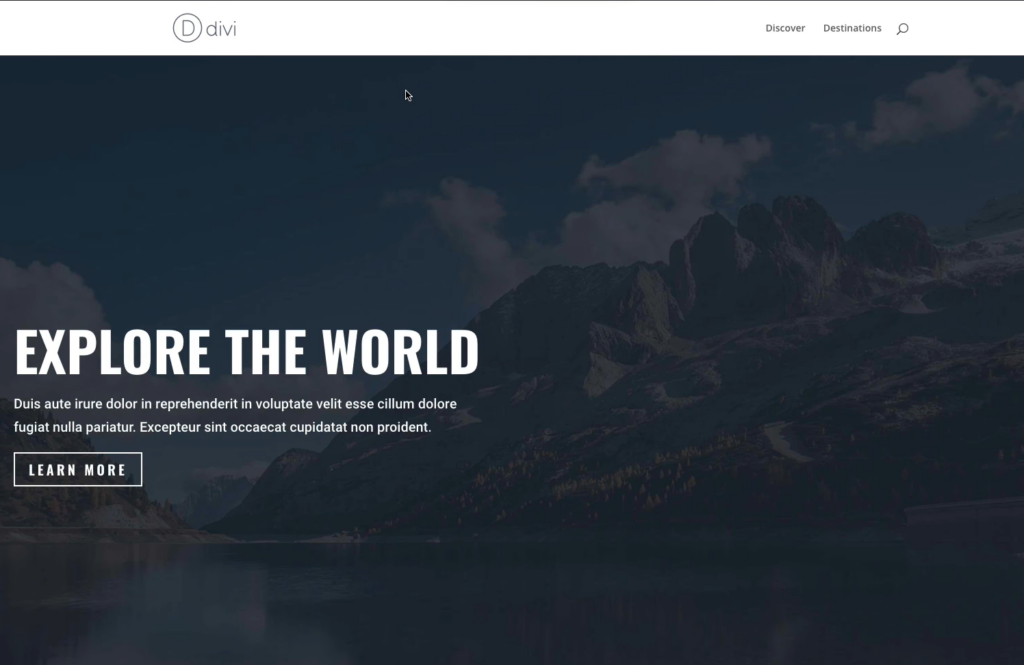
Navigation Menu for a One-page Website
Your One-page Website is Now Functional
If you’re following along the steps, congratulations! You have a functional one-page Divi website.
Whether you have limited time or resources, need a faster loading time for your website, require a website for short-form content, or your company offers a few products or services, a one-page website is your knight in shining armor. Instead of sending your users to different pages, a single-page website keeps all your content organized in one place, making this long-scrolling webpage one of the most practical and compelling website layouts.
We hope that this step-by-step guide will inspire you to bring about your vision for your one-page website. If you’ve any further queries regarding a one-page website, feel free to ask them in the comment section below!
FAQ’s
1. Are one-page websites good?
It’s a great option for anyone who has less content, generally offering a single service, a portfolio, or small businesses with fewer products. Companies tend to pick one-page websites for Campaign-specific landing pages.
2. What are the pros of a one-page website?
Here are some of the pros of a one-page website
- Quick Creation
- Simple and easy to use
- Mobile-friendly
- Can be more engaging than multi-page websites
- Economical and easy maintenance
3. What are the cons of a one-page website?
Here are some of the cons of a one-page website
- A one-page website is not suitable if you have a lot of content, such as multiple products and pages.
- Not very good for SEO as multi-page websites.
- A one-page website can lack clear structure and organization If not laid out strategically.


0 Comments