
Divi 5 Beginner's Guide: How to Get Started
We may earn a commission from affiliate links in this post. Disclosure policy
First, it’s important to understand that Divi 5 is a theme, not just a plugin like Elementor or other builders. However, the functionality is quite similar since Divi also works as a powerful page builder. Whether you’re looking for Divi 5 download options, or comparing “Is Divi easier than Elementor?”—this guide is here to make everything simple for you.
What is Divi 5 and Why It Matters
Divi 5 is the latest version of Divi, developed by Elegant Themes, which already powers websites for more than 974,000 active users worldwide. In earlier versions, Divi relied heavily on shortcodes, which at that time was revolutionary. However, over the years, many users noticed performance issues and slower speed optimization. To solve these long-standing problems, the team behind Divi rebuilt the entire system from scratch. This upgrade makes Divi 5 faster, more efficient, and ready to lead the future of WordPress site building for the next decade.
Here’s what makes Divi 5 for beginners and professionals so powerful:
- Smaller JavaScript Footprint – Divi 5 modularizes its JavaScript files, loading each library only when needed.
- Instant-Load Styles – With automatic Critical CSS generation, only the necessary styles for above-the-fold content are loaded first, giving your site a big speed boost.
- Smarter Code – The entire Divi codebase has been refactored for efficiency, maintainability, and long-term scalability.
How to Download and Install Divi 5
Downloading Divi 5 is very easy. Simply visit the Elegant Themes Member Area and log in with your account. If you are new, sign up first to create one. Once logged in, download the Divi 5 Alpha version. The file will be saved in .zip format, which must be uploaded to WordPress the same way.
Installing Divi 5
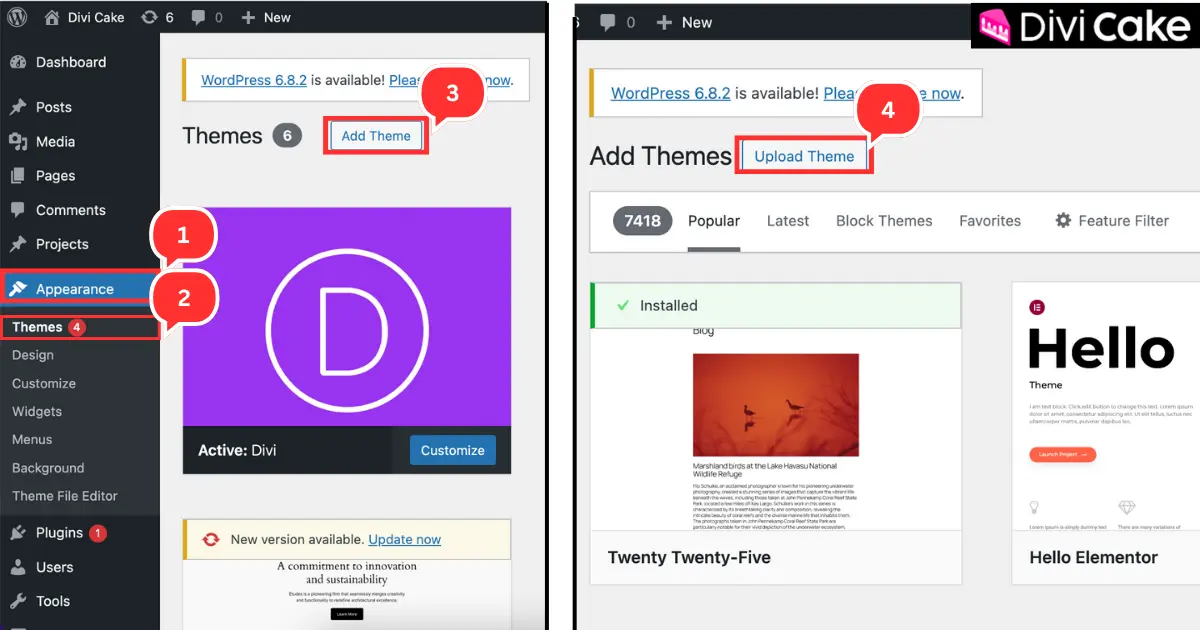
After downloading, it’s time to install Divi 5. Since Divi is a theme (not a plugin like Elementor), you’ll upload it from the Appearance → Themes section in your WordPress dashboard.
Follow These Steps to Install:
- Click on the Appearance option in the WordPress Dashboard.
- Select Themes under Appearance.
- Click on Add Theme.
- Tap the Upload Theme button and select your Divi 5 .zip file.
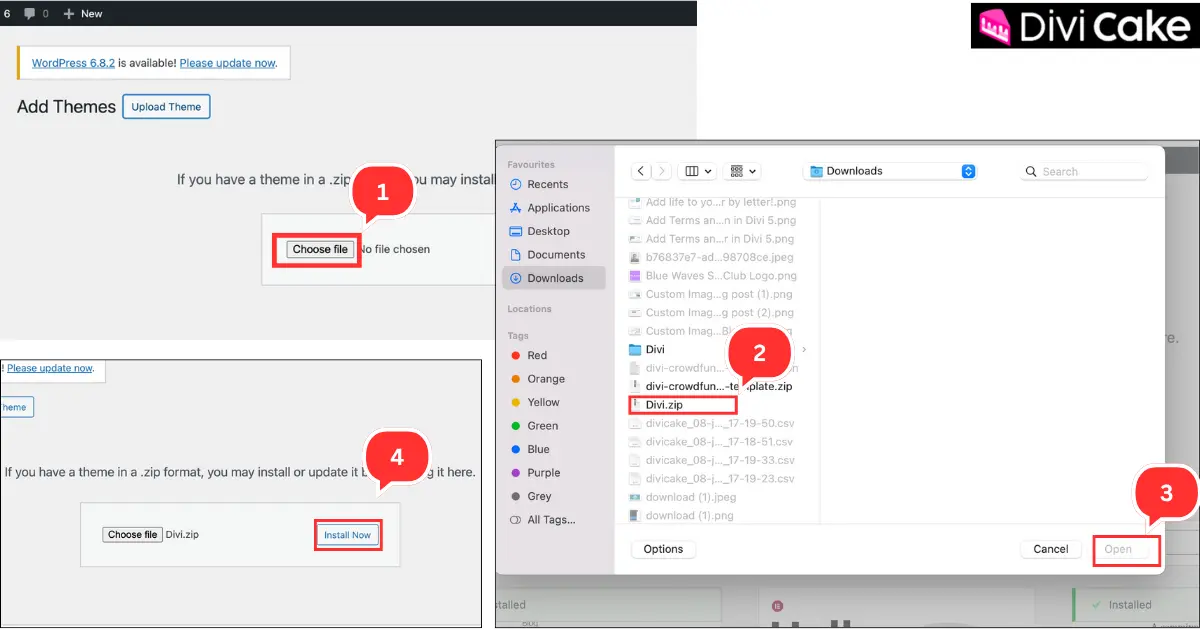
- Click on the Choose File button.
- Select the Divi 5 .zip file from your folder.
- Click on the Open button.
- Click on the Install Now button.
Once the Divi 5 theme is installed, click on the Activate button to enable it on your website.
Understanding the Divi 5 Interface
The Divi 5 interface is designed to be simple, fast, and user-friendly. It gives you full control over layouts, modules, and design settings to build professional websites with ease.
Overview of the Divi Builder Interface
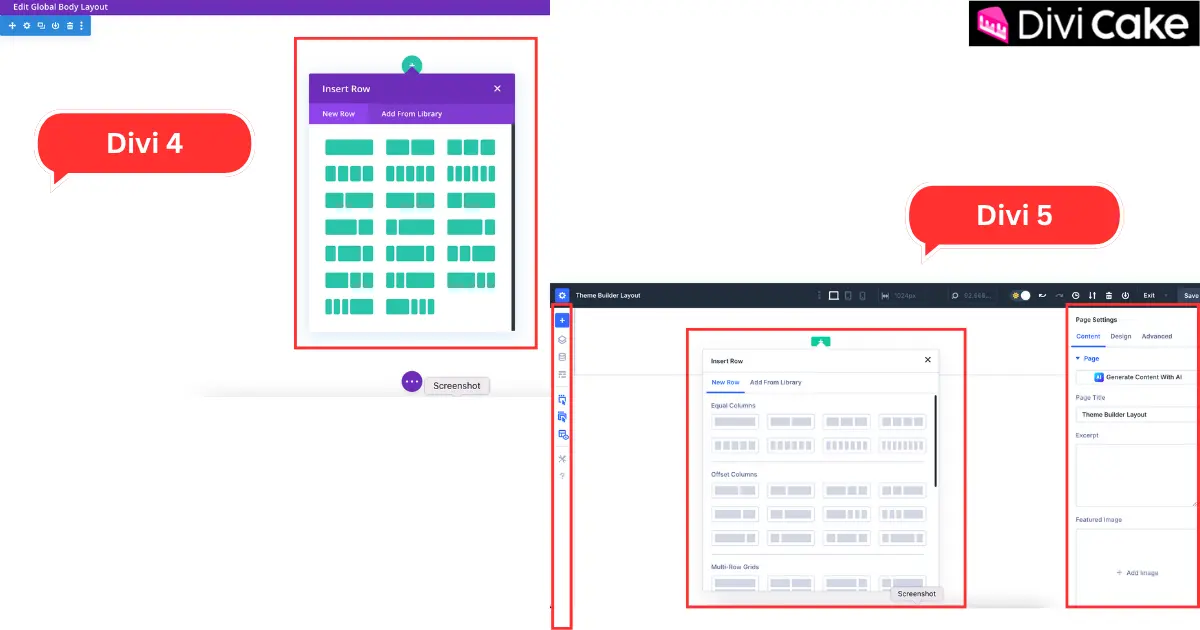
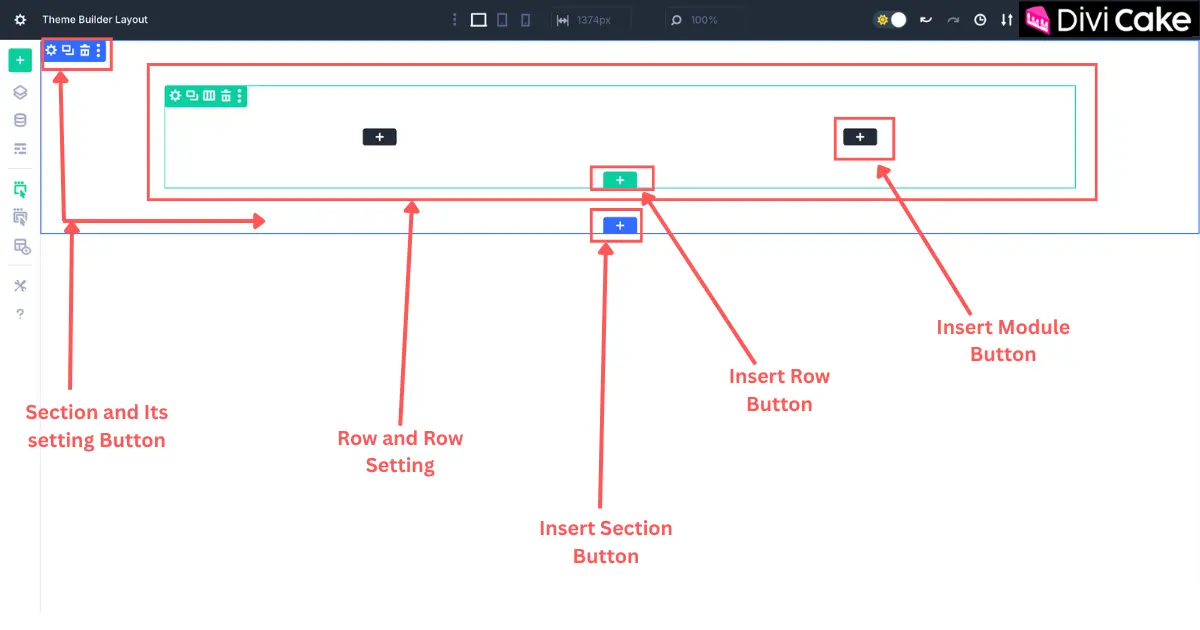
As shown in the screenshot below, the Divi 5 interface looks completely different from Divi 4 and offers a much faster, smoother experience. Unlike the older version, which was built on a traditional PHP/shortcode system, Divi 5 has been rebuilt from the ground up using ReactJS (JavaScript). This modern foundation makes the builder more powerful, responsive, and future-ready.
Key Improvements in Divi 5
- Up to 7 custom breakpoints for advanced responsive design.
- Powerful global option group presets to manage design settings across your site.
- Supports nested rows inside columns for flexible layouts.
- Module groups for reusable sections, saving time when designing.
- Optimized CSS output for better site performance.
These updates not only make Divi 5 easier to use for beginners but also more flexible for advanced users who want complete control over their designs.
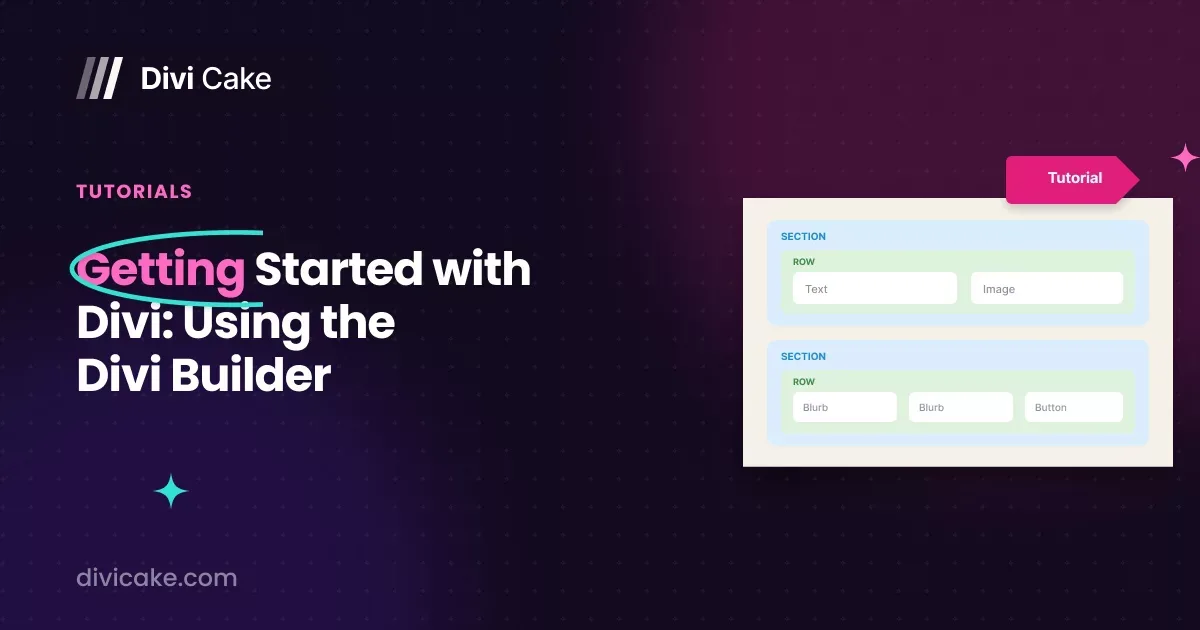
Understanding the Divi 5 Builder: Sections, Rows, and Modules
The screenshot also shows the basic structure of the Divi 5 Theme Builder, which is perfect for beginners. Each part of the layout is clearly labeled to make getting started easier:
- Insert Section Button – Adds a new section, which acts as the main container for your content.
- Insert Row Button – Creates rows inside a section and splits them into multiple columns.
- Insert Module Button – Lets you add modules like text, images, buttons, or other design elements inside columns.
Learn More: Divi Theme Builder Best Practices
What’s New in the Divi 5 Builder Experience
Divi 5 introduces a completely rebuilt core designed for speed, performance, and smoother editing. The visual and backend builders are now unified, giving you a consistent and streamlined editing experience. This means quicker page load times and faster workflows for both beginners and advanced users.
Key Improvements in Divi 5 Builder
- Custom Responsive Breakpoints – Set up to seven breakpoints for more precise mobile design.
- Design Variables & Option-Group Presets – Reuse styles across your entire site effortlessly.
- Nested Rows & Module Groups – Simplify complex layouts and save reusable design blocks.
- Cleaner Interface – Docked panels, light/dark mode, and improved search and filtering.
- Preview Option – Similar to Elementor, now included in Divi 5 (was missing in Divi 4).
These updates make Divi 5 not only faster but also more user-friendly. If you’ve ever asked “Is Divi easy to learn?” or compared “Is Divi easier than Elementor?”, the new builder experience makes the answer clear—Divi 5 is designed with both speed and simplicity in mind.
How to Create a New Page Using Divi 5
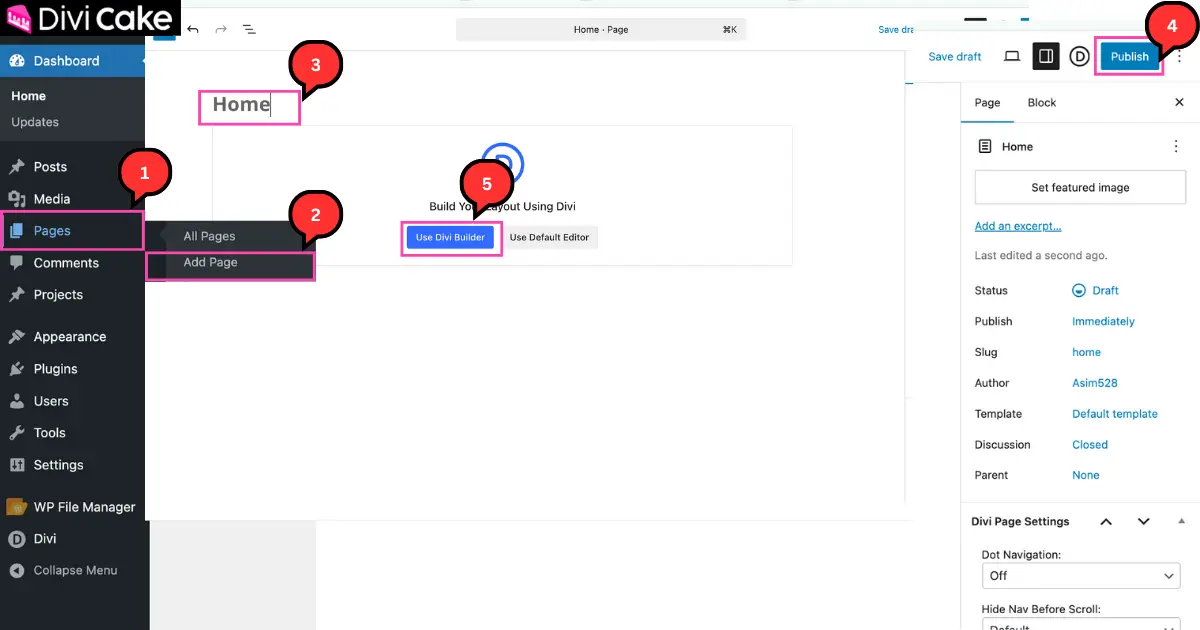
Creating your first page with Divi 5 is simple and beginner-friendly. From your WordPress dashboard to editing with the Divi Theme Builder, the process is smooth and requires no coding. Follow the steps below:
- Hover your mouse over the Pages option in the WordPress Dashboard.
- Click on Add Page.
- Enter your Page Title (see the screenshot below).
- Click the Publish button.
- Once the page is published, click on the Use Divi Builder button.
How to Insert Sections and Modules Using Divi 5
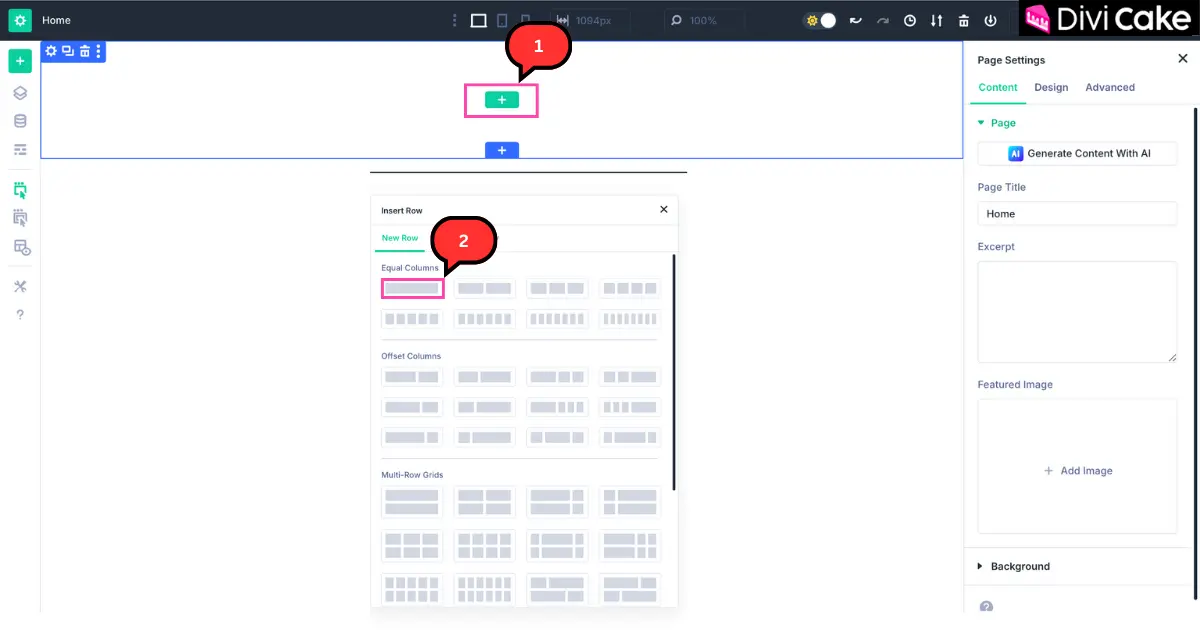
After creating your page, you’ll enter the Divi 5 Builder. Now it’s time to add sections, rows, and columns, and then use modules like headings, text, or images to build your design.
Follow These Steps:
- Click on the Plus (+) Icon.
- Insert a Single Row with a Single Column.
From here, you can add Divi modules such as text blocks, headings, buttons, or images, and then customize them to match your brand style. This simple process makes Divi 5 for beginners and how to get started free extremely beginner-friendly.
Adding a Heading Module in Divi 5
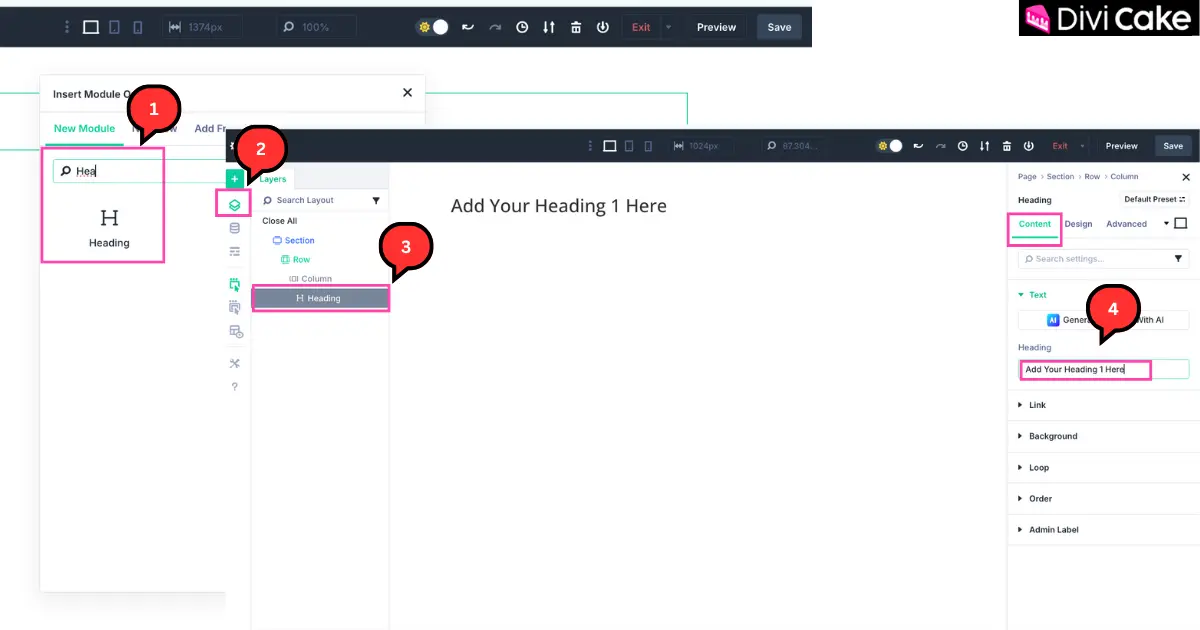
When you insert a row, Divi 5 will automatically display a list of available modules. From this list, you can choose the module you need. In this example, we’re adding a Heading module at the top of the page.
Follow These Steps:
- Search for the Heading Module and insert it (see the screenshot below).
- Press the Navigation button.
- Click on the Heading option as shown in the screenshot.
- Add your heading text inside the Content tab → Heading field.
Customizing the Heading in Divi 5
Once you’ve added your heading, you can customize it to match your brand style and preferences. Divi 5 makes it simple with clear design options.
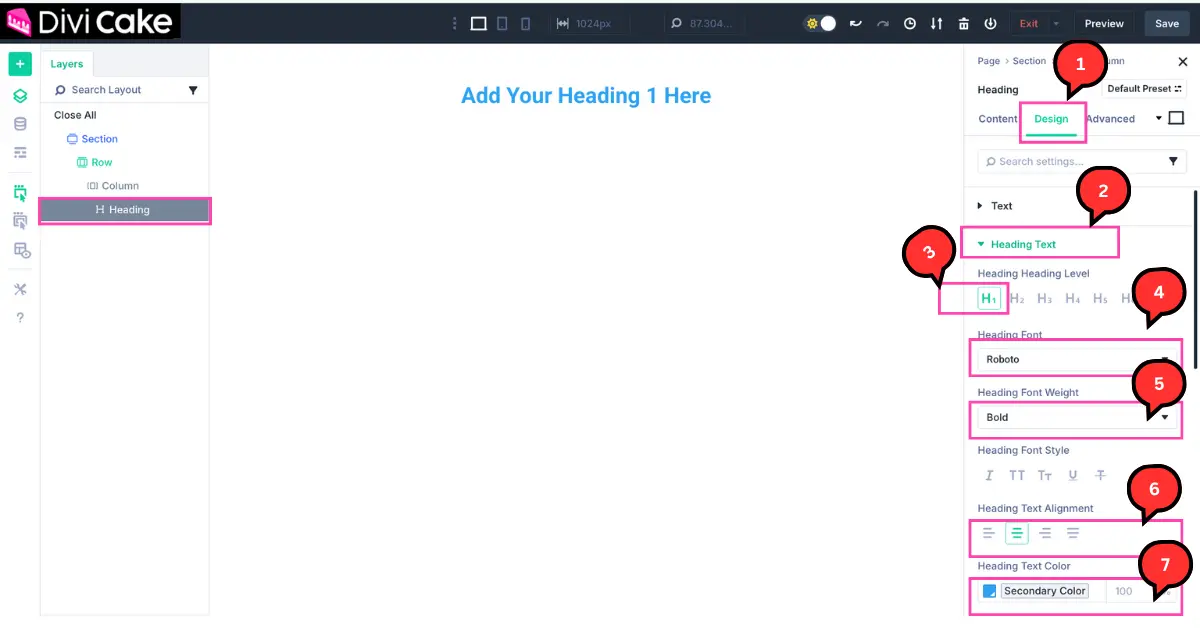
Follow These Steps to Customize Your Heading:
- Click on the Design tab.
- Select the Heading Text option.
- Choose the heading level you need (H1, H2, etc.).
- Pick your desired Heading Font (we selected Roboto).
- Adjust the Font Weight (e.g., Bold, Regular) as required.
- Set the Text Alignment (we aligned it to the center).
- Apply your preferred Heading Color (choose a color that contrasts well with the background).
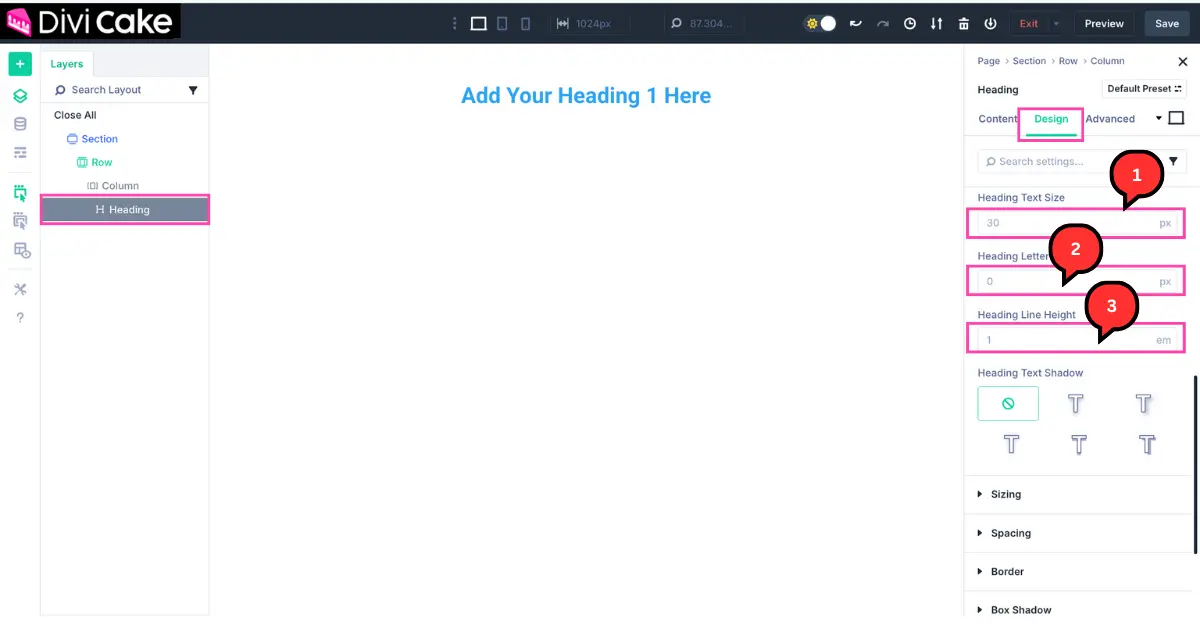
Continuing with the Design Tab. After setting the font and color, you can fine-tune your heading style in the Design tab for better readability and balance.
- Set the Heading Text Size according to your requirement.
- Keep the Letter Spacing at zero, or increase it if you want more spacing.
- Adjust the Line Height to 1px (or to your preferred value for better spacing).
Website Responsiveness in Divi 5
When you are new to Divi, you may not know how to make your website responsive on all devices. In Divi 4, there were only three options for responsiveness: desktop, tablet, and mobile. However, Divi 5 introduces more advanced and custom options.
It is very important to check responsiveness because sometimes your website may not display properly on certain devices. While the desktop and tablet sizes often align, issues usually appear on mobile where headings, text, icons, or images may overlap. To build like a pro, always check your design separately for each device and adjust sizes manually where needed.
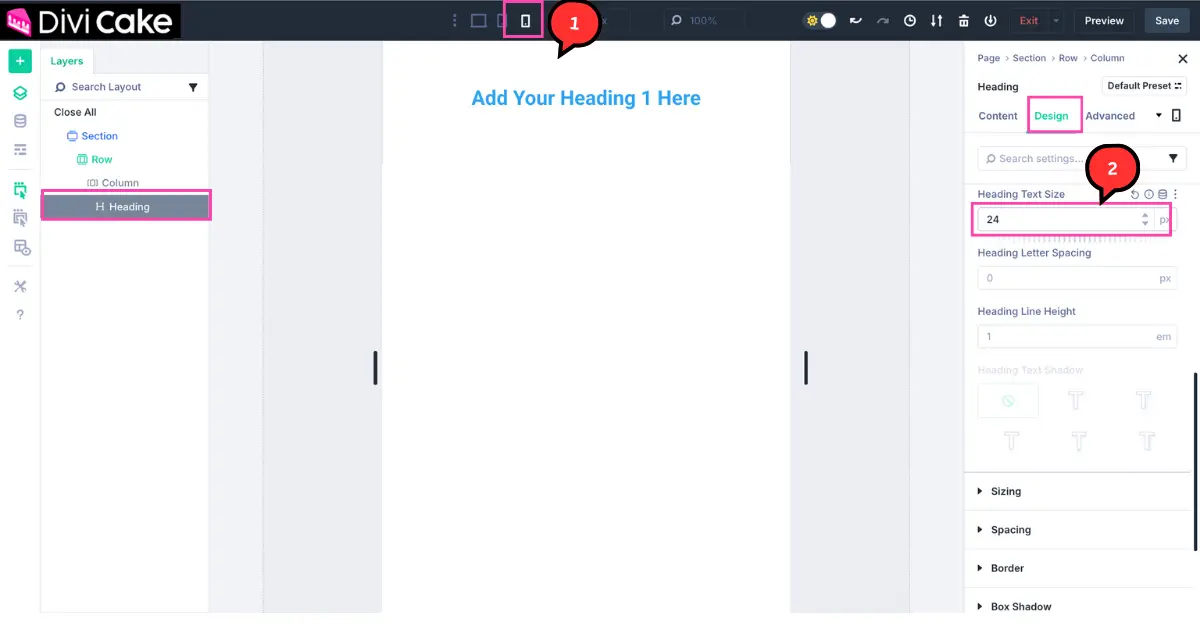
Keep in mind: when you switch to mobile editing mode, any changes you make will only apply to mobile and not affect tablet or desktop.
In this tutorial, we are going to decrease the heading size for mobile view.
- Click on the Mobile Icon button as shown in the screenshot below.
- Decrease the Heading Size just like we set it in desktop mode.
Adding Text Module in Divi 5
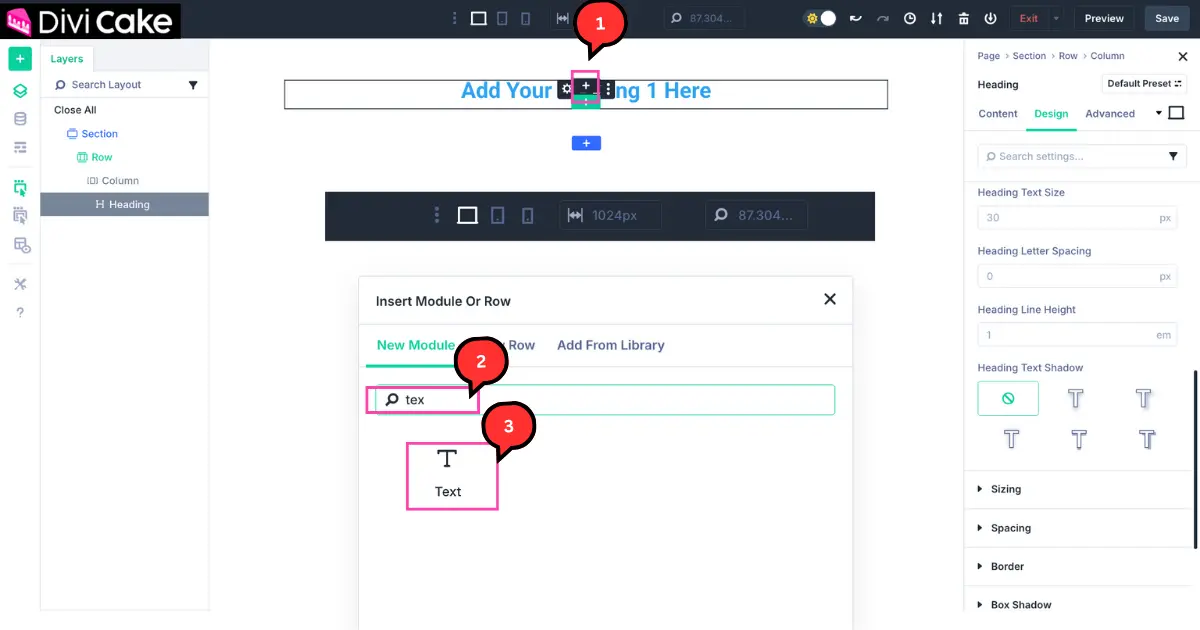
Now we are going to add a text module below the heading to describe the purpose of the website. The process is almost the same as adding the heading module.
- Hover the mouse over the Heading, and you will see a black Plus Icon button. Click on it.
- Search for the Text module.
- Add the Text Module as shown in the screenshot.
Customizing the Text Module
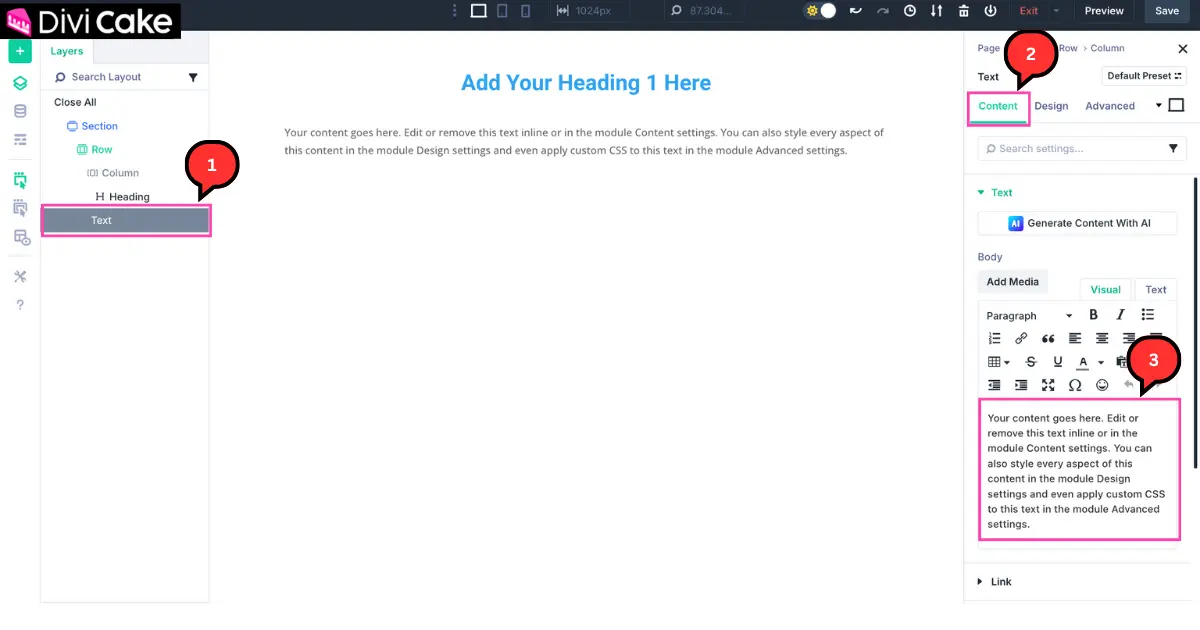
Now let’s customize the text module just like we customized the heading.
- Click on the Text Module as shown in the screenshot.
- Go to the Content tab.
- Change the content according to your website’s needs.
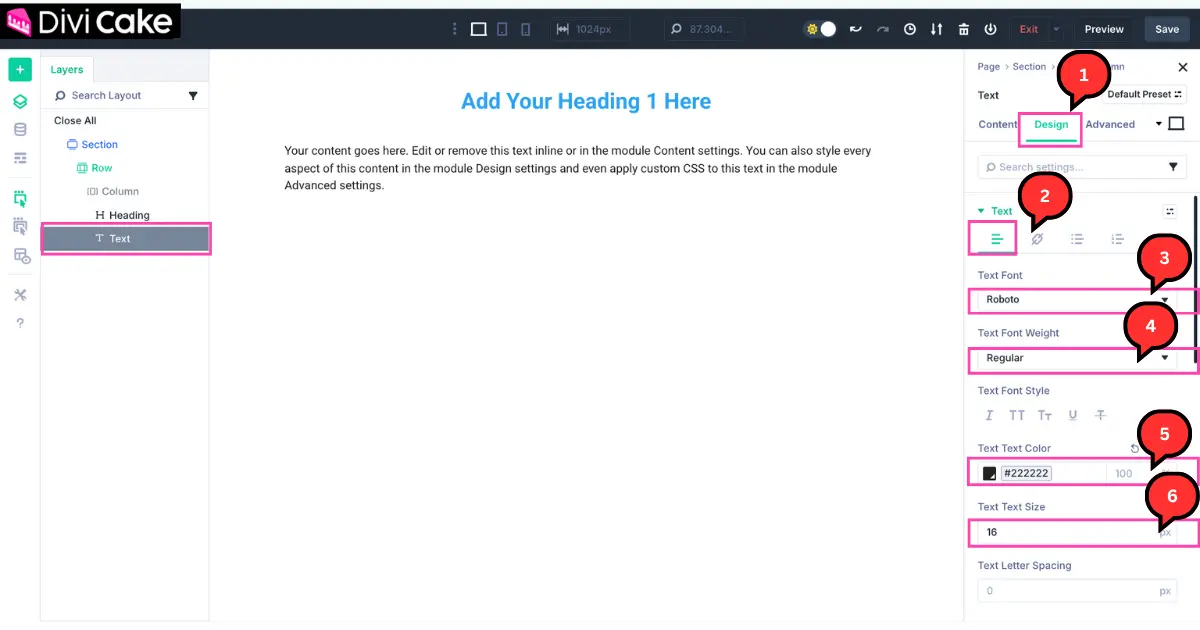
Continued Customization of the Text Module. After updating the content, you can style the text to match your design.
- Click on the Design tab.
- Click on the Text option.
- Change the Text Font.
- Set the Text Font Weight.
- Choose your preferred Text Color.
- Adjust the Text Size as needed.
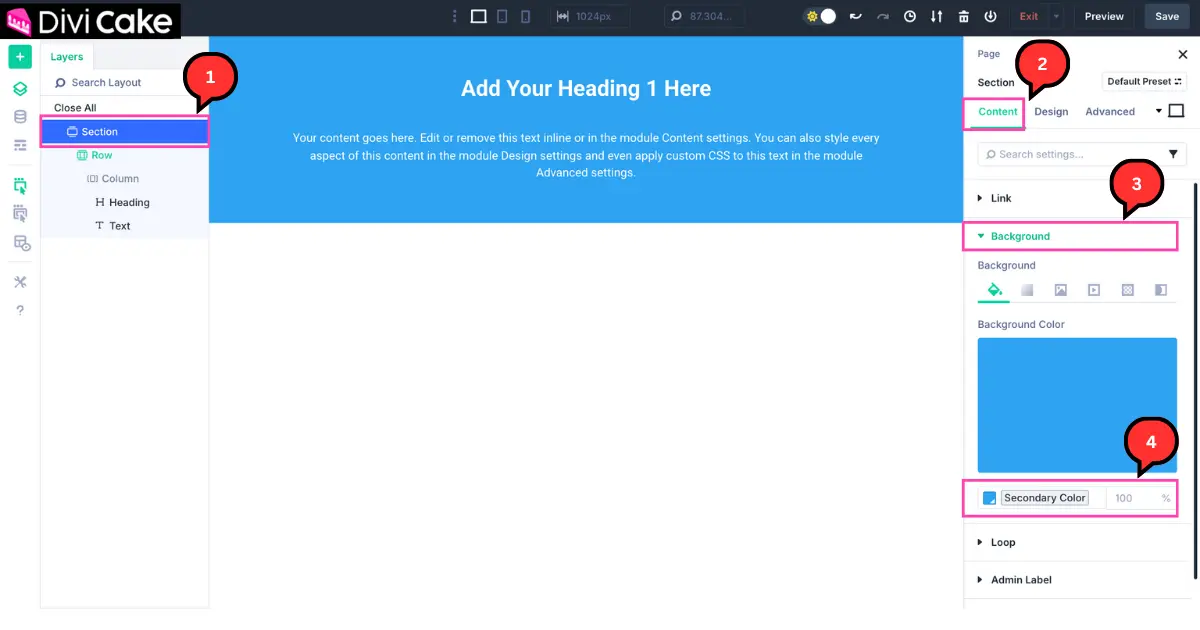
Add Section Background Color
In the screenshot below, we updated the Heading and Text colors after changing the background color, because the old colors were not clearly visible.
- Click on the Section color.
- Go to the Content tab.
- Click on the Background option.
- Select and apply your preferred Background Color.
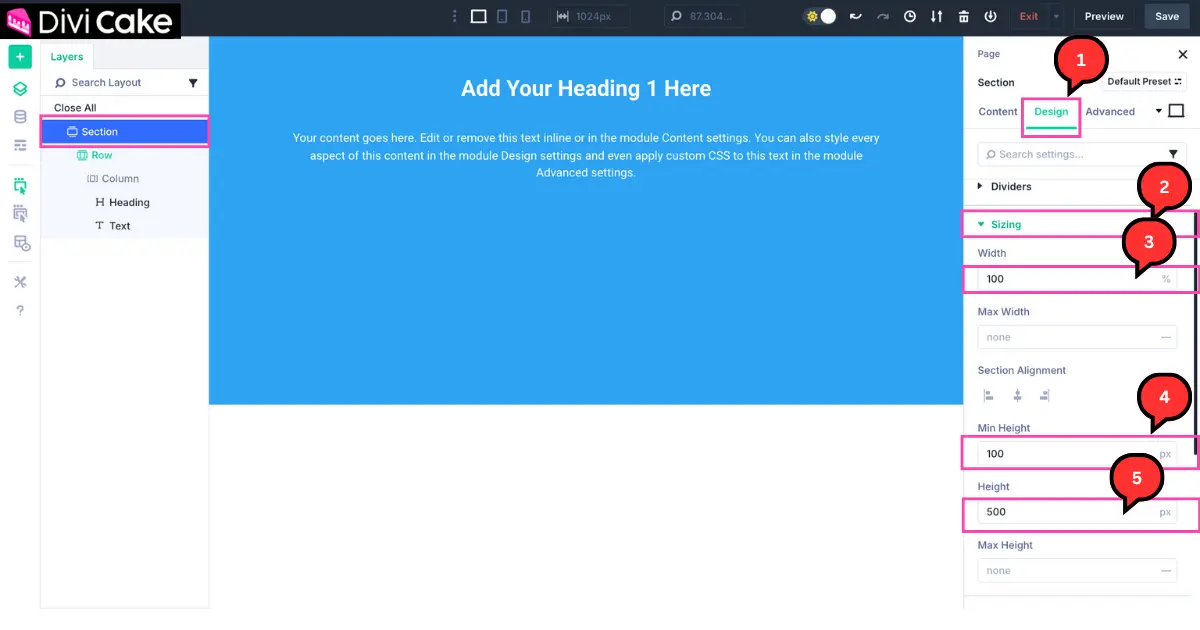
Continued Section Background Color
- Click on the Design tab.
- Select the Sizing option.
- Set the Width to 100%.
- Set the Min Height to 100px.
- Adjust the Height to 500px or more, depending on your design needs.
Adding and Duplicating Blurb Modules
Now we’ll show you how to add Blurb Modules, customize them, and quickly copy them from one place to another. For this step, we’re creating a separate section. This method saves you time because you only need to fully customize one module according to your requirements. After that, you can duplicate it multiple times and simply change the content in each copy—no need to redesign every module from scratch.
- Click on the blue Plus Icon button (as shown in the screenshot).
- Add a Row with four Columns (or as many as you need, based on your layout).
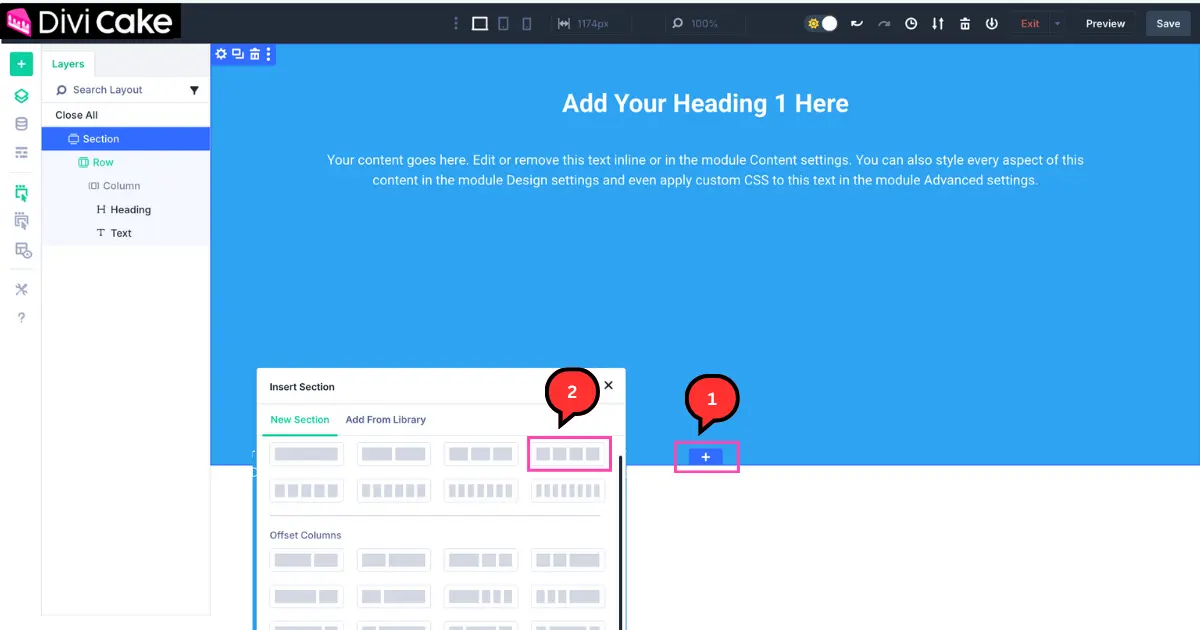
Inserting a Blurb Module
- Click on the Plus Icon inside the first column.
- Search for the Blurb Module in the list.
- Add it by clicking on the Blurb Module option.
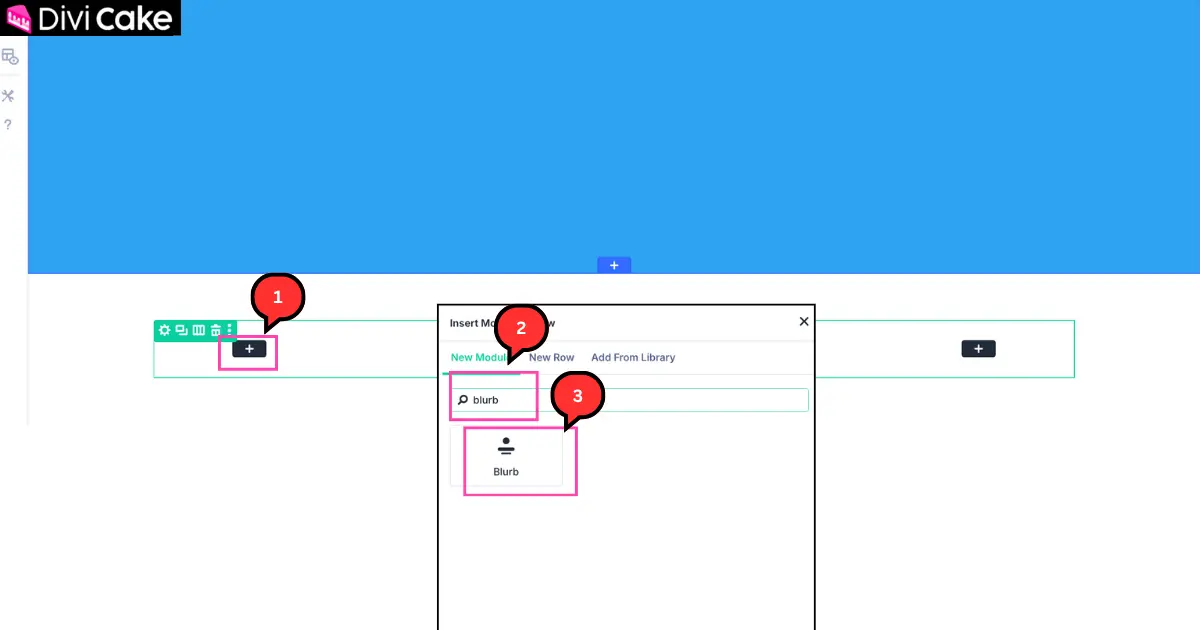
Customizing the Blurb Module Content
Now that the Blurb Module is added, it’s time to replace the default dummy content with your own title and description. Since you already know how to open module settings from the previous steps, follow these instructions:
- Click on the Blurb Module to open its settings.
- Go to the Content tab.
- Update the Title with your preferred heading.
- Replace the Description with your website content as shown in the screenshot below.
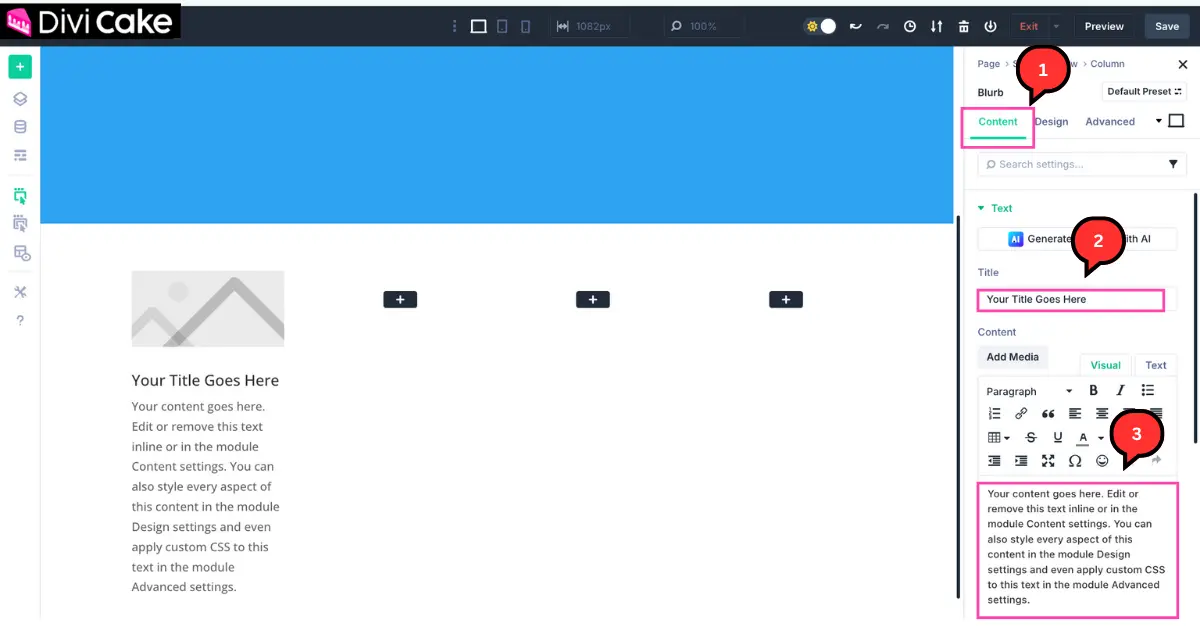
Learn More: How To Increase The Divi Blurb Content Width
Adding an Image or Icon to the Blurb Module
The Blurb Module gives you two options: you can either upload a custom image or use one of Divi’s built-in icons. If you want to add an image, simply upload it. If you prefer using an icon, just toggle ON the Use Icon button located above the image option.
- Open the Content tab of the Blurb Module.
- Click on the Image & Icon option.
- Upload your website image, as shown in the screenshot below.
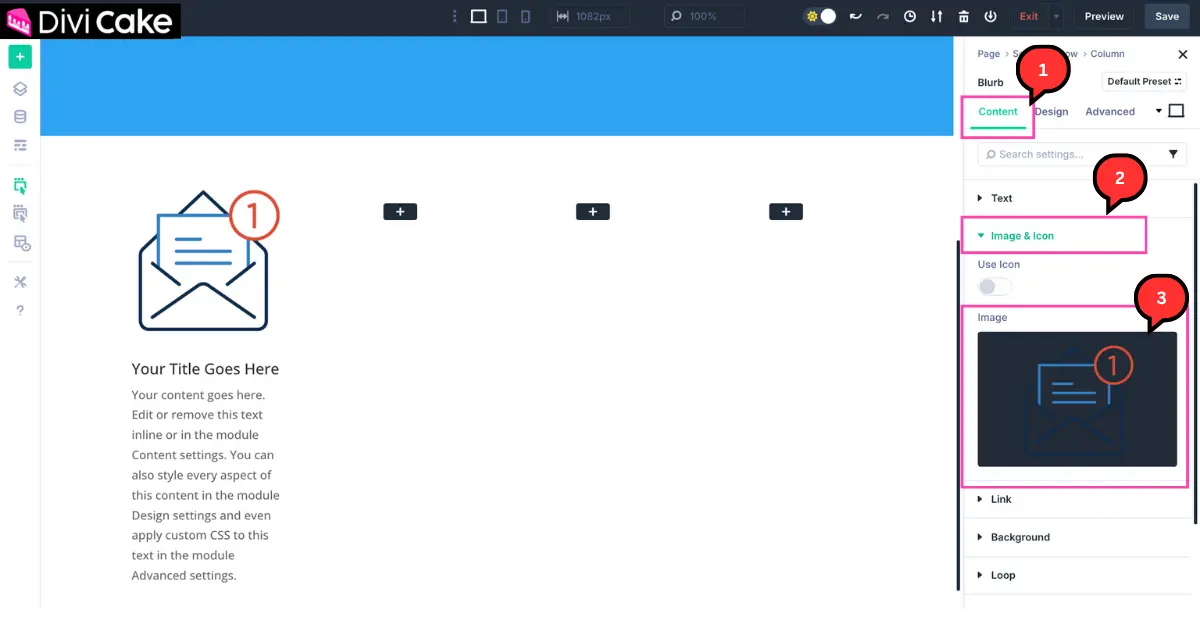
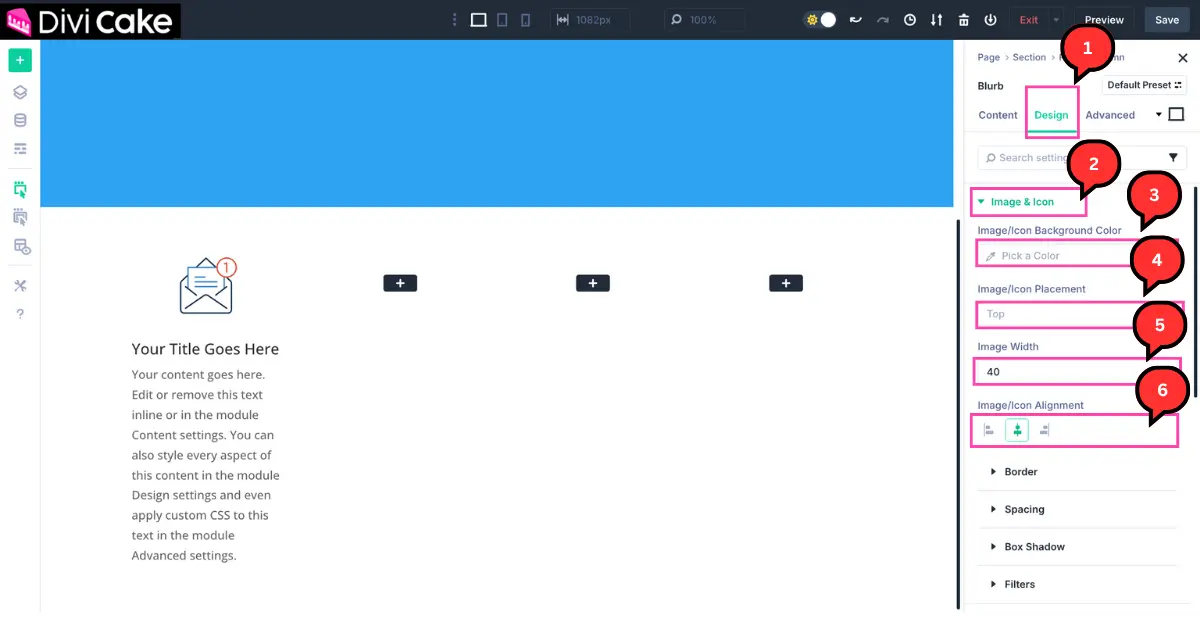
Customizing the Blurb Module Design
Once you’ve added an image or icon, you can customize the Blurb Module’s appearance to match your website style. Follow these steps:
- Open the Design tab.
- Click on the Image & Icon option.
- Keep the Image & Icon Background Color transparent for a cleaner look.
- Set the Image & Icon Position to Top.
- Adjust the Image Width (we used 40px).
- Align the Image/Icon to the Center.
Customizing the Blurb Module Title Text
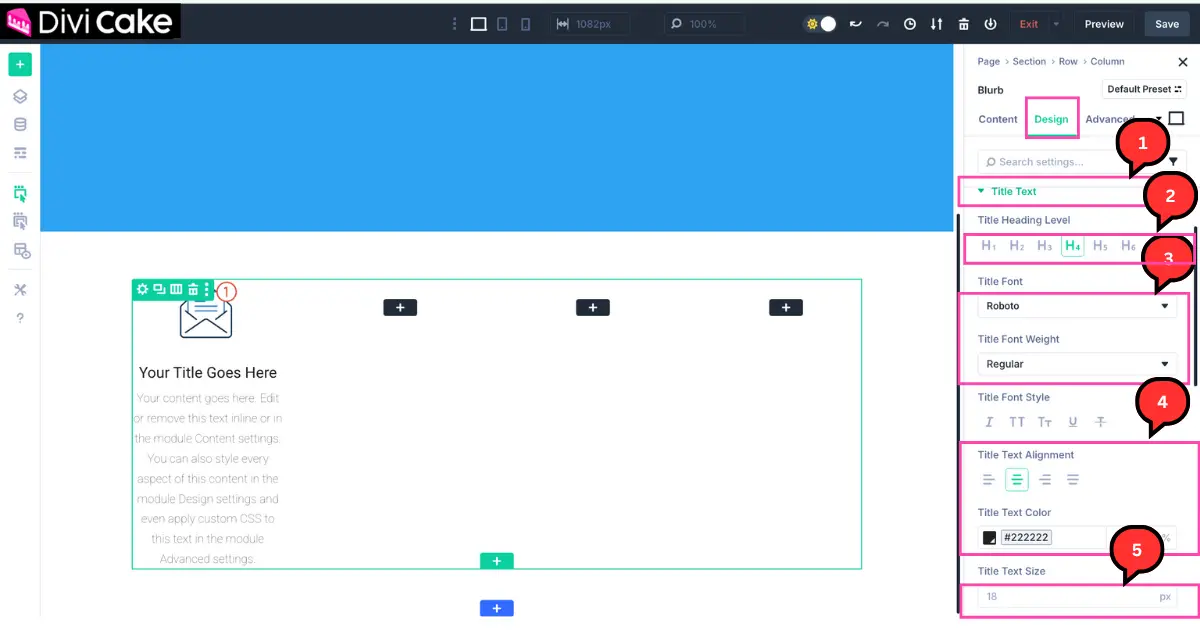
Let’s style the Blurb Module title to match your design.
- Open the Design tab and click on the Title Text option.
- Set the Title Heading Level (H1, H2, H3, etc., depending on your layout).
- Choose a Title Font (we used Roboto) and adjust the Font Weight.
- Set the Title Text Alignment (left, center, or right) and apply your desired color.
- Adjust the Title Text Size in pixels to fit your design.
Customizing the Blurb Module Body Text
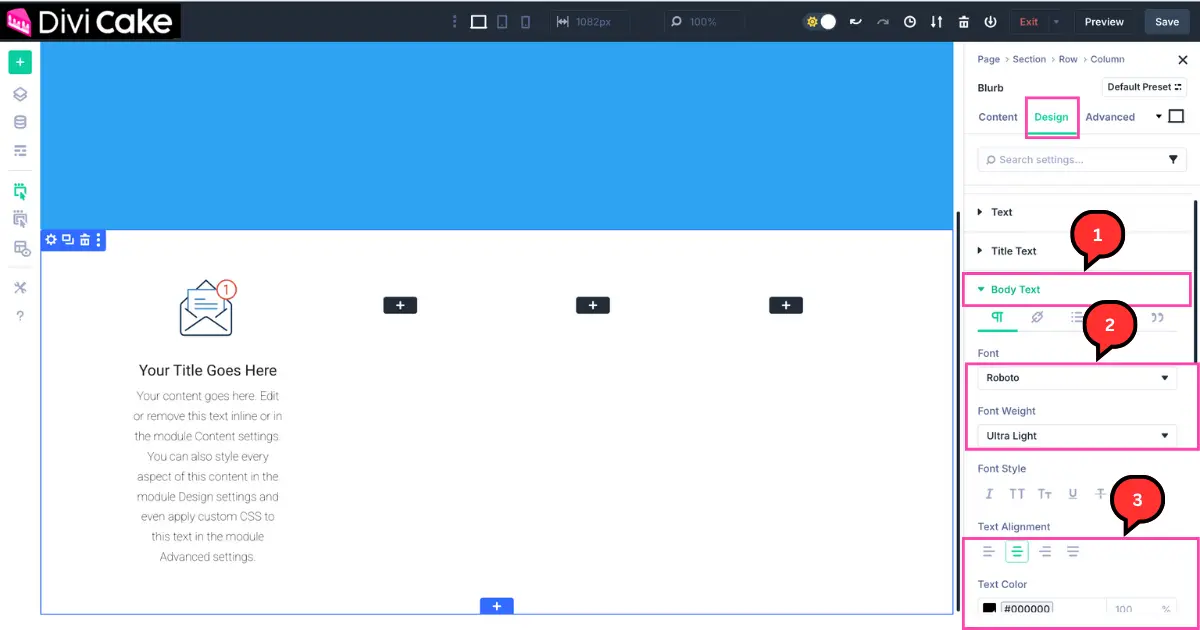
After styling the title, you can customize the body text of the Blurb Module:
- In the Design tab, click on the Body Text option.
- Choose your preferred Text Font and adjust the Font Weight.
- Set the Text Alignment (left, center, or right).
- Pick a suitable Text Color to match your design.
Learn More: Align The Divi Blurb Body Text To The Left
Copying and Pasting Blurb Modules
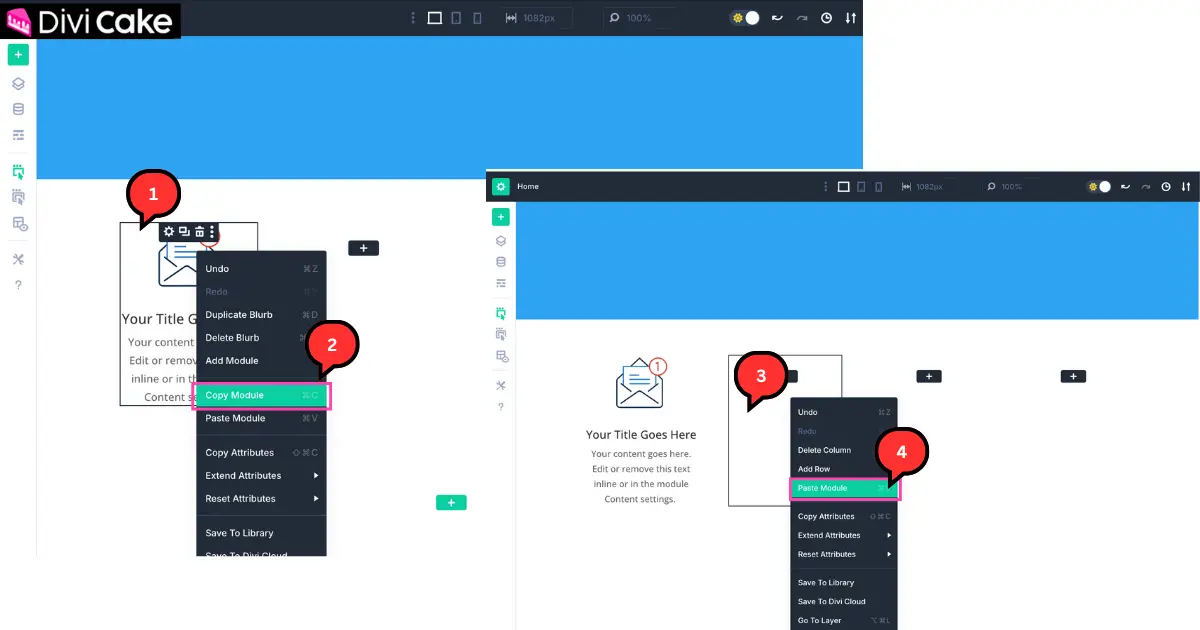
Instead of creating and customizing each Blurb Module from scratch, you can save time by copying the one you’ve already styled and pasting it into other columns. Then, simply replace the image and text for each module.
- Right-click on the Blurb Module you customized (see screenshot).
- Select Copy Module.
- Move to the second column, right-click in the empty area.
- Click on Paste Module to insert the copied design.
Repeat this process for as many columns as you need.
Learn More: How to add a clickable icon button to a Divi blurb module?
Using Divi 5 Premade Layouts
Divi 5 includes a wide collection of professionally designed premade layouts that you can use instantly. These layouts are crafted for different industries such as business, eCommerce, portfolios, and blogs. Instead of starting with a blank page, you can choose a layout pack and build your website much faster.
How to Access and Import Premade Layouts
You can access premade layouts directly inside the Divi Builder:
- Open the page where you want to use the layout.
- Click on Load From Library.
- Browse through Divi’s layout packs or search by category.
- Select your preferred layout and click Use This Layout.
The layout will instantly load on your page, and you can start customizing the content, images, and design to match your brand.
Creating a Global Header & Footer
Creating a global header and footer in Divi 5 is simple, but it requires attention to detail and a bit of time. To make it easier for you, we have created separate step-by-step tutorials. You can follow our detailed guide on how to create a custom global header and how to design a custom global footer in Divi 5 to make your website look professional and consistent on every page.
Conclusion
Divi 5 is a complete game-changer for beginners and professionals alike. With its rebuilt core, faster performance, and modern interface, it makes website building easier, quicker, and more flexible than ever before. From creating your first Divi page to customizing modules, adding backgrounds, and using premade layouts, everything is designed to save time while giving you full creative control.
Whether you’re wondering “Is Divi good for beginners?” or comparing Divi vs Elementor or Avada, the new Divi 5 proves to be both powerful and beginner-friendly. Plus, with features like responsive editing, global headers and footers, and ready-to-use layout packs, you can build a professional-looking website without writing a single line of code.
Now that you’ve learned the basics through this Divi 5 tutorial, it’s your turn to explore, experiment, and start designing your dream website. The best part? Divi 5 continues to grow and improve, so you’ll always have the tools you need to stay ahead.
Learn More: How Divi 5 Transforms the WordPress Experience
Submit a comment
Comments are read before they appear. Your email is not published.
Thanks. Your comment is waiting for review and will appear here once it is approved.