Divi developers really like using the Divi Blurb module because it lets them put together images or icons, titles, and text. But there’s a little problem – by default, it doesn’t let you put the description text below the icon/image and the title, especially if you want the icon on the left of the title. In this tutorial, we’ll show you how to fix that and align the Divi Blurb body text to the left below the icon or image. Let’s get started and make your Divi design more flexible!
Step 1. Let’s Begin: Configuring Your Divi Blurb
Before we jump into the tutorial, let’s ensure the Divi Blurb module is configured correctly. Note that this method works best with smaller icons or images to maintain a neat appearance. In our example, we’ll choose an icon with the default size. Now, let’s begin!
Select Image Or Icon for the Blurb Module
Open the Image & Icon toggle. By default, the blurb uses an image, but you have the option to switch to Use Icon and pick any icon you like. It’s all about customization! Now, let’s walk through the steps.
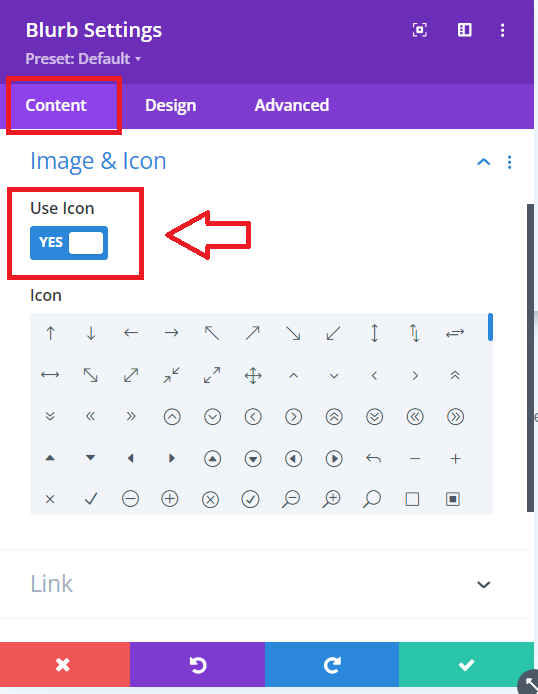
Pick any icon
Select Left Placement
Head over to the Design tab and open up the Image & Icon toggle. Choose Image/Icon Placement and set it to Left.
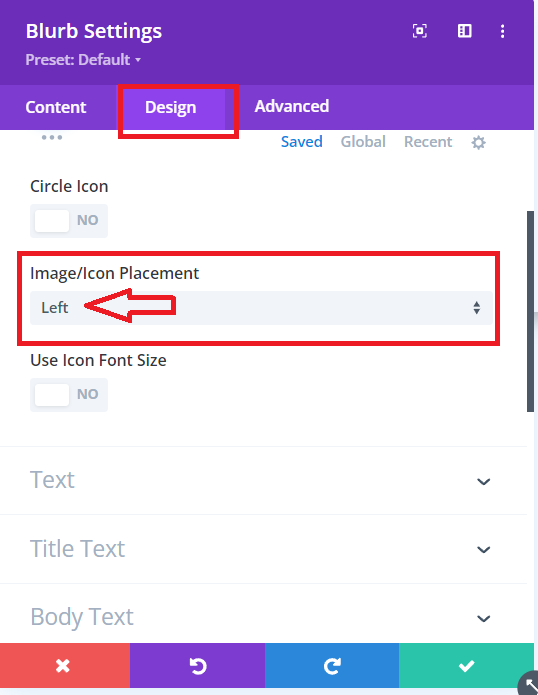
Left placement of the icon
Read More: How to Add Advanced Hover Effects to Divi’s Blurb Module Using Hover.css
Step 2: Give Your Divi Blurb a Style Boost: Add CSS Directly to the Module!
Instead of dealing with custom CSS and snippets, let’s take the easy route and add the code directly to your Divi Blurb module. It’s super simple, so no need to stress! We’ve got the code right here for you. Just copy and paste it into the Advanced tab under the Custom CSS toggle. We’ve even included a screenshot to make it crystal clear. Let’s get into the details!
CSS Code for Blurb Image
left: 50px;
position: relative;
CSS Code for Blurb Title
left: 50px;
position: relative;
margin-top: 5px;
CSS Code for Blurb Content
min-width: calc(100% + 50px);
left: -50px;
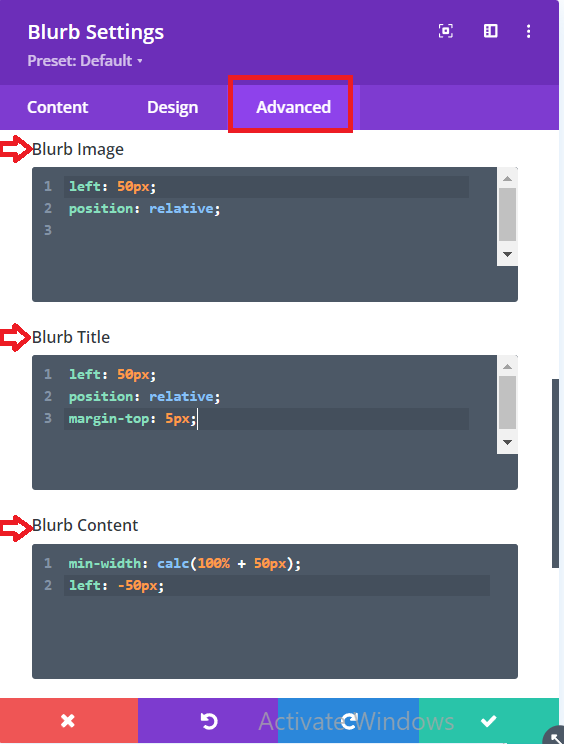
Adding CSS code directly to your Divi Blurb
Step 3: Further Customization of Blurb Module
Remember, feel free to tweak the numbers, especially when adjusting the size of your image or icon. It’s a bit like a puzzle, so give it a go and make sure those numbers match up in all three code boxes. Enjoy experimenting!
Quick note: We made the Divi Blurb module look cooler by adding some neat stuff. Added a bit of padding around it (5% on all sides), gave it a nice shadow, and changed the color of the icon. It’s these little things that make it stand out!
Final Look of Blurb Module
Now, take a look at a real-life example of a Blurb module after we’ve added the code:
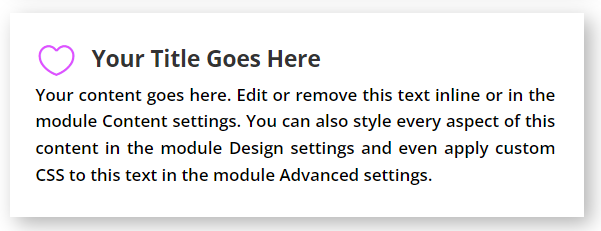
Alignment of Divi Blurb Body Text To The Left below The Icon/Image
Conclusion:
Great job! Now, your Divi Blurb stands out with the text neatly aligned below the icon or image, adding a touch of flexibility to your design. By following the steps and tweaking the CSS directly, you’ve personalized your Blurb module.
Remember, customization is in your hands. Whether it’s choosing an image or an icon, adjusting placements, or playing with the CSS, you’re the designer. Those small details like padding, shadows, and color changes make a big difference.
Enjoy experimenting and let your creativity shine. The final look of your Blurb module is a testament to your unique style. If you found this tutorial helpful, share your thoughts in the comments. Happy designing!
Read More: 7 Unique Ways to Add Hover Effects to Divi




0 Comments