Divi is a powerful and popular WordPress theme. It has a lot of features, but it can be difficult for beginners to know how to get started. We’re often asked what to do first. In this article, we’ll show how to purchase Divi, what your purchase options are, how to install it, and what to set up first.
This is the second of a series for beginners where we’ll cover Divi basics and a lot more. For part 1 of this series, see Getting Started with Divi: Purchase, Installation, and Setup.
Purchase Options
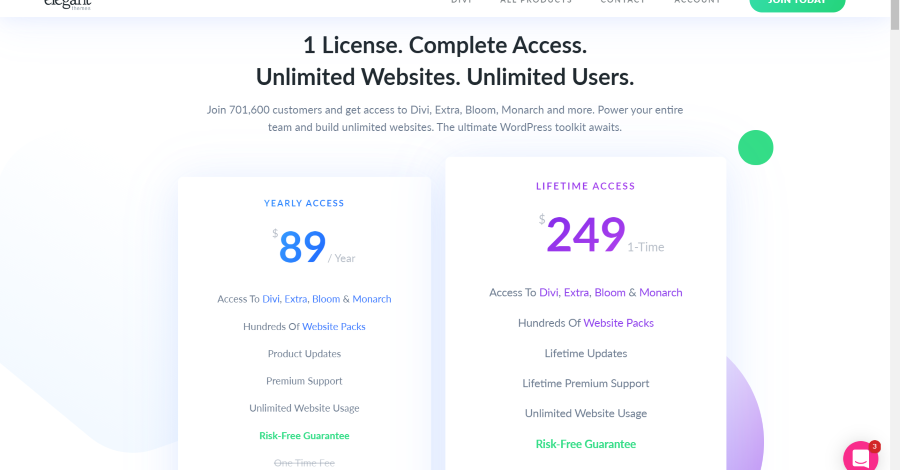
Divi is available from the company that created it: Divi . It has two purchase options:
- Yearly Access – $89 per year
- Lifetime Access – $249 1-time
Both get you the same features and tools and include access to Divi, Extra, the Divi Builder plugin, Bloom, Monarch, built-in layouts, and unlimited usage. The Divi Builder plugin is for use with other WordPress themes. Bloom and Monarch work with any WordPress theme.
The difference between the two plans is how often you have to pay to keep getting updates and premium support.
Yearly access must be paid every year to have access to the built-in layouts and get updates and support. If you end your membership you get to keep and use everything you’ve downloaded.
Lifetime access is a one-time payment and you’ll never have to pay again. You’ll always have access to updates, the built-in layouts, and premium support.
Lifetime access is our favorite option. If you can’t afford it, then we recommend purchasing yearly access until you can afford the lifetime plan. We recommend that you keep a check on sales at the Elegant Themes website. Elegant Themes runs amazing Black Friday deals and they often have special sales throughout the year for their anniversary and other occasions.
How to Download Divi
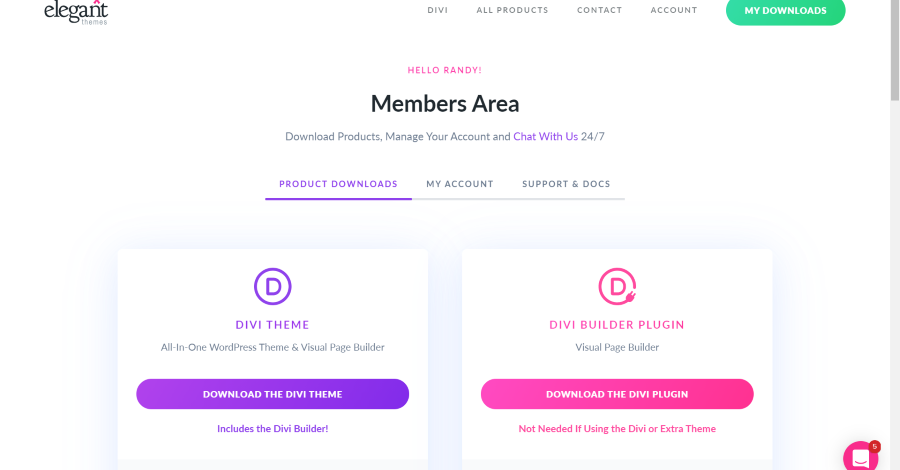
When you log into your account you’re taken to the Members Area where you’ll see a link to download the Divi theme and the Divi plugin. You only need to download the Divi theme. The plugin adds the Divi Builder to any WordPress theme, but the Divi theme already has the Divi Builder built-in. You only need the plugin if you want to use a different WordPress theme.
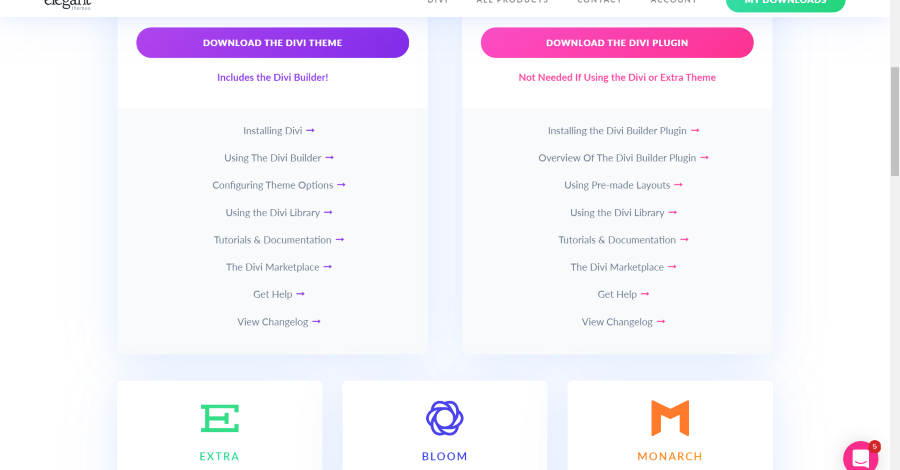
You can also access links to the product documentation. They include detailed articles on how to install the products and use them.
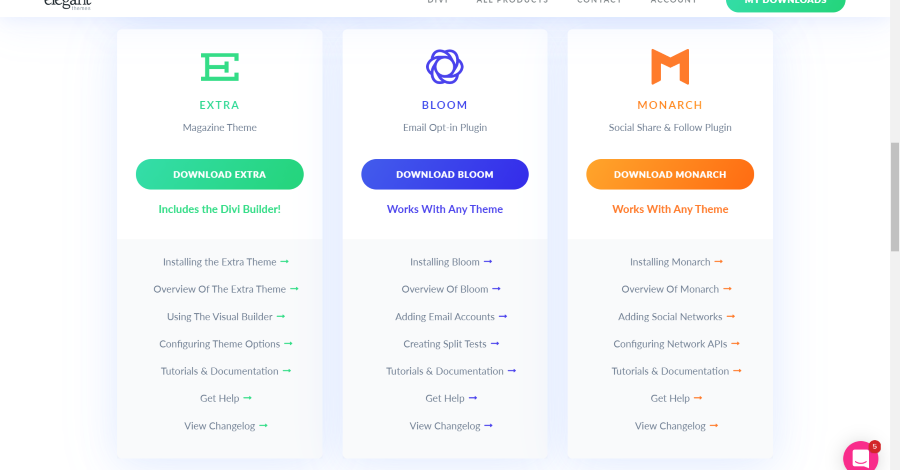
Under the Divi download area, you’ll see the other ET products. Here, you can download Extra (a magazine theme that runs on the Divi Builder), Bloom (a plugin that adds an email option form), and Monarch (and social media follow plugin). Download Divi to your computer and make a note of where you saved it.
Read More: Create and Style a Divi Menu: Add Icons and Images To The Divi Menu
How to Install the Divi Theme on WordPress
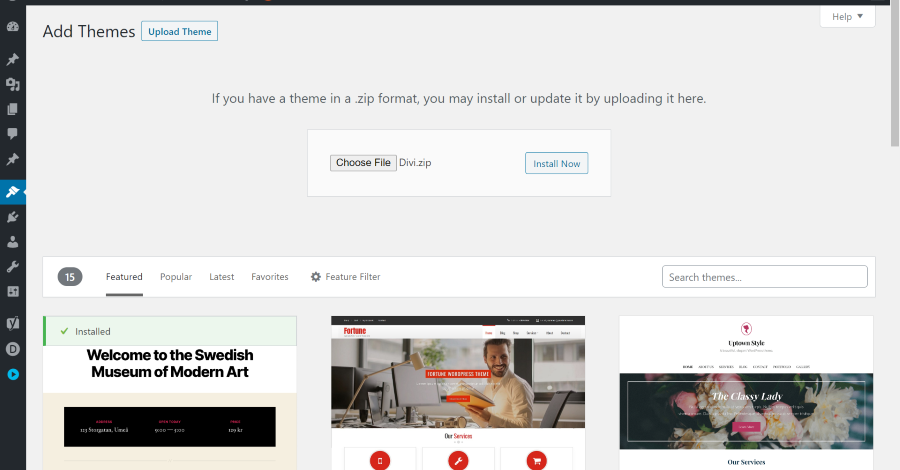
Install Divi in the Themes menu of your WordPress dashboard. Go to Appearance > Themes and click Add New at the top of the screen. Select Upload Theme. Click Choose File, navigate to the folder that you saved the download and select it, and then click Install Now. Wait for the upload to complete.
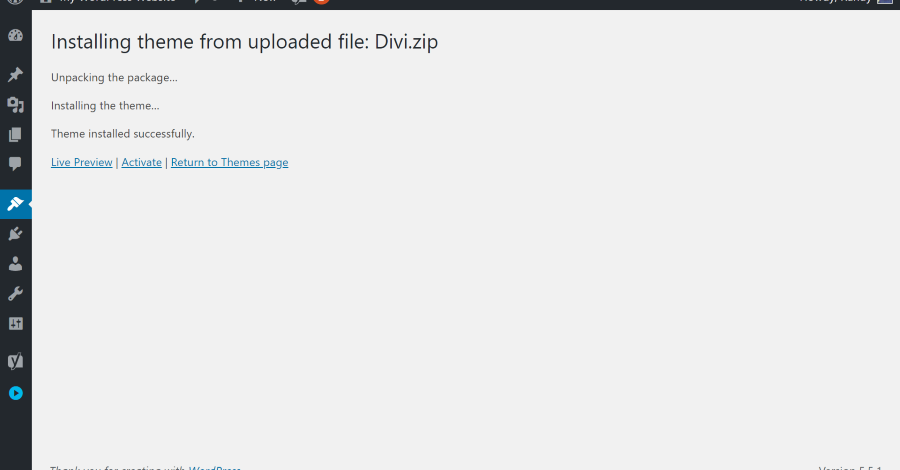
Once Divi is finished uploading, you’ll see a message informing you the upload is complete and gives you several options. Click Live Preview if you want to see how your website will look before activating Divi. Click Activate to use Divi.
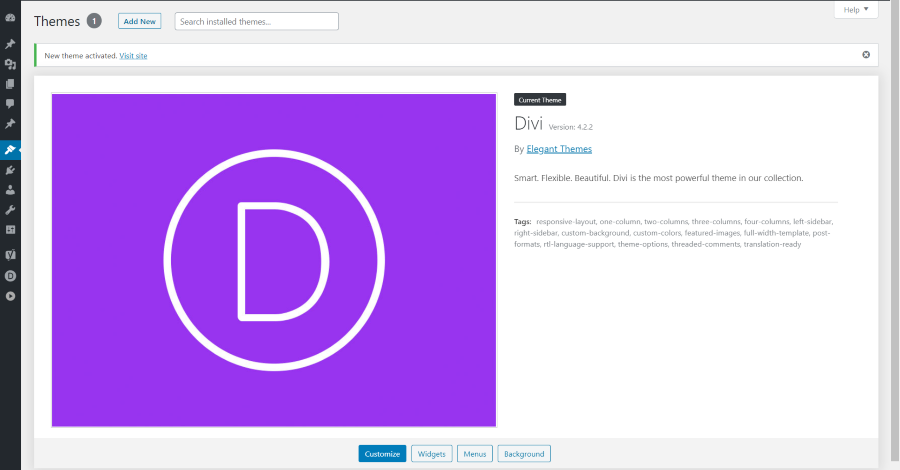
Divi is now the active theme. It won’t have any special design until you create pages or add styling to your current pages. You can now customize the site with Divi’s amazing customization tools.
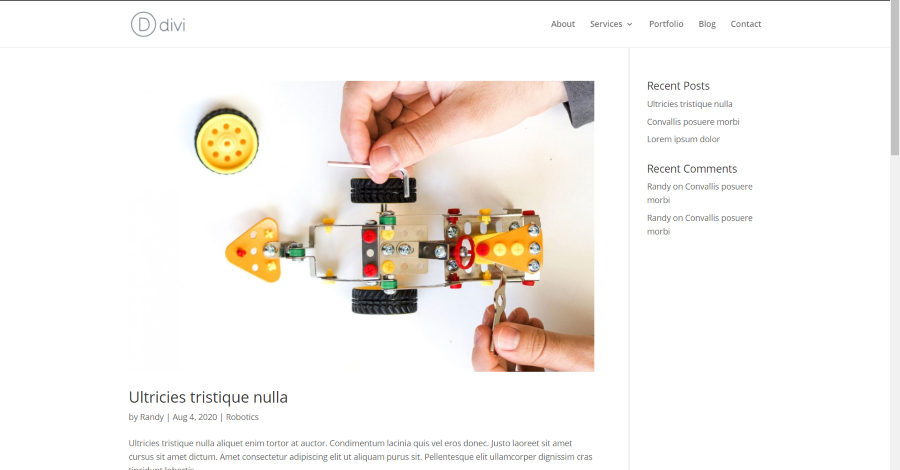
If you have blog posts and sidebars already in place, they will display as a normal blog.
Most Basic Setup
Here’s a look at the most important things to set up first once you get Divi installed and activated.
Read More: 9 Best Contact Form Plugins for Divi and WordPress
Divi API Key
To update Divi and other Elegant Themes plugins like Bloom, Monarch, and the Divi Builder, or use the layouts in the Divi Builder, you’ll need an Elegant Themes API key. This key works like a password and connects your Elegant Themes account to access the latest software updates and features. Just make sure you have an active Elegant Themes subscription to get your API key and username for authentication.
What is a Divi API key?
To obtain your Elegant Themes API key, start by logging in to the Elegant Themes website. Click on the “Account” link in the header, and use the same password you use to log in to authenticate your API keys in the Divi Theme and plugins. This password is essential for both accessing the Elegant Themes website and ensuring the security of your API keys within the Divi Theme and plugins.
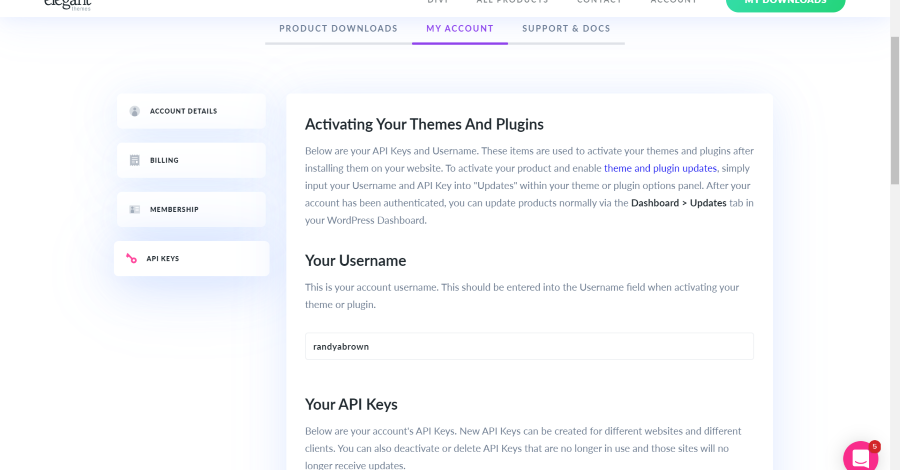
To find your Divi API key you will need to follow these steps:
- Log into your Elegant Themes account via the Account link on www.elegantthemes.com
- Navigate to Account > Username & API Keys.
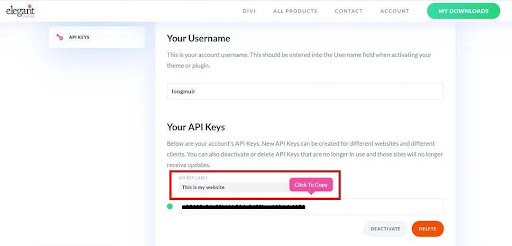
- You will see a list of your account’s API Keys. New API Keys can be created for different websites and different clients. You can also deactivate or delete API Keys that are no longer in use and those sites will no longer receive updates.
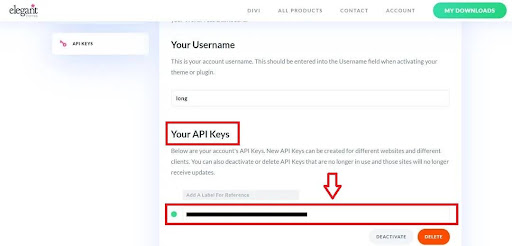
Divi API key
Read More: Divi Speed Optimization: A Comprehensive Guide
Where to add the API key?
After obtaining your API key from the Elegant Themes website client area, you can easily integrate it into your Divi Theme. To add your key to Divi, go to your WordPress dashboard and select Divi > Theme Options. When Divi Theme Options opens, select the Updates tab. Add your username and API key and save changes. You can now get updates and use the built-in layouts.
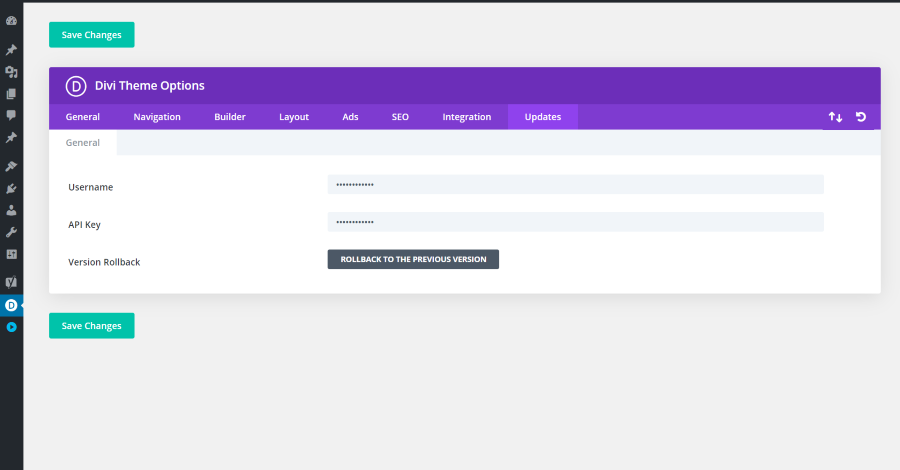
Where to Add the API Key
How to Add new API keys for clients?
When you’re building websites for clients or others, it’s a smart move to have a separate API key for each site. This way, you have the flexibility to disable or delete a specific API key and its access whenever needed, without having to access the website itself.
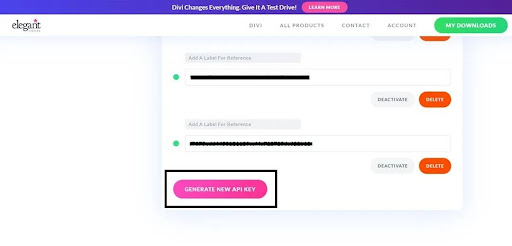
To manage this, head over to your Elegant Themes members area and navigate to “My Account” > “API Keys.” There, you’ll find the option to create new API keys under your Elegant Themes membership account. Simply click on the “Generate New API Key” button, and a fresh key will be added to your list. This provides a convenient way to control access and enhance security for each individual website you’re working on.
How to Add new API keys for clients?
Many Divi developers provide ongoing support and updates to their clients’ websites by using a unique API key. This key allows clients to receive theme and plugin updates as long as they are on a maintenance plan. Essentially, the developer grants the client access to Divi without them having to purchase it individually.
However, if a client decides to end the maintenance plan in the future, most Divi developers would want to revoke the client’s access to updates and layouts. To achieve this, the developers deactivate the API Key. This way, it becomes easy to disable or remove the website’s access to Elegant Themes’ product updates. The developer may then advise the client to obtain their own membership, possibly through an affiliate link, to continue receiving Divi updates and layouts.
Read More: How to Clear Divi Cache for Enhanced Performance – A Step-by-Step Guide
How to manage multiple API keys?
The Elegant Themes API dashboard lets you make new API keys. These keys show up in your API Keys section. In that section, you can:
- Give each key a label so you remember which key is for which website.
- Easily copy a key by clicking a button. You’ll get a notification when it’s copied.
- Turn off any specific key for a while if you don’t want it active. You can turn it back on later if you need to.
- Delete any key permanently if you don’t need it anymore.
How to manage multiple API keys?
Should you deactivate or cancel a Divi API key?
If your old client has disappeared and stopped paying for the maintenance plan you set up, it’s time to cut off their access to Divi updates through your Elegant Themes membership. To do this, log in to your Elegant Themes members area and head to My Account > API Keys. Find the right key, and then either deactivate it, which gives you the option to reactivate later, or delete it permanently.
Deciding whether to deactivate or cancel API access on a Divi website is your call. Generally, many Divi developers only grant clients access to Elegant Themes products through their API if they’re on a paid maintenance plan. Some may insist that clients purchase and use their own Elegant Themes membership from the get-go, but it’s ultimately your choice. According to Elegant Themes licensing terms, you’re allowed to use your API key on any client’s website.
Logo
You’ll want to add your logo to your website. Fortunately, Divi lets you upload a custom logo in the theme options. Logo is the first option in the General tab. Select Upload.
Upload or choose your logo from your Media library. Click Set As Logo. Save changes.
Read More: Divi Logo Guide: Resize, Reset, and Style Like a Pro
Social Media Links
Divi Social Media Links
Divi allows you to add social media icons with links to your accounts in the footer. In the Divi Settings General tab, scroll down until you see toggles to enable the accounts you want to use. Disable any accounts you don’t want to use. If you keep them enabled, the icons will display in the footer. Delete the hashtag and add the URL to your social media pages.
Read More: Designing Flawless Websites: Tips, Tricks, and Divi Enhancements
Optional Settings
Several settings are optional but very helpful when you first get started. The sooner you set them up the better, so I’ve included them here.
Classic Builder
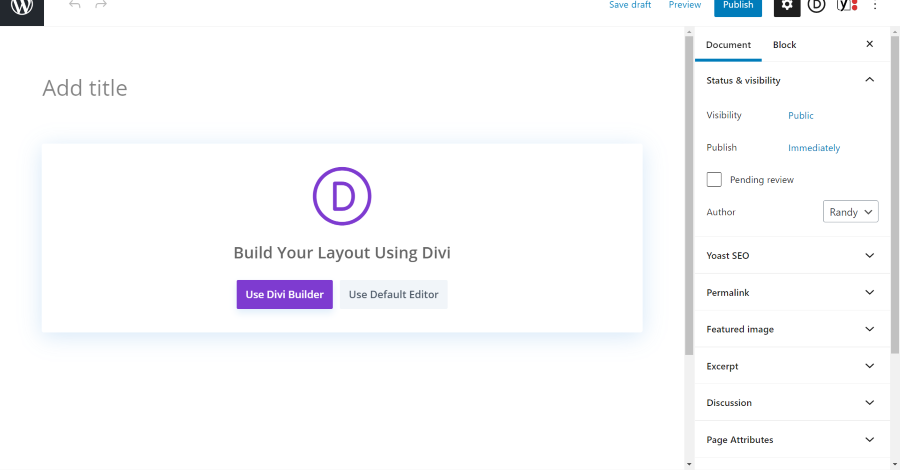
By default, when you create a page or post, WordPress will use Gutenberg. This allows you to build on the backend and includes a button to build with Divi on the frontend. Whether you use the original editor or Gutenberg is just a matter of preference.
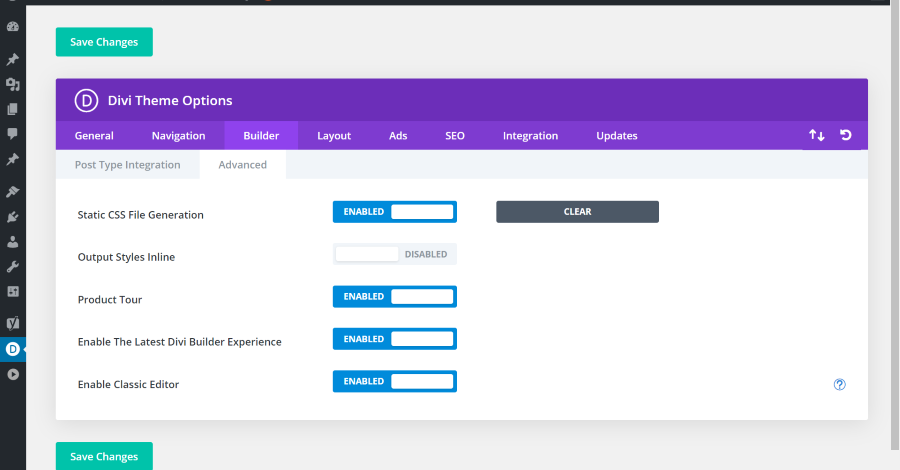
If you want to use the Divi Builder on the backend, you can enable the WordPress Classic Editor. In the Divi Settings, select Builder > Advanced and click the button to enable the Classic Builder and then save changes.
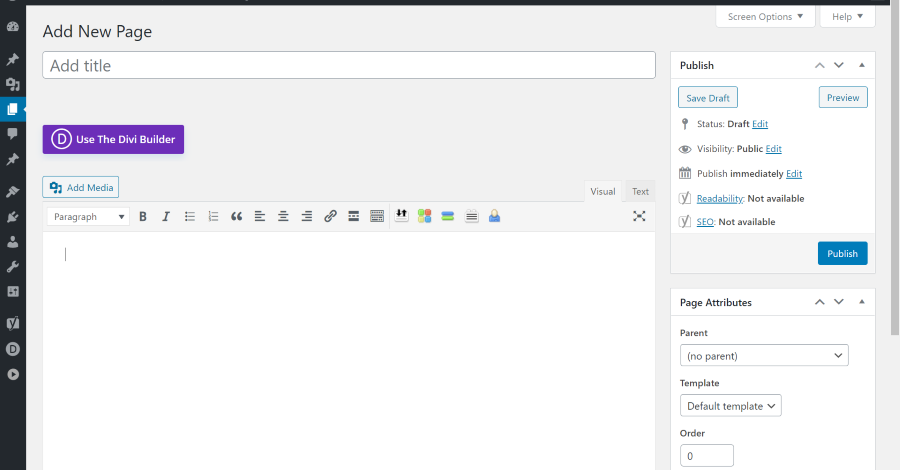
Now, when you create a new page or post you’ll see the Classic Builder with a button to enable the Divi Builder if you want to use it. Once you enable the Divi Builder, you’ll be able to build on the backend or frontend.
Secondary Menu
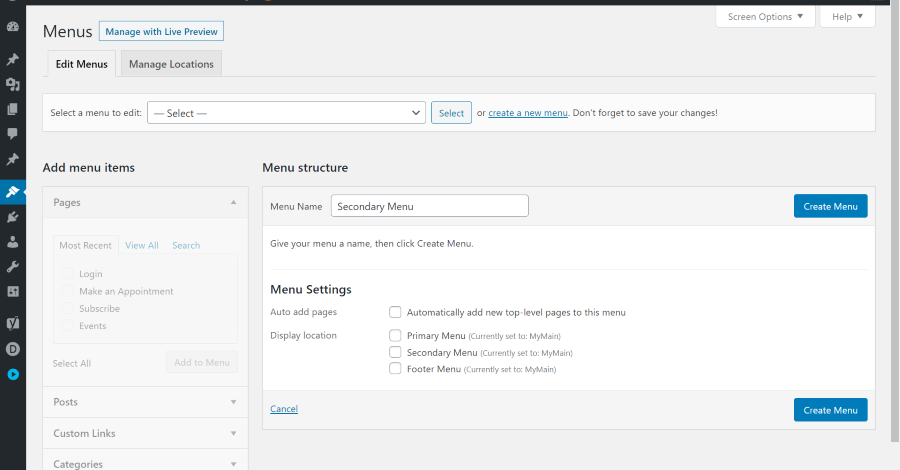
Divi adds a Secondary Menu that appears above the main menu. To create a Secondary Menu and assign it so it will display, go to Appearance > Menus in the WordPress dashboard and click create a new menu in the section called Select a menu to edit. Add a name for the menu and click Create Menu.

Create your menu and select Secondary Menu to assign it. Save the menu.
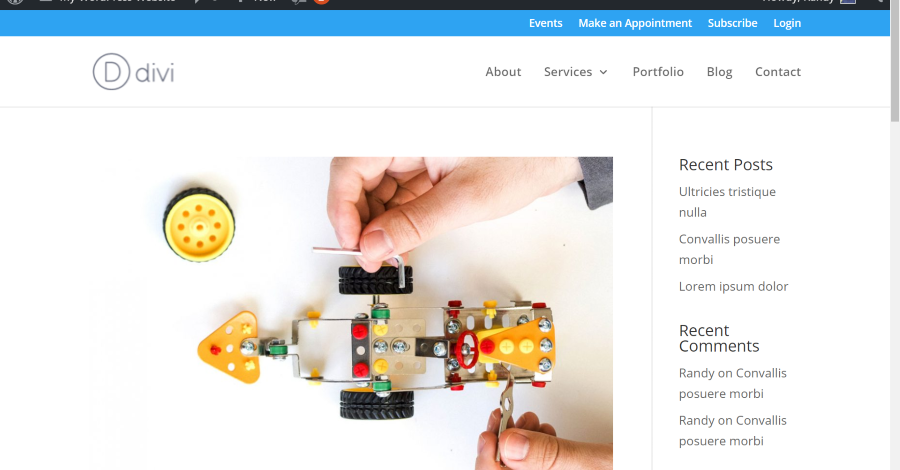
The Secondary Menu now appears above the Primary Menu. My secondary menu is showing in blue in the example above.
Read More: Divi AI: How to Create a Landing Page with AI
Google Analytics
Google Analytics plays a crucial role in helping you grasp where your website traffic originates and how users interact with your content. With just a few simple clicks and by inserting specific code snippets, you can effortlessly integrate this robust statistical tool into any Divi website. It provides valuable insights into the sources of your traffic and the way visitors engage with the content on your site.
Google Analytics provides valuable information about how people interact with your website, like how many views your pages get, how long visitors stay, and whether they leave right away or explore more. This data helps you improve your web pages to get more people to take action, like making a purchase or signing up. By understanding what users do on your site, you can make smarter choices about how it looks and how you promote it in the future.
Understanding Google Analytics and Its Impact on Your Website
Integrating Google Analytics into your Divi theme is a smart move for Divi users. It helps you understand your website traffic and user behavior, offering valuable insights. With this integration, you can access important data like the number of visitors, average time spent on pages, and where your visitors are located.
This data is crucial for making informed decisions about your website’s functionality and design, paving the way for maximum success. Divi users benefit greatly from Google Analytics as it enables them to identify strategies to boost visitor engagement and enhance their search engine optimization efforts.
By having Google Analytics in place, Divi users can gather the information needed to achieve their goals and provide an exceptional user experience. It’s a tool that goes beyond just numbers – it empowers users to refine their strategies, improve website performance, and ultimately succeed in their online endeavors.
Read More: Getting Started with Divi: Theme Options – General Tab
Key benefits of adding Google Analytics to your Divi theme
Here are some of the key benefits of adding Google Analytics to your Divi theme:
Gain Insights Into Your Website’s Visitors
Google Analytics is like a magnifying glass for your website. It helps you figure out where your visitors come from and what they do once they’re on your site. With this info, you can tweak your Divi website to make it even better and find smarter ways to promote your business.
Discover the Impact of Your Marketing Strategies
Google Analytics offers insights into which marketing strategies are bringing the most visitors to your website. This data is valuable for deciding where to invest your marketing budget. By identifying the most effective strategies, you can focus on those that drive more traffic and ultimately lead to more sales.
Spotting Problems on Your Website
Google Analytics is a valuable tool that can help you pinpoint issues with your website. For instance, if you notice a sudden drop in the number of visitors, you can use Google Analytics to dig into the reasons behind it and make necessary improvements. This way, you stay on top of your site’s performance and address any issues promptly.
Track Important Performance Metrics
Google Analytics is a handy tool to measure your website’s performance. It allows you to keep tabs on various aspects, such as the number of people making purchases, how much time visitors spend on your site, and the count of those who leave without exploring anything. It’s like having a virtual eye on your online space, helping you understand what’s working well and what might need improvement.
Gain Comprehensive Reports
Google Analytics is a powerful tool that offers detailed reports customized to suit your requirements. With it, you can create reports displaying information for particular timeframes, locations, traffic origins, and more. It allows you to dig deep into your website’s data, helping you understand your audience and how they interact with your site. Whether you want to know the performance over a specific period, the regions where your visitors are coming from, or the sources driving traffic to your site, Google Analytics has got you covered.
Read More: Common Divi Contact Form Issues & How to Fix Them?
Setting up Google Analytics for Your Divi Website
Now that you see the importance of using Google Analytics, let’s set up your Google Analytics account and add a tracking code to your Dive website. This will help you gather valuable insights and information about the performance of your website.
Getting Started: Setting Up Your New Google Analytics Account
To start using Divi Google Analytics, the first thing you need to do is create a new Google Analytics account. This setup lets you keep track of who’s visiting your website and how they’re interacting with the pages you’ve built using Divi.
Getting started with Google Analytics is easy. You just have to sign up using an email address, your website’s URL, and your name to confirm the account. This way, you’ll be all set to monitor your website visitors and their activities on your Divi-powered web pages. Visit: Google Analytics for setting up your google analytics account.
To get started, simply click on the button labeled “Start Measuring.” This will take you to a page where you can set up your account.

Google Analytics Account
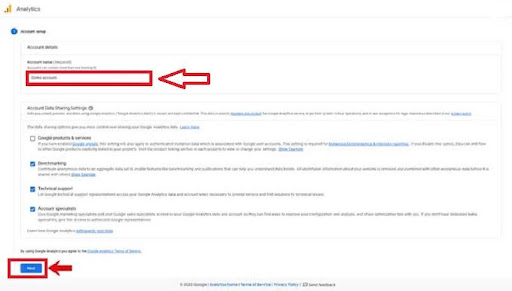
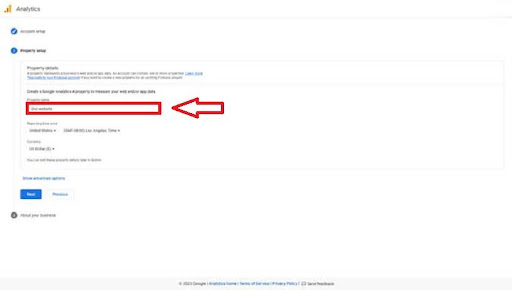
Giving Name to Google Analytics Property
In this next part, you need to give a name to your Google Analytics property in the property details section. Below that, you have the option to change the country and currency settings. Feel free to make these adjustments according to your preferences. To proceed click on the blue Next button.
Check the option that apply to you
On the next screen, you can check the options that apply to you.
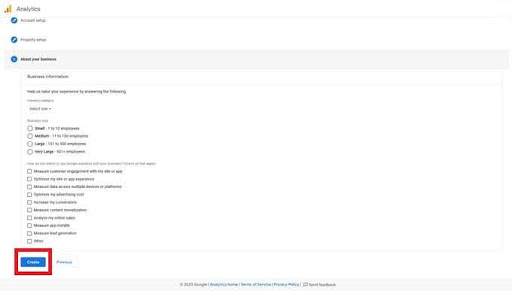
Create button at Google Analytics
Read More: Introducing All-New Divi Code AI
Once you hit the ‘Create’ button, a pop-up will appear showing the Google Analytics Terms of Service Agreement. You’ll need to accept this agreement to move forward. After that, your Google Analytics account will be successfully set up.
Get your Google Analytics tracker code
We suggest taking a tour of the Google Analytics dashboard to become familiar with it. To get a tracking code, start by creating a data stream. Click on “Web” since we’re setting this up for our Divi website. Once you’ve done that, you’ve successfully set up a Google Analytics account.
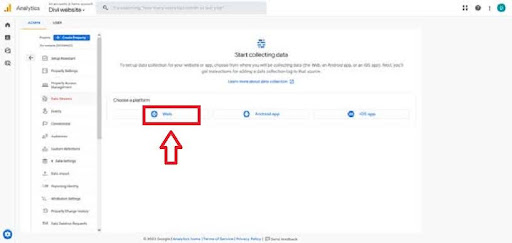
Web Data Stream
Enter your website’s URL and choose a name for the stream (it can be anything you like). Click the “Create stream” button to proceed.
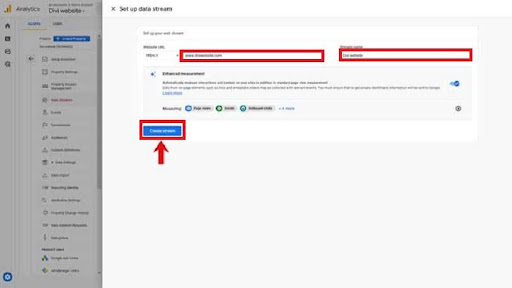
Entering website’s URL
After you click, you’ll see another screen. Switch to the “Install manually” tab there. You’ll find your global site tag code. Just copy that code.

“Install manually” option at Google Analytics
Read More: Fixing Divi Bugs: Effective Solutions and Troubleshooting
Connect Google Analytics to Divi
Head over to your WordPress admin dashboard and click on “Divi.” From there, go to “Theme Options” and find the “Integration” section. In the provided “Add code to the < head > of your blog” field, paste the Global site tag code.
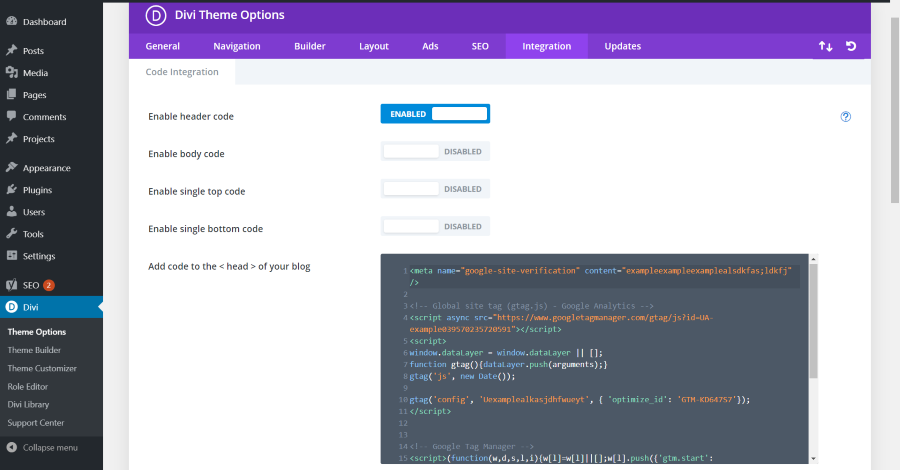
Add code to the head of your blog
Integrating Google Analytics into your Divi website is a straightforward and powerful way to boost your site’s performance. By having access to live data, you can tweak your web pages to increase conversions. Google Analytics also provides valuable insights into how users interact with your site, helping you make informed decisions about design and marketing strategies moving forward. It’s like having a real-time guide to understand and enhance your website’s effectiveness.
Ending Thoughts
That’s our look at how to purchase Divi and get it set up to start building your website. Divi has a lot of options that we haven’t covered here, but we’ll visit many of them in future articles. These are the basic options and the most common optional settings that you’ll need as soon as you install Divi.
This is the second article in this series for getting started with Divi. Be sure and check out the first article, Getting Started with Divi: What is Divi?, and stay tuned for part three of this series where we’ll cover how to create pages with the Divi Builder.
We want to hear from you. Are you new to Divi? Let us know about your experience in the comments.


0 Comments