In the fast-paced digital realm, the speed and responsiveness of your website is essential for user experience. One pivotal aspect of optimizing your WordPress site, especially when powered by the widely acclaimed Divi theme, is efficient cache management.
In this step-by-step guide, we will unravel the intricacies of clearing Divi cache to elevate your website’s performance.
Understanding Divi Cache
What is Cache?
What is Divi Cache?
Divi cache is a dynamic component integral to Divi, designed to enhance website speed and efficiency. Essentially, it stores previously loaded resources, such as images and stylesheets, so that when a visitor returns to your site, the content can be delivered swiftly without reloading everything from scratch.
Why Clear Divi Cache?
While the cache significantly boosts load times, there comes a time when clearing it becomes imperative. Why? Clearing Divi cache ensures that visitors view the most recent version of your website.
It prevents outdated content display and guarantees a seamless, up-to-date user experience.
Before You Begin
Before delving into the step-by-step process of clearing Divi cache, there are essential preparatory steps to ensure a smooth operation.
Backup Your Website
Backing up your website is a cardinal rule before making any significant changes. While clearing cache is generally a routine operation, unforeseen issues can arise. Having a recent backup ensures that you can swiftly revert to a working version in case of any complications.
Check for Updates
Before initiating the cache-clearing process, it’s imperative to confirm that both your Divi theme and WordPress are up-to-date. Compatibility issues may arise if your theme or WordPress version is outdated, potentially leading to unforeseen glitches.
Stay on the cutting edge by updating both Divi and WordPress to their latest versions.
Step-by-Step Guide
Clearing Divi Cache
Now that we’ve laid the groundwork let’s delve into the step-by-step process of clearing Divi cache. Following these instructions ensures that your website operates at its peak performance.
Accessing Divi Dashboard
- Login to your WordPress Admin Dashboard:
- Navigate to your website’s admin dashboard by entering your credentials.
- Navigate to the Divi Theme Options:
- Once logged in, locate the “Divi” tab in the left-hand menu.
Locating Cache Settings
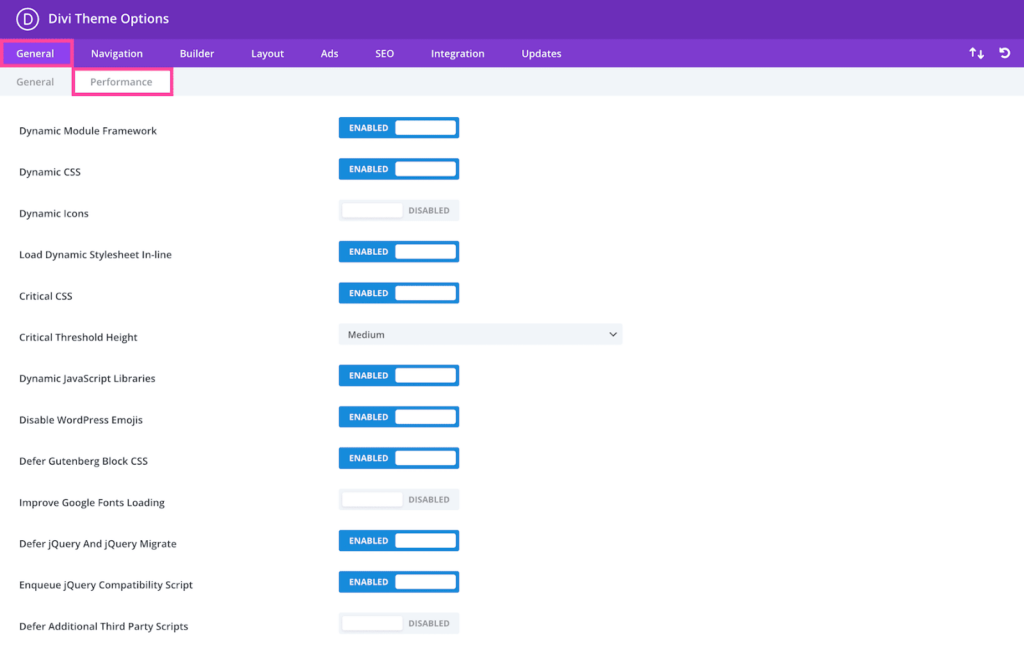
Divi Cache Settings In The Divi Theme Options
- Navigate to the “General” Tab:
- In the “Theme Options” panel, find the “General” tab.
- Locate the “Performance” Section:
- Scroll down to find the “Performance” section within the “General” tab.
Clearing Divi Browser Cache
- Understanding Browser Cache:
- Before clearing, grasp the significance of browser cache. It stores elements of your website for faster loading on subsequent visits.
- Navigate to Browser Cache Settings:
- In the “Performance” section, find and click on “Clear” next to “Browser Cache.”
Clearing Divi Page Cache
- Purpose of Page Cache:
- Page cache accelerates loading times by storing entire pages.
- Locate Page Cache Clearing Option:
- Within the “Performance” section, click on “Clear” next to “Page Cache.”
Clearing Divi Minified CSS and JS
Clearing CSS Cache
- Importance of Minified Files:
- Compressed CSS and JS files contribute to faster page loads. Learn why it’s crucial.
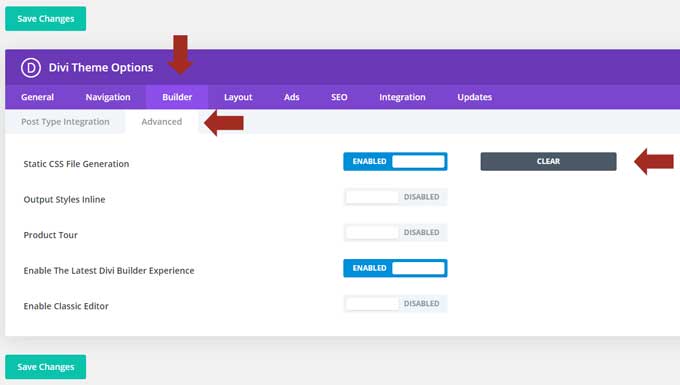
- Clear Minified CSS and JS:
- Under “Performance,” click on “Clear” next to “Clear Divi’s minified CSS and JS.”
Verifying Cache Clearance
- Check Site Performance:
- After clearing cache, ensure changes reflect on your live site.
- Additional Verification Steps:
- Explore any additional steps or tools to verify successful cache clearance.
Common Issues and Troubleshooting
Even with a detailed cache-clearing process, occasional hiccups may occur. Here’s a quick guide to address common issues and troubleshoot any challenges that may arise.
Changes Not Reflecting
Possible reasons:
- Browser Cache: Local browser cache may not reflect immediate changes.
- CDN: Content Delivery Network caching might delay updates.
Solutions:
- Advise users to clear their browser cache manually.
- If using a CDN, ensure it’s configured to update promptly.
Website Errors After Clearing Cache
Possible Reasons:
- Incompatibility: Plugins or theme elements may not be compatible.
- Cache Conflict: Interference with other caching mechanisms.
Quick Troubleshooting Tips:
- Disable plugins one by one to identify conflicts.
- Ensure the server-side caching aligns with Divi’s settings.
Best Practices
Ensuring optimal performance isn’t a one-time task but an ongoing commitment. Here are some best practices to consider for efficient Divi cache management.
Regular Cache Maintenance
Frequency:
- Encourage users to make cache clearing a routine practice.
- Specify an optimal frequency based on website updates and changes.
Automation:
- Explore options for automating cache clearance through plugins or server-side solutions.
Consider Using a Cache Plugin
Benefits:
- Highlight the advantages of using a dedicated cache plugin.
- Mention popular plugins compatible with Divi for extended functionality.
Installation Guide:
- Briefly outline the steps to install and configure a cache plugin with Divi.
Conclusion
Cache is Cleared
In the realm of website optimization, the efficient management of Divi cache emerges as a key player in delivering a seamless user experience. Clearing the cache not only ensures faster load times but also guarantees that your audience interacts with the latest version of your content.
As we conclude this step-by-step guide, remember that periodic cache maintenance is not just a recommendation; it’s a proactive strategy for sustaining optimal website performance. By following the outlined steps and embracing best practices, you empower your website to operate at its full potential.
In your journey to a faster and more responsive website, the simplicity of clearing Divi cache belies its profound impact. Regularly revisit this guide, stay informed about updates, and consider integrating cache plugins to refine your website’s efficiency further.
Thank you for entrusting us with your quest for enhanced website performance. Happy caching!
Frequently Asked Questions (FAQs)
Q1: How often should I clear Divi cache?
The frequency of cache clearance depends on how frequently you update your website. If your content undergoes regular changes, consider clearing the cache at least once a week. For less dynamic sites, a monthly clearance might suffice.
Q2: Can I automate the Divi cache clearance process?
Divi itself doesn’t provide native automation for cache clearance. However, you can explore third-party plugins that offer scheduling features. These plugins can automate the cache clearance process based on your specified intervals.
Q3: What happens if I don’t clear Divi cache?
While Divi cache is designed to enhance performance, not clearing it might lead to outdated content display. Visitors may not see the latest updates, affecting user experience. Regular cache clearance ensures your audience interacts with the most recent version of your website.
Q4: Are there risks associated with cache clearance?
Clearing Divi cache is generally a safe process. However, in rare cases, it might lead to temporary glitches like CSS issues or delayed loading on the first visit after clearance. These issues usually resolve on subsequent visits. Always back up your site before making significant changes to mitigate potential risks.
Q5: Can I use multiple cache plugins with Divi?
Using multiple cache plugins simultaneously is not recommended, as they may conflict with each other. Divi has built-in cache management, and if you need additional features, consider using a dedicated plugin that is compatible with Divi. Always test any new plugin in a staging environment before applying it to your live site.


0 Comments