Looking for a simple way to create an attractive promo bar for your website? In this easy-to-follow guide, you’ll discover how to effortlessly incorporate customizable promo bars throughout your Divi site using its basic features.
You have the flexibility to design promo notification bars and assign them to any page or post type you desire! It only requires a bit of code, and we’ll guide you through the process step by step. So, let’s dive in and craft an eye-catching promo bar in Divi!
To Create a promo bar by using DIVI without any plugins follow these steps:
- Add a section module on top of the global header
- Add JQuery code to add a clickable functionality to the close button
Step 1: Add a section module on top of your existing global header
Customize the Layout Using the Divi Theme Builder
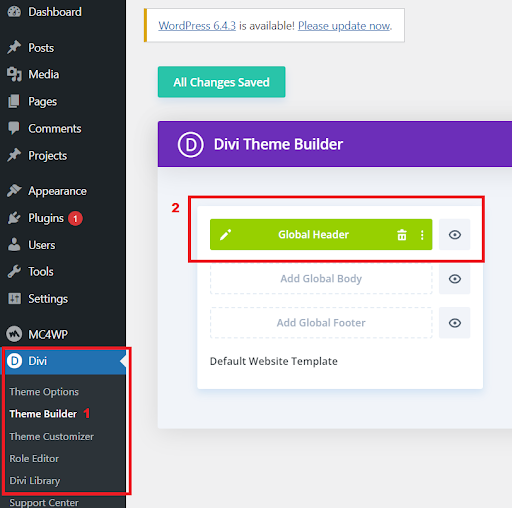
Customizing your promo bar becomes a breeze with Divi and its Theme Builder. The beauty of it lies in the extensive control it offers. Whether you fancy having a promo bar exclusively on your shop pages, blog posts, or a specific page, you can make it happen. How? Simply assign the desired pages or post types within the Divi Theme Builder. Navigate to Divi > Theme Builder. If you’re already using the Theme Builder with a header or global header, that’s where you’ll make your adjustments. The flexibility is yours to explore!
Read More: How to Backup Your Divi/WordPress Site
Customize the Layout Using the Divi Theme Builder
Include a section featuring a three-column row, as illustrated in the accompanying image.
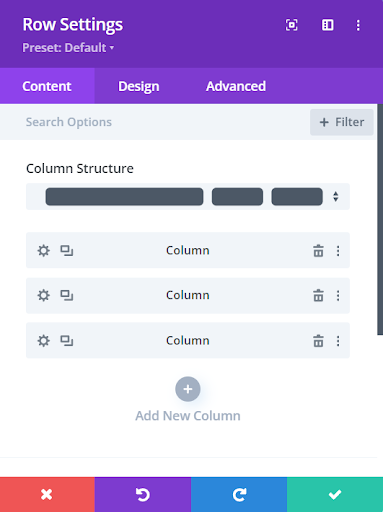
Row having three columns
Design your promo bar in the Divi Builder
To kick off, start by crafting your promotional bar within the Divi Builder. Feel free to mix and match various Divi Modules to suit your preferences. A standard setup might involve using a text module, a button, and a close button, similar to what we’ve demonstrated in our example.

Promo Bar
Set Up The Divi Promo Bar Close Button
To give your website visitors the option to hide the Divi promo bar, we’ll need to tweak some CSS classes, IDs, and add a bit of code. This way, when someone clicks to close it, the section will vanish. Don’t worry, the next three steps are straightforward, and each one plays a crucial role.
Read More:Autoplaying Videos in Divi: Unveiling 3 Methods Without the Need for Plugins
Adding A Close X Button
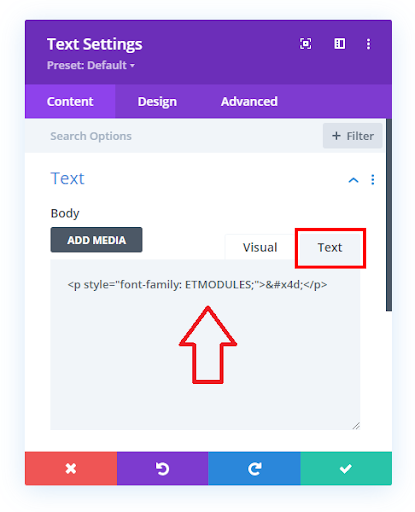
To begin, incorporate a close icon (X) into your section. It’s a straightforward process, especially with Divi’s built-in icon font. Just utilize the icon code for “X” within your layout by adding a Text Module to the section and pasting the following code:
<p style="font-family: ETMODULES;">M</p>
Keep in mind that occasionally it may appear as an “M” for unknown reasons. However, if you use M as the icon code, it will still display correctly on the front end. This code is sourced from the ETmodules icon font family.
Add the above code accordingly as shown in the image:
Adding A Close X Button
Adding CSS ID To Close X Button
Don’t forget to assign a CSS ID to the “Close X Button” containing the icon code. Simply navigate to the module where you added the code for the icon and access the settings. Within the Advanced tab, toggle open the CSS ID & Classes section, then insert the ID ‘close-promo’ into the designated CSS ID input field.
Read More: Adding Divi Theme Fade-in Effect to Text, Images, Modules and Buttons
Adding ID to the X icon
Adding CSS Class to the section
The final step in setting up the Divi promo bar section is to assign a CSS class to it. Here’s how to do it: First, navigate to the section settings and click on the Advanced tab. Then, toggle open the CSS ID & Classes option. In the input field labeled CSS Class, type in “promo-bar” and hit enter. This class will help you customize the promo bar section according to your preferences.
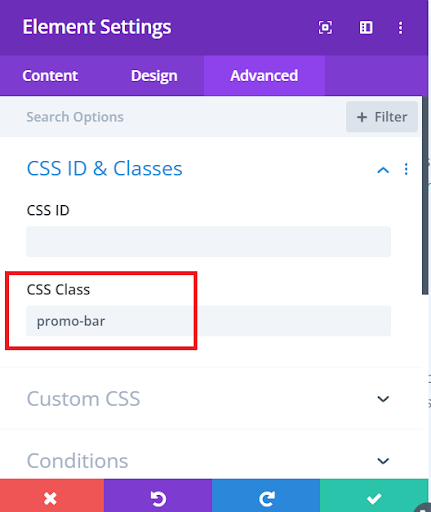
Adding a class to the section
Read More: How To Make A Divi Sidebar Menu
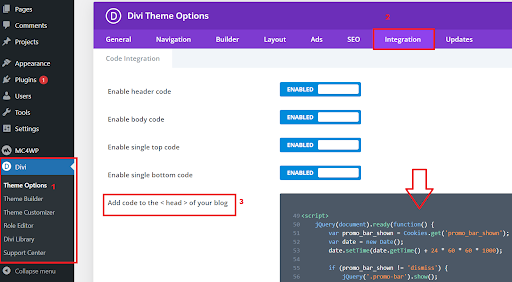
Step 2: Adding JQuery code to add a clickable functionality to the close button
Paste this code in your Divi > Theme Options > Integrations tab in the “Add code to the < head > of your blog” code area.
Copy the JQuery Code from here
To get our Divi promo bar functioning properly, the initial bit of code involves jQuery. This code serves the purpose of concealing the promo bar when a visitor clicks the close or hide button. The crucial element here is the ID #close-promo, which represents the button triggering the action. So, when a user clicks the X icon, it essentially becomes the signal for the entire section to disappear. This happens seamlessly due to the CSS class we incorporated into the section, making the whole process intuitive for the user.
Adding the code to the Divi Dashboard
#close-promo:hover {
	cursor: pointer;
}
Adding a mouse pointer when hovering over the X icon
Read More: Mastering Divi Mobile Menu: A Step-by-Step Guide to Personalizing and Styling
Paste this code in your Divi>Theme Options>Custom CSS code box.
Conclusion:
In conclusion, crafting an appealing promo bar for your website using Divi Theme Builder is a straightforward process. By following the steps outlined in this guide, you can seamlessly integrate customizable promo bars across your Divi site without relying on plugins. The Divi Theme Builder empowers you with the flexibility to design and assign promo bars to specific pages or post types effortlessly.
Starting with the addition of a section module on top of your global header, you can then leverage the Divi Theme Builder to customize the layout according to your preferences. The three-column structure, as depicted in the provided image, adds a visually appealing touch to your promo bar.
Furthermore, the guide walks you through the process of designing the promo bar in the Divi Builder, suggesting the use of Divi Modules like text, button, and close button for a standard setup. The inclusion of a close button allows users to hide the promo bar, and with the provided jQuery code, this functionality is seamlessly implemented. The code ensures that when a visitor clicks the close button, the entire promo bar section gracefully disappears.
Remember to add the provided jQuery code to your Divi Theme Options in the Integrations tab to enable this functionality. Additionally, a nice touch is the CSS customization for the X icon, adding a pointer when hovered over, enhancing the user experience.
By following these steps, you can create an eye-catching and functional promo bar on your Divi-powered website, providing a dynamic and engaging element for your visitors.
Read More: How To Create A Divi Mega Menu


0 Comments