Updating logos on a website can be a real hassle, especially if you’ve got different headers for various pages. Imagine having to switch out each logo image manually—tedious, right? Well, Divi comes in clutch here. It’s got a nifty feature that lets you use a dynamic logo. This means you can save loads of time! In this guide, we’ll walk through using a dynamic logo in Divi’s Fullwidth Menu Module. Let’s dive in!
The Benefits of Incorporating a Dynamic Logo
The dynamic logo feature in Divi simplifies the process of changing website logos by allowing users to update them in one central location. This change automatically reflects across all modules utilizing the dynamic logo, streamlining the editing process. This proves particularly beneficial for headers and becomes even more advantageous when managing multiple menu modules, saving time and reducing the risk of oversight.
But why would Divi users need multiple menu modules? Well, the Divi Theme Builder empowers users to create diverse headers for various pages on their websites, unlocking a range of design possibilities. It’s common to have distinct headers for the homepage, blog, services page, CTA landing page, and more. Often, these headers may share the same logo. Without the dynamic logo option, users would have to manually update the logo in each menu module within every header template. Even using copy and paste features requires navigating through each template, making the dynamic logo a valuable time-saving tool for Divi users.
Using a Dynamic Logo in the Fullwidth Menu Module
Let’s begin by opening the Fullwidth Menu Module where you’d like to incorporate a dynamic logo. In this case, we’re making changes to the header template using the Divi Theme Builder. Assuming you’ve already set up a Fullwidth Menu Module with a chosen logo, follow along for the next steps.
Access the Divi Theme Builder Interface
To enable a dynamic logo, navigate to the WordPress dashboard, click on “Divi,” and then access the “Theme Builder.” Select the edit icon for the header you want to modify. Wait for the editor to open.
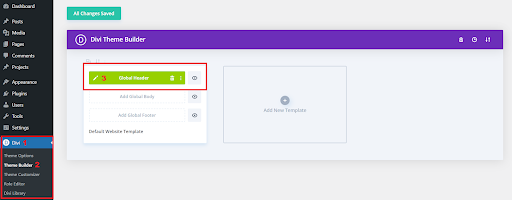
Divi Theme Builder Interface
Transform the Logo into Dynamic Content
Proceed to the Fullwidth Menu Module settings by clicking on its gear icon.

Module Settings
Within the Content tab, navigate to the Logo section. Hover over the logo image and utilize the trash can icon for removal, or opt for the circular reset icon as an alternative.
Logo Settings
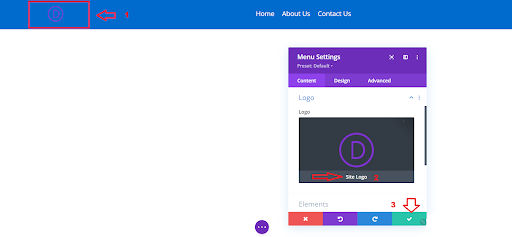
Now, hover over the image section to unveil the Dynamic Content icon. Click on the icon to explore the various Dynamic Content options. This will open a modal containing numerous options. Choose “Site Logo” from the top section.
Selecting Site Logo
Once you’ve selected the new logo, you’ll notice it appearing in the menu at the top of your website, as specified in the Divi Theme Options. Beneath the logo in the Logo selection settings, you’ll see a message that says “Site Logo,” indicating that the module is now showcasing the dynamic logo. To complete the process, click the green button to close the module.
Setting up the SiteLogo
Next, save the layout by clicking the green Save button in the lower right corner and clicking the X in the upper right corner to close the Divi Theme editor.
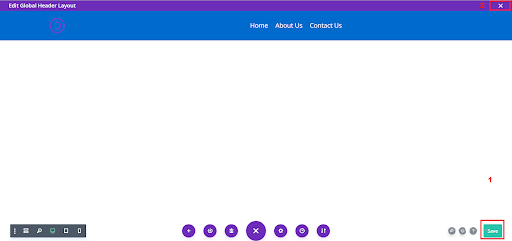
Divi Theme editor with the upper right ‘X’
Now, select “Save Changes” located in the upper left corner of the Theme Builder interface.
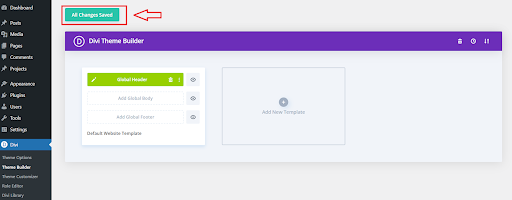
Theme Builder Save Changes
When you set a dynamic logo for the Fullwidth Menu Module, the new logo will automatically show up on the front of your site. You don’t have to manually update it here because it changes dynamically. To get more details on using dynamic content with Divi, look up “dynamic content” on the Divi Cake Blog. Remember to follow these steps for each Fullwidth Menu Module where you want the logo to be dynamic. It’s a good idea to do this while you’re making or copying headers. Let’s now learn how to edit the Divi logo to make it change in the Fullwidth Menu Module.
Let’s Change the Divi Dynamic Logo
Next, let’s learn how to choose the logo for your Divi website. You can switch logos easily without diving into complex menus. To do this, head over to “Divi” and click on “Theme Options” in your WordPress dashboard. Under the “General” tab, there’s a section called “Logo.” Here, you’ll find options to upload, reset to default, or modify your logo by providing its URL. If you already have a logo set up, it’ll be displayed there. Simply click on the “Upload” button to pick a new image or select from your Media Library. Once done, your new logo will be ready to shine on your site!
Changing the Divi Dynamic Logo
When you do this, it will take you to a folder with all your media. You can pick an image you already have saved or add a new one. Find your logo and then click on “Set As Logo” in the bottom right of the media folder screen.
Read More: 25 Best Free Divi Layouts in 2024
Selecting the logo image
Simply click on “Save Changes” in the upper left corner of the screen, just above the Divi Theme Options. After doing this, any template that uses the Fullwidth Menu Module with the dynamic logo setting will now display your updated logo automatically.
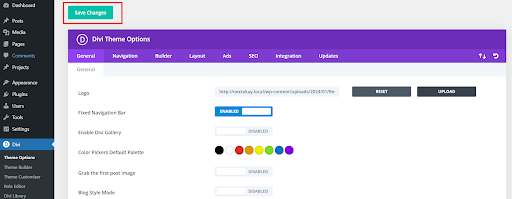
Saving Changes
Now, if you take a look at the front end of my website, you’ll notice the new logo is there. Surprisingly, I didn’t go into the Theme Builder to make any changes. The system automatically updated the logo across all Fullwidth Menu Modules using the dynamic logo feature. To illustrate, let’s say we open any of the templates in the Theme Builder. You’ll see the updated logo in the Homepage Header Layout, and we didn’t have to do anything extra for this change. It just happened seamlessly.
Read More: 12 Highly Responsive Divi Carousel Plugins and Layouts in 2024
Final Look
Dynamic Logo in Divi
Conclusion
Implementing a dynamic logo within Divi offers a game-changing advantage for website management, particularly in handling multiple headers and menu modules. The time and effort saved by utilizing this feature are substantial, ensuring seamless logo updates across various templates without the need for manual intervention.
With Divi’s dynamic logo functionality, the hassles of individually updating logos within different modules become a thing of the past. Through a simple process within the Theme Builder and Theme Options, users can efficiently set and modify logos across their website, experiencing automatic updates across modules using the dynamic logo setting.
In essence, the incorporation of dynamic logos streamlines website customization, empowering users to focus more on design creativity and content without being bogged down by repetitive manual tasks. Embracing this feature in Divi is not just a time-saver; it’s a practical way to maintain consistency and efficiency across a website’s branding elements.
Read More: Yoast vs Rank Math vs All in One SEO: Best WordPress Plugin?


0 Comments