
How to Create Stunning Divi Vertical Tabs for Your Website
We may earn a commission from affiliate links in this post. Disclosure policy
Want to add sleek and professional vertical tabs in Divi? You’re in the right place! Divi vertical tabs are a great way to organize content, enhance navigation, and give your website a clean, modern design. Whether you’re just starting with Divi theme or you’re an experienced user, this guide will walk you through the process step by step. You’ll learn how to use Divi’s built-in Tabs Module to create vertical tabs, no third-party plugins required.
We’ll begin by inserting the default Divi Tabs Module and designing it to suit your needs. Then, using a simple custom CSS snippet, we’ll convert the standard horizontal tabs into fully functional vertical tabs. You’ll also discover how to customize colors, fonts, and layouts to ensure your vertical tabs blend perfectly with your site’s style. Let’s dive in and create beautiful, responsive Divi vertical tabs that work flawlessly!
Step 1: How to Add a Vertical Tab Module in Divi Theme
If you want to add vertical tabs in your Divi website, the first step is to pick the right spot for your Divi vertical tabs. Here’s how you can easily do it:
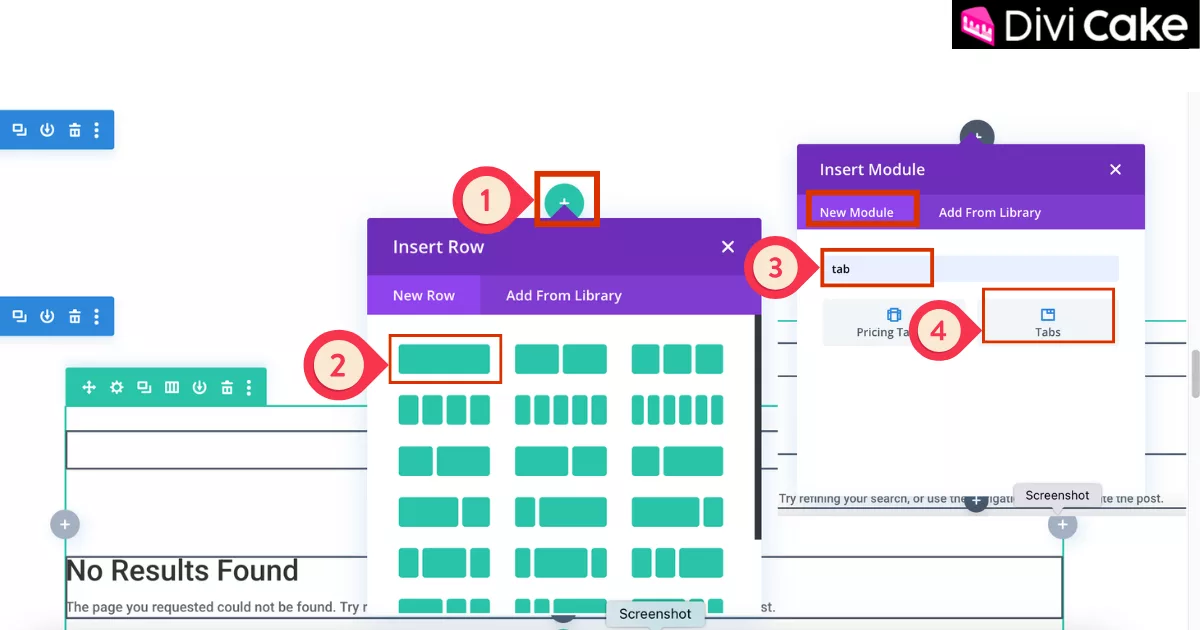
- First, select the section where you want your vertical tab in Divi to appear. For example, you can start with a blank section, just like the screenshot shows.
- Next, click the Plus Icon button to add a new section.
- Choose a Single Row with one column - but you can pick any layout you like.
- Now, in the new module search bar, type Tab.
- Finally, click the Tab Module to insert it into your layout.
Step 2: Customize Content of the Divi Vertical Tab Module
Once you insert the Divi tab module, the settings panel will pop up automatically. This is where you begin customizing each tab to suit your content. To make your Divi theme vertical tabs look professional and organized, you’ll need to set the title and description for every individual tab.
Here’s how to do it step-by-step for one tab (you can repeat the steps for as many tabs as you need):
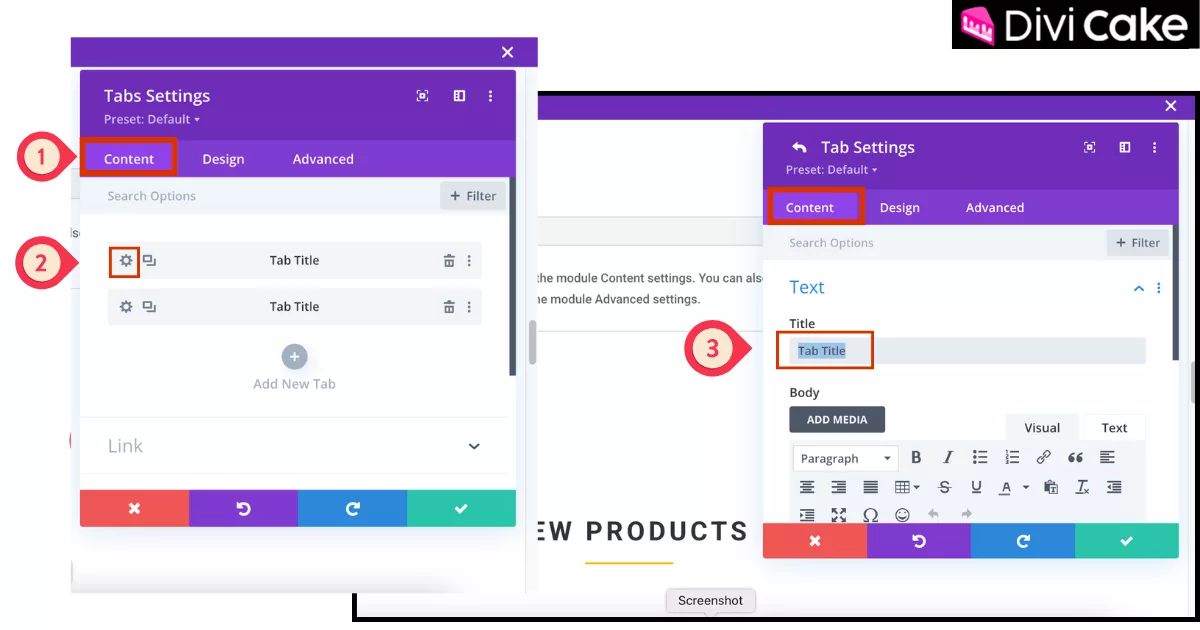
- In the Tab Module settings, click on the Content tab.
- Look for the specific tab you want to edit and click on the Gear Icon next to it (as shown in the screenshot).
- Under the content settings for that tab, switch to the Text option.
- Now, enter your custom Title text that matches your content purpose.
Step 3: Update Tab Content Body in Divi Tabs Module
After setting the title for your Divi vertical tab, the next step is to add content inside the body area of that tab. This is where you’ll place the main information you want your visitors to see and yes, it’s super easy to do!
Just follow these steps:
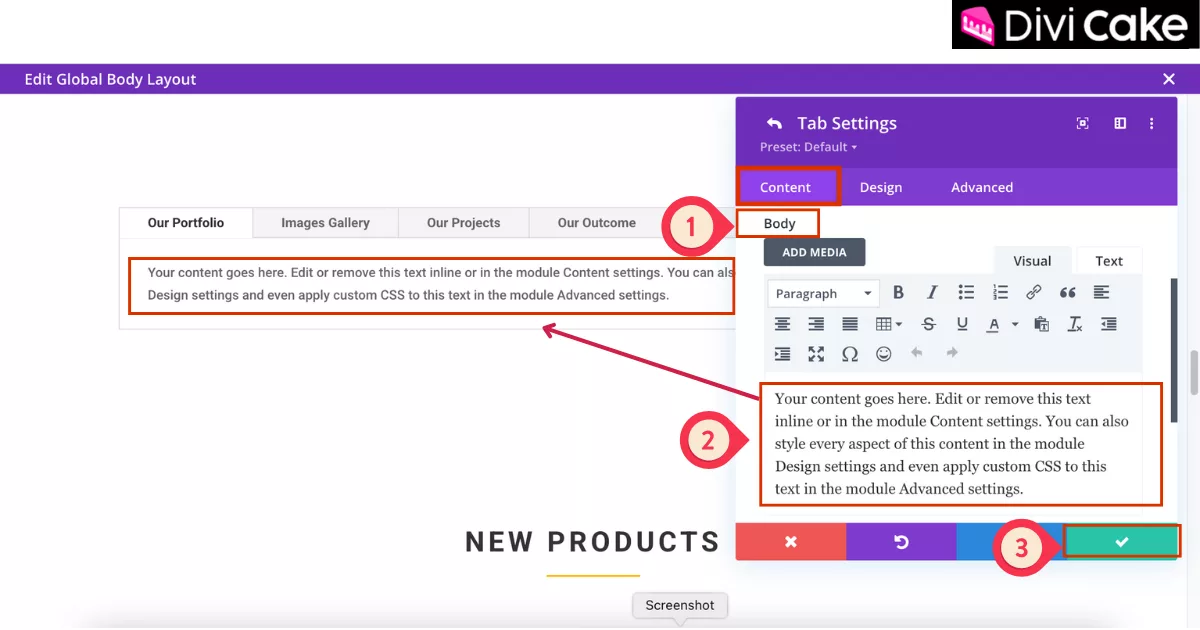
- Scroll down a little inside the Tab Settings panel.
- Find the Body option - this is where your main content goes.
- Click on it and replace the existing text with content that fits your website’s needs.
- Once you’ve updated the text, click the Tick Mark (✓) save button to apply the changes.
Step 4: Customize Body Text
In this step, we’ll focus on customizing the body text within the Divi Tabs Module. To do this, navigate to the Design tab and locate the Body Text settings. Here, you’ll find various options to adjust the text color, font size, line height, spacing, and more. These settings allow you to style the tab content to match your site’s overall design and enhance readability.
Here’s what to do next:
- Click on the Design tab in the Tab Module settings.
- Select Body Text to start customizing your content’s look and feel.
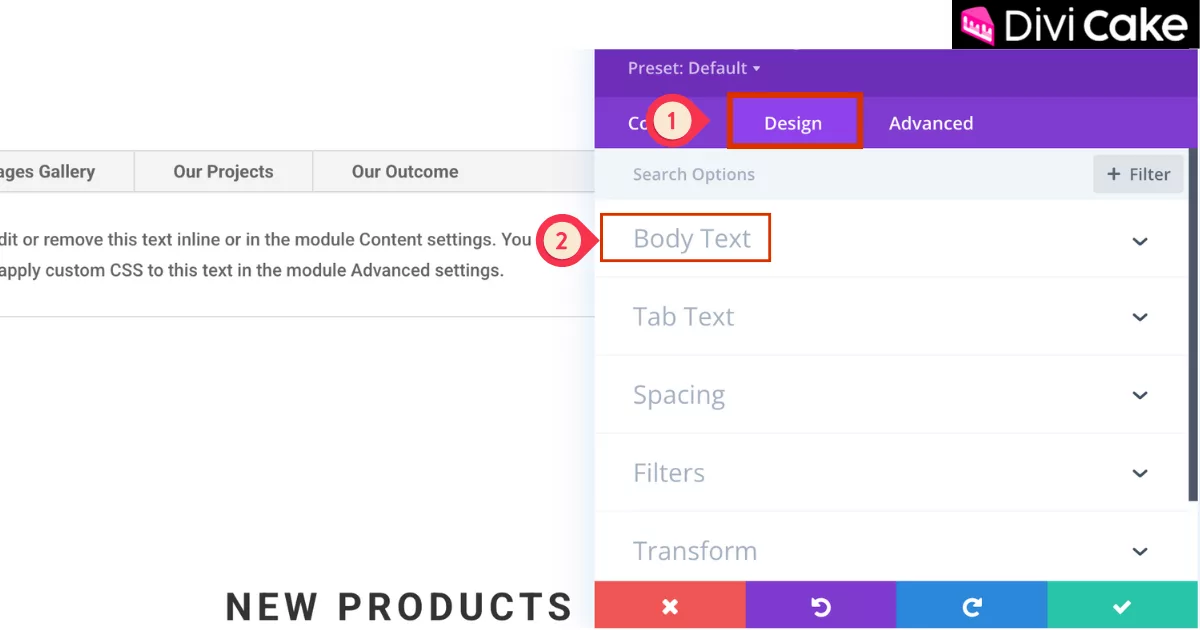
Now the customization option is open. It totally depends on your website which colors, text size, spacing, or active tab color you want b all the options are right here in the settings!
- Make sure you are in the Design tab.
- In the Body Text, the very first options include Tab Alignment, Links, and Comma settings — select these based on your needs.
- Set Body Text Alignment as per your website’s layout.
- Set Body Text Color to match your site’s theme.
- Set Body Text Size for easy readability.
- Set Body Text Letter Spacing for a clean and stylish look.
- Set Body Line Height for perfect vertical spacing.
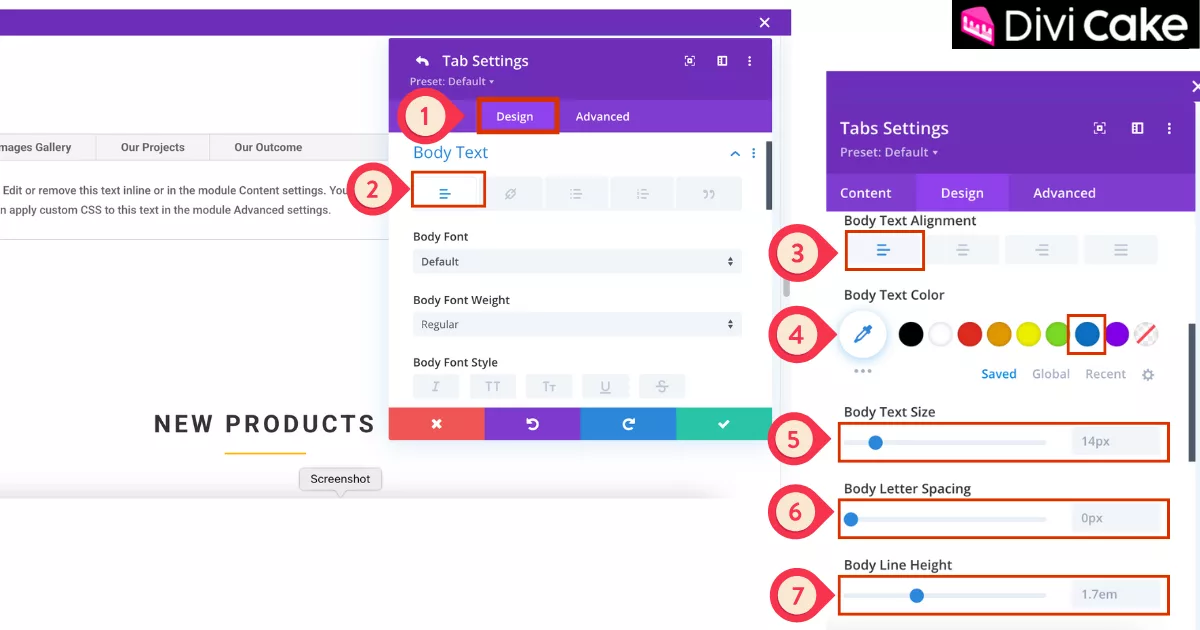
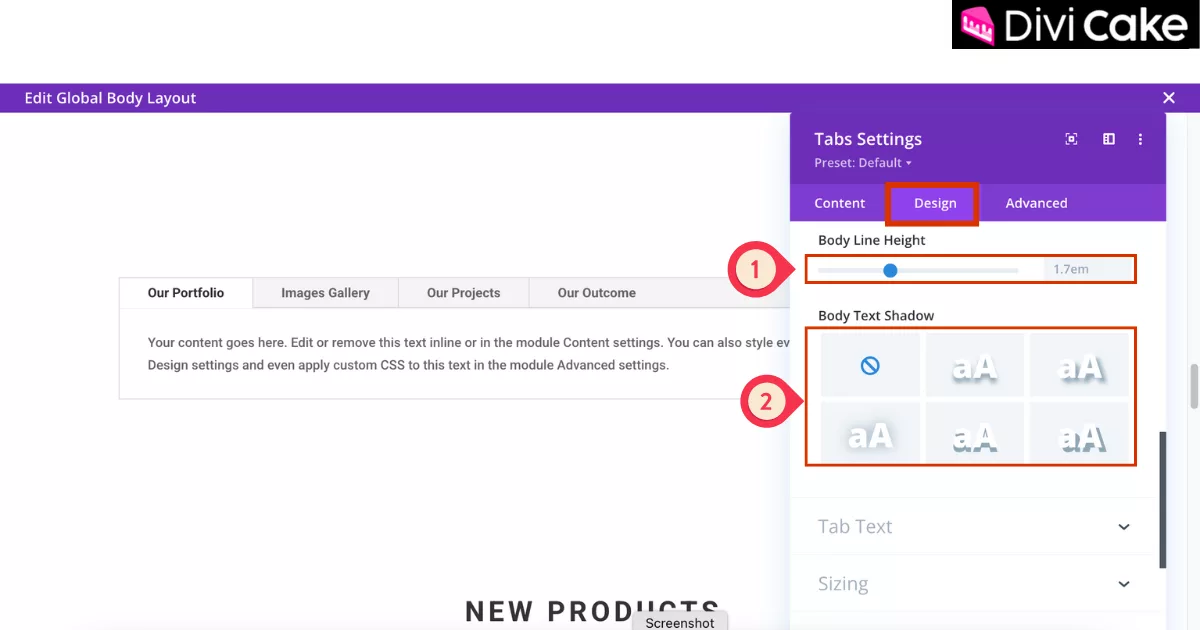
Continuing in the same Body Text in the Design tab options, there are even more settings available to make your Divi vertical tabs look perfect according to your site’s style.
- Set Body Line Height to control the vertical spacing between lines of text.
- Set Text Shadow if you want to add a bit of depth and visual focus to your tab content.
Step 5: Customize Tab Text in the Divi Vertical Tabs
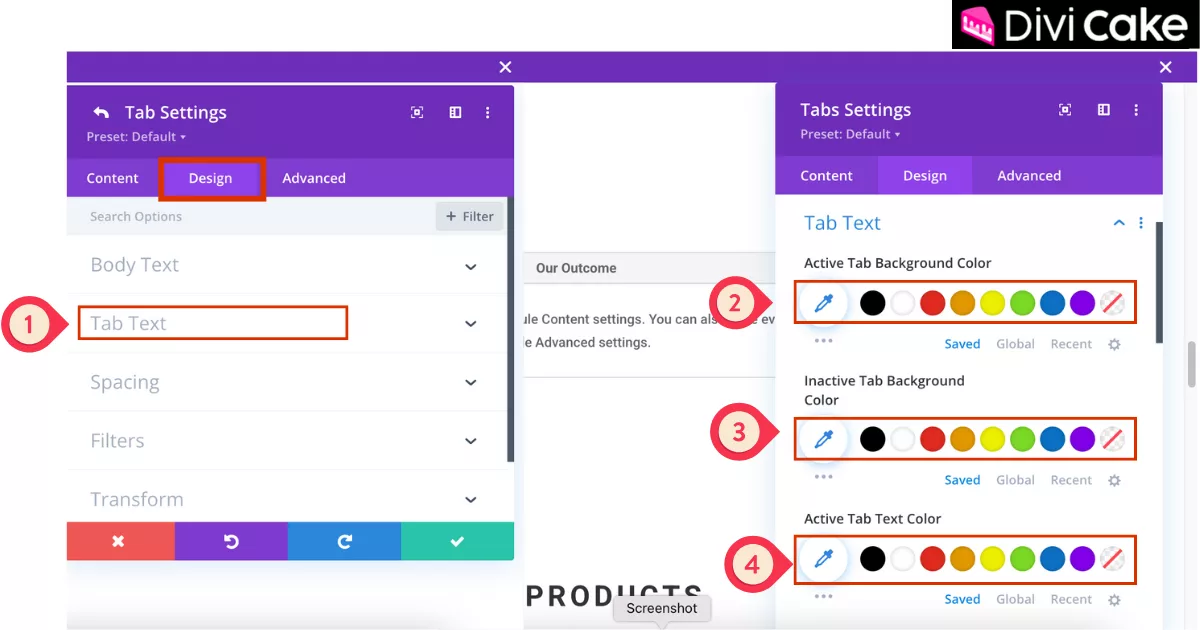
After applying all the Body Text customization, now it’s time to set up the Tab Text styling and we’ll continue working inside the Design tab of the Divi Tab Module.
- Click on the Tab Text option under the Design tab.
- Set Active Tab Background Color to highlight the selected tab.
- Set Inactive Tab Background Color to make non-active tabs blend in.
- Set Active Tab Text Color to match your website’s theme and enhance visibility.
Complete Tab Text Styling for Divi Vertical Tabs
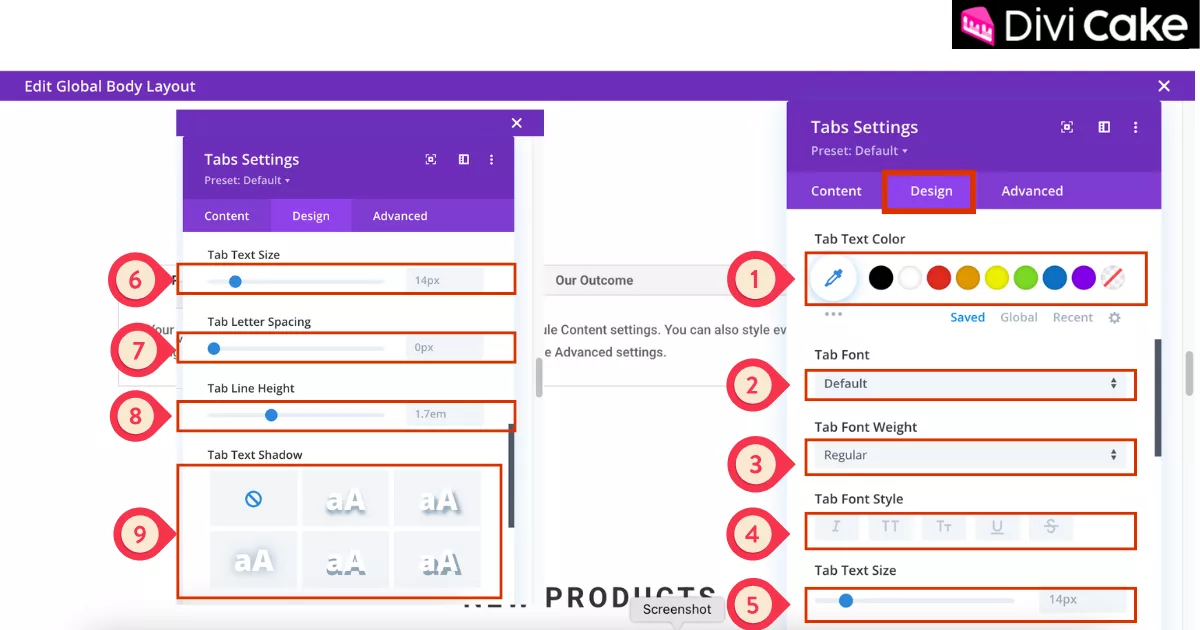
Still inside the Tab Text settings under the Design tab, you can now fully style the text of each tab to match your website’s overall look and feel. These options help you bring consistency and polish to your Divi vertical tabs.
- Set Tab Text Color to match your site’s color palette.
- Set Tab Font to maintain branding across your design.
- Set Tab Font Weight (light, regular, bold) for better emphasis.
- Set Tab Font Style (italic, uppercase, underline, etc.) as needed.
- Set Text Size for ideal readability.
- Set Tab Letter Spacing to adjust the space between letters.
- Set Tab Line Height for a balanced vertical layout.
- Set Tab Text Shadow if you want to add a soft, elegant effect.
Learn More: A Look at Divi’s New Global Color System
Step 6: How to Turn Horizontal Tabs into Vertical Tabs in Divi Using CSS
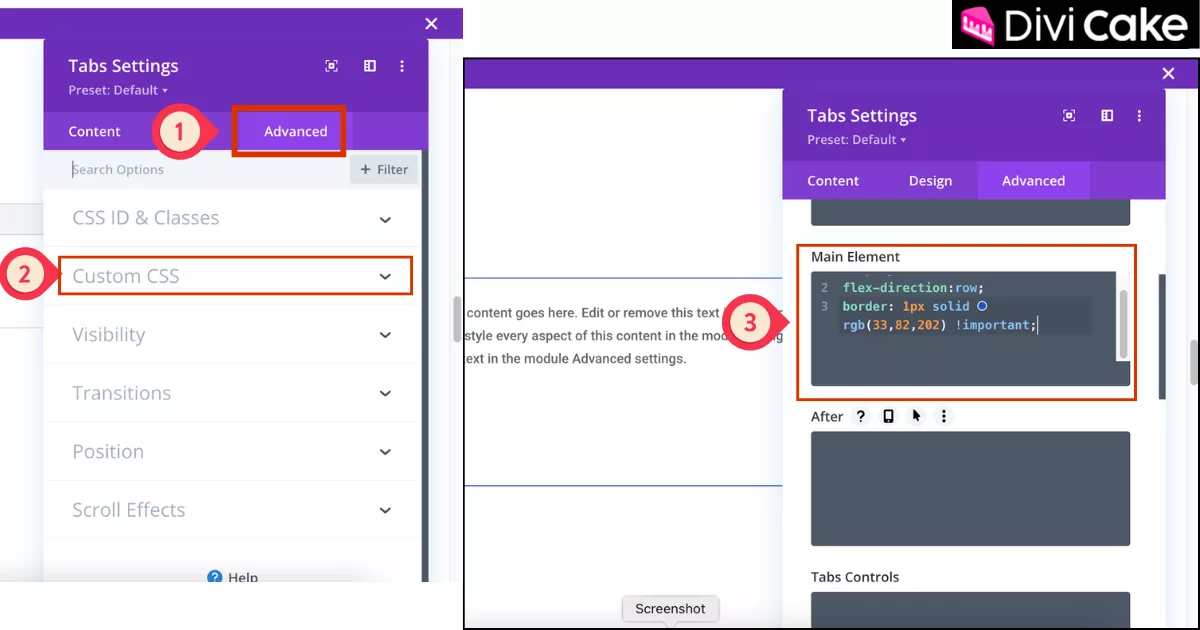
Now, let’s move to the Advanced tab of the same Divi Tab Module settings. Don’t worry this is still the Divi’s own tab module! Adding a small bit of CSS code here will change your default horizontal tabs into sleek vertical tabs Divi style.
display:flex;
flex-direction:row;- Click on the Advanced tab in your Tab Module settings.
- Click on the Custom CSS option.
- Paste the CSS code into the Main Element box**.**
Step 7: Adding More Custom CSS to Perfect Your Vertical Tab
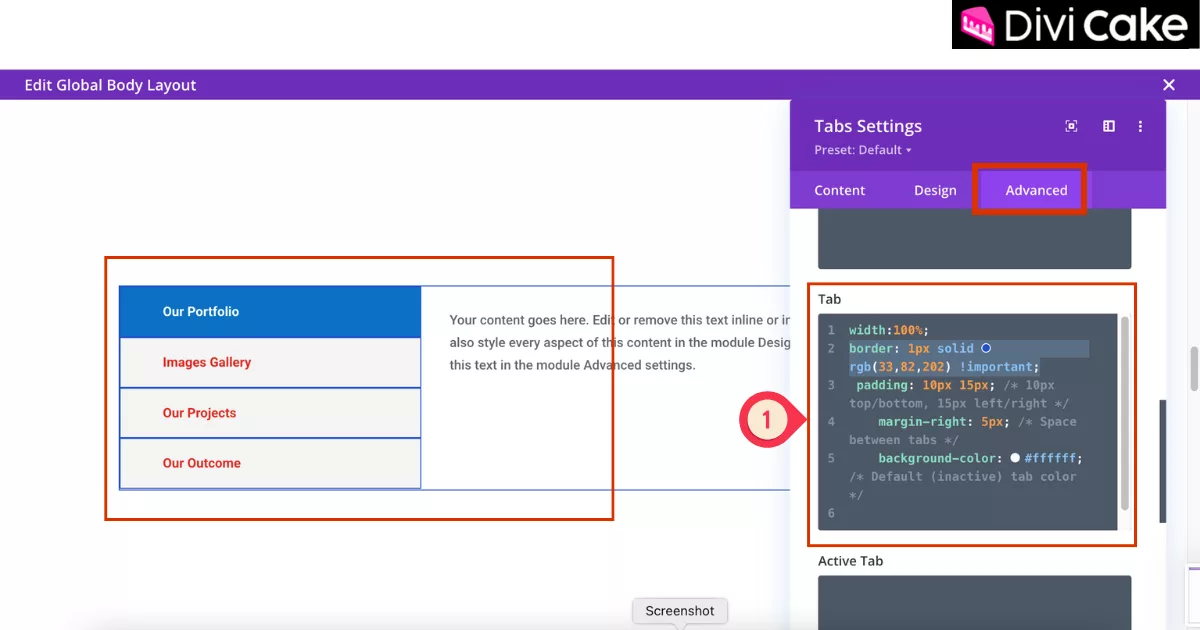
Next, scroll down inside the Custom CSS section in the Advanced tab of your Divi Tab Module settings. Here, you’ll find the Tab Code box, this is where you’ll paste a few more lines of CSS to fine-tune your vertical tabs.
Copy the CSS Code:
width:100%;
border: 1px solid rgb(33,82,202) !important;
 padding: 10px 15px; /* 10px top/bottom, 15px left/right */
    margin-right: 5px; /* Space between tabs */
background-color: #ffffff; /* Default (inactive) tab color */- Paste the CSS code in the Tab box inside the Custom CSS section of the Advanced tab.
Learn More: Getting Started with Divi: Theme Options – General Tab
Final Result
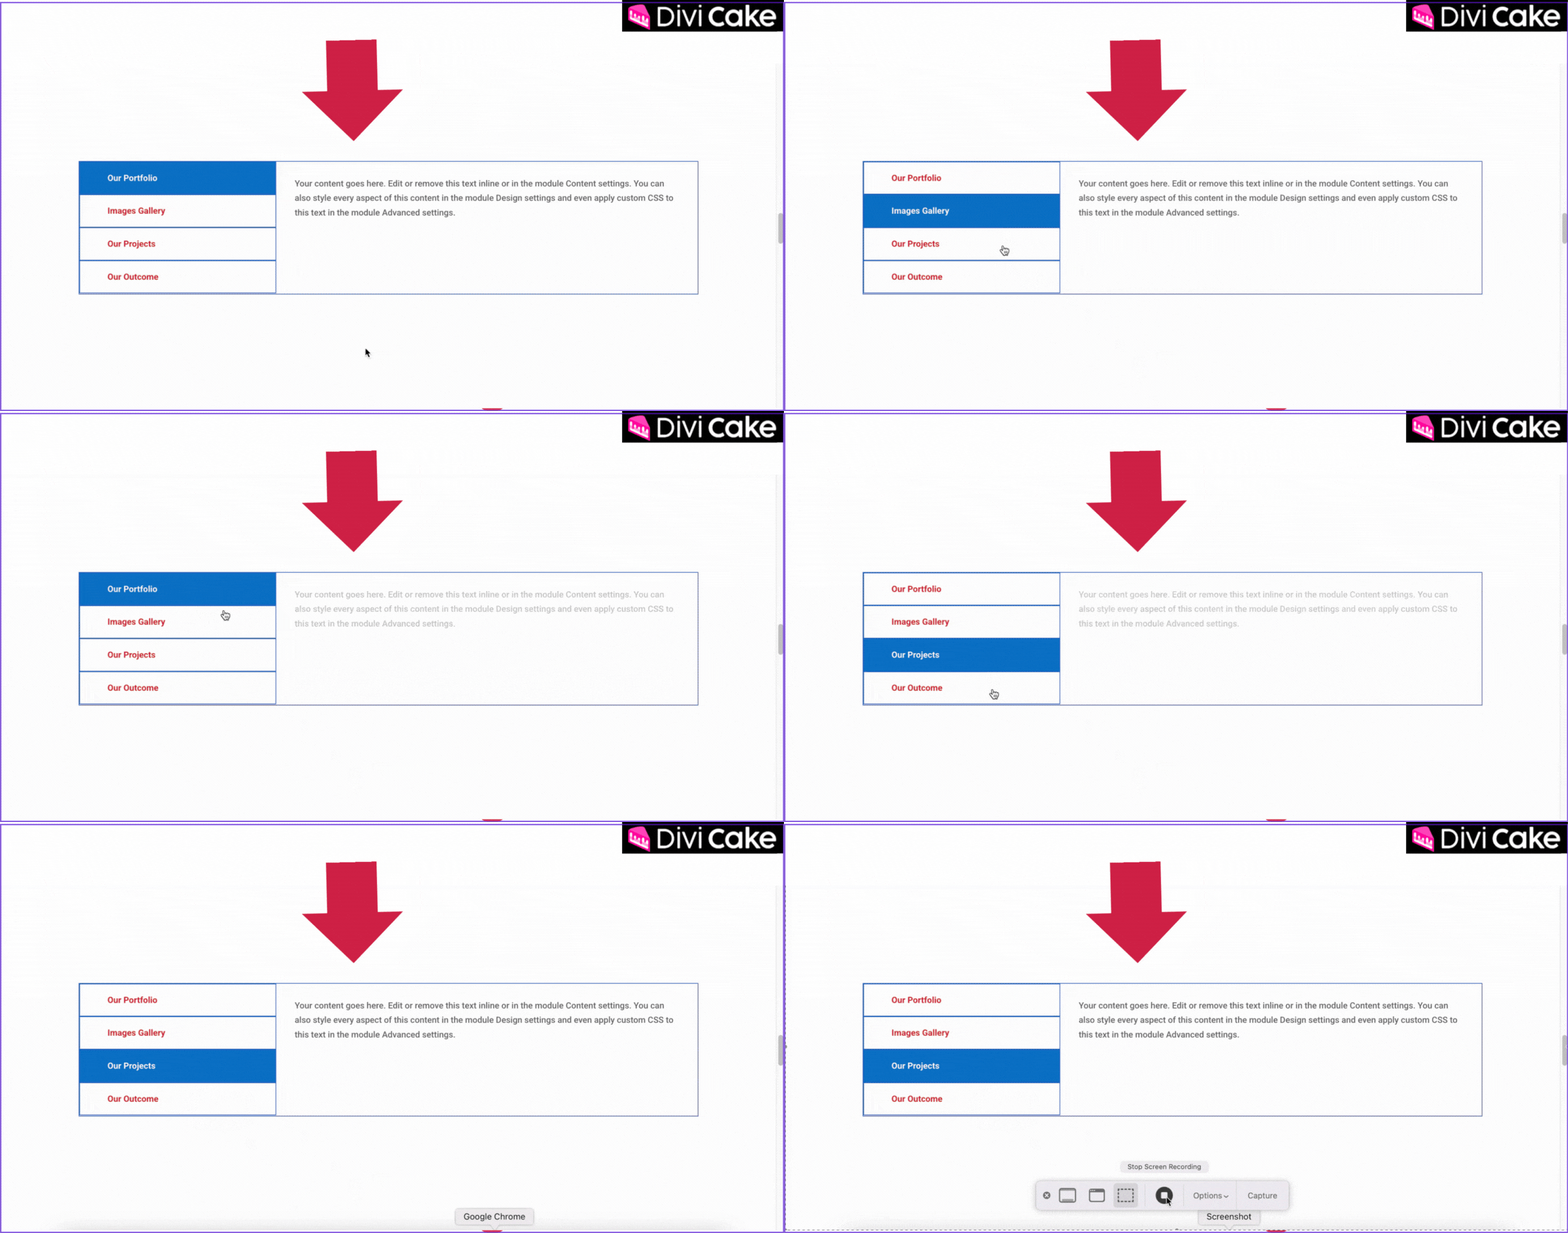
The GIF below shows the stunning final outcome after successfully converting the default Divi horizontal tab module into a clean, stylish vertical tabs Divi module using just a few lines of custom CSS code.
See how smoothly the tabs now display vertically, improving navigation and giving your website a fresh, modern look!
Conclusion
And that’s it a quick and effective way to create Divi vertical tabs using the built-in Tabs Module and a touch of custom CSS. Without needing any third-party plugins, you can transform standard horizontal tabs into clean, modern vertical layouts that improve both design and usability. This approach is perfect for organizing content in a stylish, user-friendly way while keeping your site lightweight and efficient.
Whether you’re aiming for better navigation or simply want to match your tabs with your brand’s look, the Divi theme builder vertical tabs module gives you the flexibility to do it all. Now that you know how to make tabs vertical in Divi, go ahead and apply it to your website and experience the difference it makes for your visitors. If you have any questions or want to share your results, feel free to reach out. I’m here to help you create stunning, functional Divi layouts your audience will love!
Read More: Make a Horizontal or Vertical Scroll Section/Page in Divi

Submit a comment
Comments are read before they appear. Your email is not published.
Thanks. Your comment is waiting for review and will appear here once it is approved.