The design settings in Divi, like the blur effect, can add a nice touch to your website. But there’s a problem – when you apply these effects, they don’t just affect the background image; they affect everything in the section, including the modules. This can mess up your design if you only want the background image to be blurred or filtered. In this tutorial, I’ll share a smart trick to apply a blur or other filter effect only to the background image of a Divi section or row without affecting the modules. Let’s dive in and solve this issue together!
Resolving the Issue: Divi Filter Effect Design Settings Impacting Entire Sections Instead of Just the Background Image
In Divi, every section, row, and module comes with design settings that allow you to easily apply and tweak filter effects. These settings can be found within the Design tab under the Filters toggle. This means you can quickly enhance the look of your website elements without diving into complex coding or third-party tools. Whether you want to add a subtle blur, adjust the brightness, or apply a unique color overlay, you have full control right at your fingertips. This feature empowers you to create visually stunning designs that capture your audience’s attention and elevate the overall aesthetic of your website.
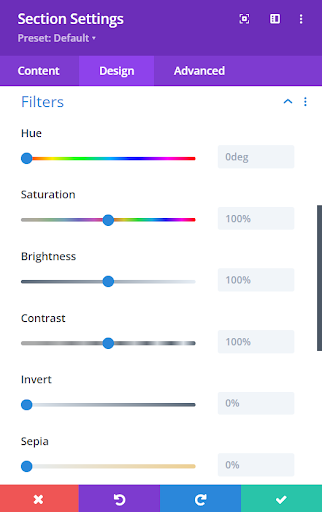
Divi Filter Effect Design Settings
Read More: How to Fix Divi Builder Not Loading Issue: Troubleshooting Tips
The Impact of Filter Effects Extends Beyond Backgrounds
One major issue with applying filter effects in Divi is how they impact the entire section or row, including any text, images, or other modules within it. This isn’t ideal because we typically want these effects to only affect the background image. For instance, if we add a blur effect to the background image, we don’t want the text or other content within that section to also become blurred. This limitation can make it challenging to achieve the desired visual effect without affecting the readability or clarity of the content.
Customize with CSS: Assigning a Custom CSS Class to Your Section or Row
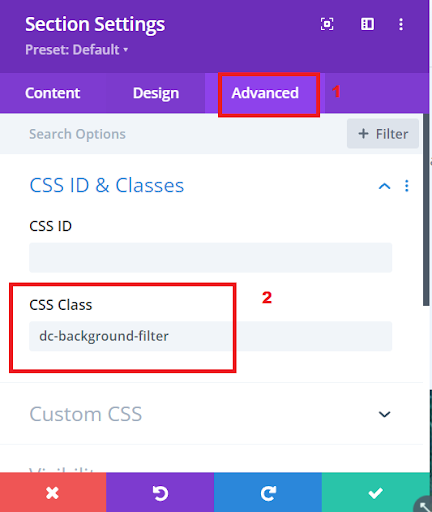
To begin adding blur or other filter effects to the background image of a section or row in Divi, the first step is to assign a custom CSS class. This class helps us target the specific section or row when applying the effects. Here’s how you can do it:
- Open the settings for the section or row where you want to apply the effect.
- Navigate to the “Advanced” tab.
- Look for the “CSS ID & Classes” toggle and click on it to reveal the input field.
- In the input field labeled “CSS Class,” type in the class name “dc-background-filter” (without the quotes).
By adding this custom CSS class, we’re setting up the section or row to be styled with blur or filter effects. This step is crucial for ensuring that our CSS code applies only to the desired elements on the page. Once the class is applied, we can move on to the next steps of actually adding the desired effects using CSS code.
Read More: How to Use a Dynamic Logo in Divi Website
Section Settings
Enabling the Parallax Effect
In the next step, go to the settings for the section or row background. Simply locate the Background option and click on the background image tab. Within this tab, make sure to check the box labeled “Use Parallax Effect”. This adds a neat scrolling effect to your background image. Additionally, choose “CSS” as the Parallax Method. This ensures that the effect is applied smoothly and seamlessly. Once you’ve made these adjustments, you’re all set to move on to the next step in customizing your Divi section background.
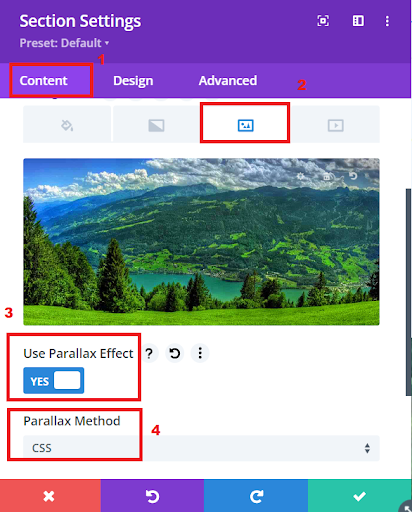
Enabling the Parallax Effect
Read More: How To Create A Promo Bar in Divi Theme
Using the CSS Code To Disable The Parallax Effect
The reason we enable parallax in the settings but then disable it with code is to make sure we can access a specific class called “et_pb_parallax_css.” This class is really important because it allows us to target only the background image without affecting anything else on the page. So, by using this approach, we can achieve the desired effect without having to use parallax.
Paste the below code in your Divi > Theme Options > Integrations tab in the “Add code to the < head > of your blog” code area.
.dc-background-filter .et_pb_parallax_css {
	background-attachment: inherit !important;
	background-position: 50%;
}
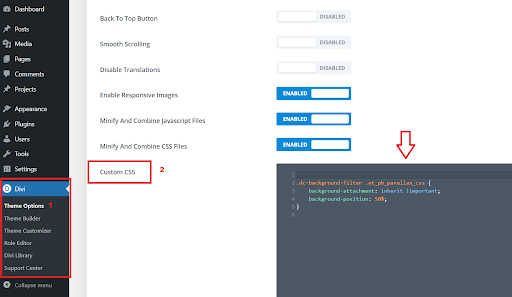
Adding custom css code to the Divi’s Dashboard
How the above mentioned code works lets understand that in detail:
- When we use “.dc-background-filter,” it means we’re targeting the section or row that holds the background we want to change. This lets us apply specific effects to just that area.
- Next, we have “.et_pb_parallax_css,” which is a class Divi uses for elements with a parallax background effect. This helps us identify elements that have this special visual effect applied to them.
Read More: Creating a Membership Website in Divi/WordPress: A Comprehensive Guide
Now, onto the CSS properties:
- “background-attachment: inherit !important;” This line essentially tells the background to behave like its parent element. It’s important because it overrides any special settings for the parallax effect that might be in place. The “!important” part ensures that this instruction takes priority over any conflicting instructions.
- “background-position: 50%;” Here, we’re setting the background’s position to be in the center. This helps maintain the visual appearance when the parallax effect isn’t active.
In simpler terms, this code snippet helps us control and adjust the background appearance of specific sections or rows in our website design, ensuring they look the way we want, especially when dealing with parallax effects.
Using The CSS Code To Apply The Blur Effect Or Other Filter Effect To Divi Background Images
Once you’ve decided on the blur or filter effect you want for your Divi section background image, the next step is to apply it using CSS. Below is an example of the code you’ll need to add to your website. You can customize this code to fit your preferences and style:
Paste this in your Divi>Theme Options>Custom CSS code box.
.dc-background-filter .et_pb_parallax_css {
	 filter: blur(10px);
	-webkit-filter: blur(10px);
}
Let’s break down what the code above does in simpler terms:
- The “.dc-background-filter” class is like a special label we use to point to the section or row containing the background image we want to change. Think of it as a way to say, “Hey, this is the area we’re focusing on!”
- Divi uses the “.et_pb_parallax_css” class for elements that have a cool parallax effect in their background. It’s like when you scroll down a page, and the background seems to move at a different speed than the rest of the content, creating a neat visual effect.
- Now, when we say “filter: blur(10px);”, it’s like telling the computer, “Hey, I want you to make this background image a bit fuzzy.” The “10px” part is how much blur we want – the higher the number, the fuzzier it gets. You can tweak this number to make the blur effect stronger or gentler, depending on what you like.
- We also include “-webkit-filter: blur(10px);” for Safari browsers, just to make sure our blur effect works smoothly there too. Some older versions of Safari need this extra bit of code to understand what we want them to do with the blur effect.
- So, in simple terms, we’re just telling the website to blur the background image in a certain section or row, and we’re making sure it looks good on different types of web browsers. Easy peasy! Feel free to adjust these values to get the desired look for your Divi section background image. If you’re unsure about anything, don’t hesitate to ask for clarification!
Read More: Autoplaying Videos in Divi: Unveiling 3 Methods Without the Need for Plugins
Before:

Background section image before applying the blur effect
After:

Background section image after applying the blur effect
Conclusion
In conclusion, mastering the application of blur and filter effects to Divi section background images can greatly enhance the visual appeal of your website. While Divi’s design settings offer convenient ways to apply these effects, they impact entire sections, including text and other modules, which may not always be desirable.
However, by utilizing custom CSS classes and smart coding techniques, you can overcome these limitations and precisely target background images without affecting other elements. The step-by-step instructions provided in this tutorial offer a straightforward approach to achieving this, empowering you to create visually stunning designs that captivate your audience.
Whether you’re aiming for a subtle blur effect or experimenting with various filters to add depth and dimension, the possibilities are endless with Divi’s versatile customization options. By taking advantage of these techniques, you can elevate your website’s aesthetics and leave a lasting impression on your visitors.
Don’t hesitate to explore further and experiment with different settings to find the perfect look for your Divi section backgrounds. With creativity and a little know-how, you can transform your website into a visually captivating masterpiece.
Read More:Adding Divi Theme Fade-in effect to Text, Images, Modules and Buttons


0 Comments