
How to Add a Dynamic Copyright Year to Your Divi 5 Footer (Automatically Updated)
We may earn a commission from affiliate links in this post. Disclosure policy
A copyright notice is one of the most common elements in any website footer. But many website owners forget to update the year manually, which makes the site look outdated. The best solution is to use a dynamic copyright year that updates automatically. This way, the year is always correct because it pulls the current date directly from the server.
The good news is that adding a dynamic copyright year in Divi 5 is quick and simple. In this guide, we’ll show you how to add it to your Divi footer so it updates automatically every year without you having to edit it manually.
Access Your Divi 5 Footer
Before adding a dynamic copyright year, you need to know how to access the footer area in Divi. If you are a beginner or not a developer, don’t worry we’ll guide you step by step.
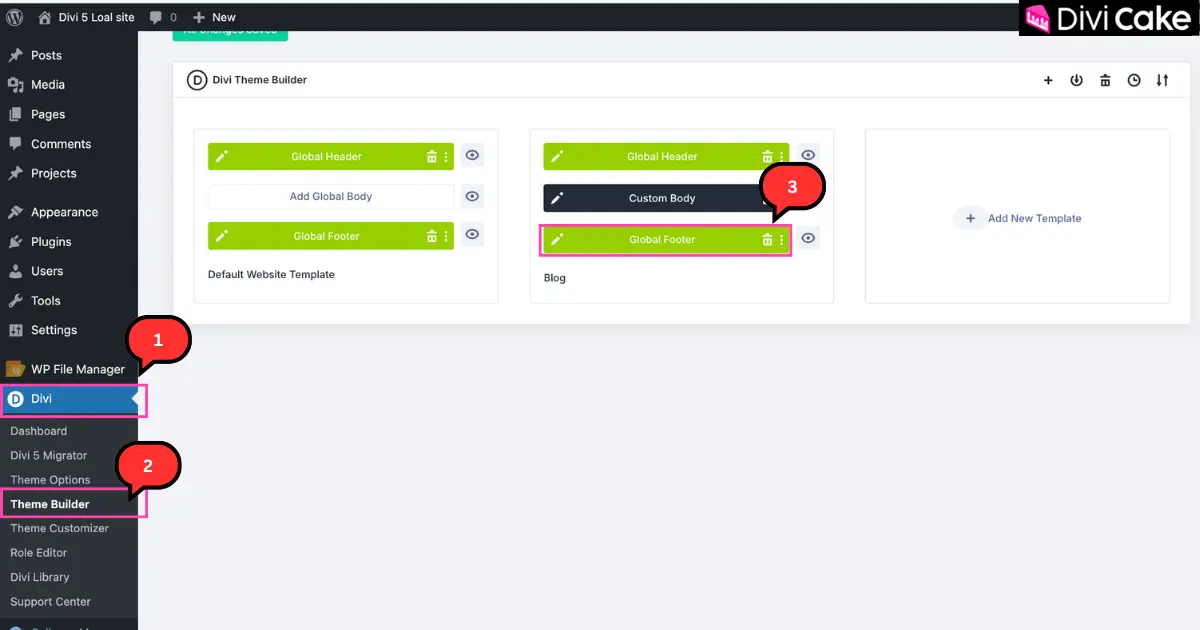
Follow these steps to open your Divi Global Footer:
- In your WordPress dashboard, click on Divi.
- Select Theme Builder.
- Open the Global Footer (see screenshot below).
Add a Dynamic Copyright Year in Divi 5 Theme Builder
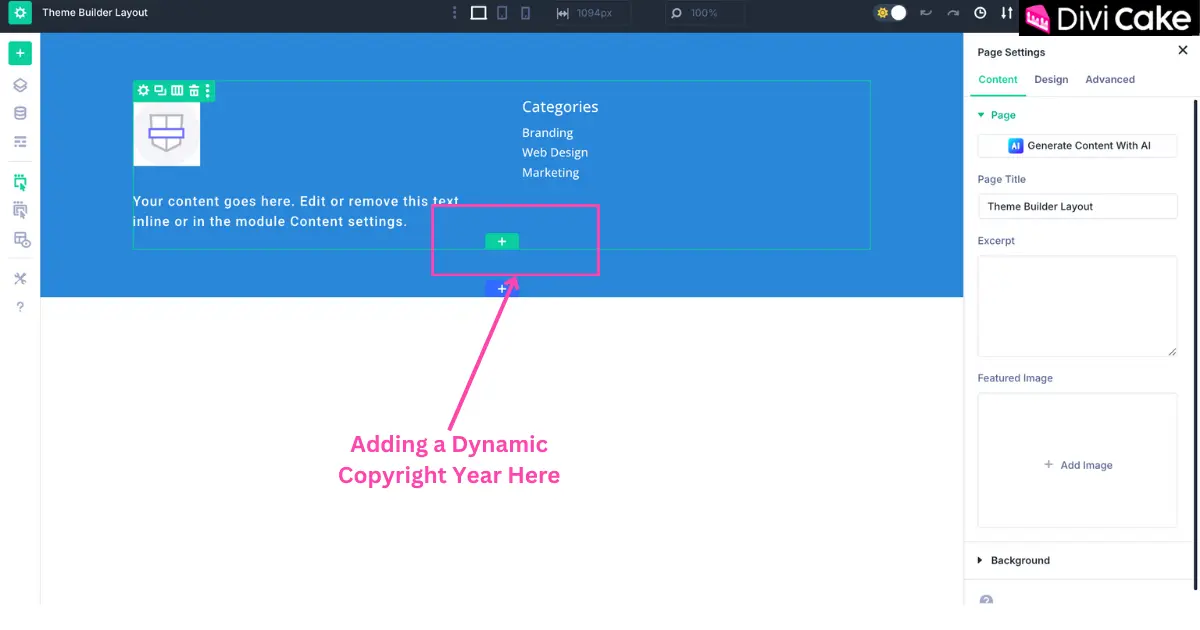
As shown in the screenshot below, this is the Divi footer where we will add the dynamic copyright year. In the Divi 5 Theme Builder, you can use the green plus (+) icon to insert a new module or content inside the footer section. This is where we will place the dynamic copyright credit so it updates automatically every year.
Center Footer Credits in Divi 5
To make your footer look more professional, you can place the copyright credit in the centre. Most modern websites display their footer credits in the middle for a clean and balanced design.
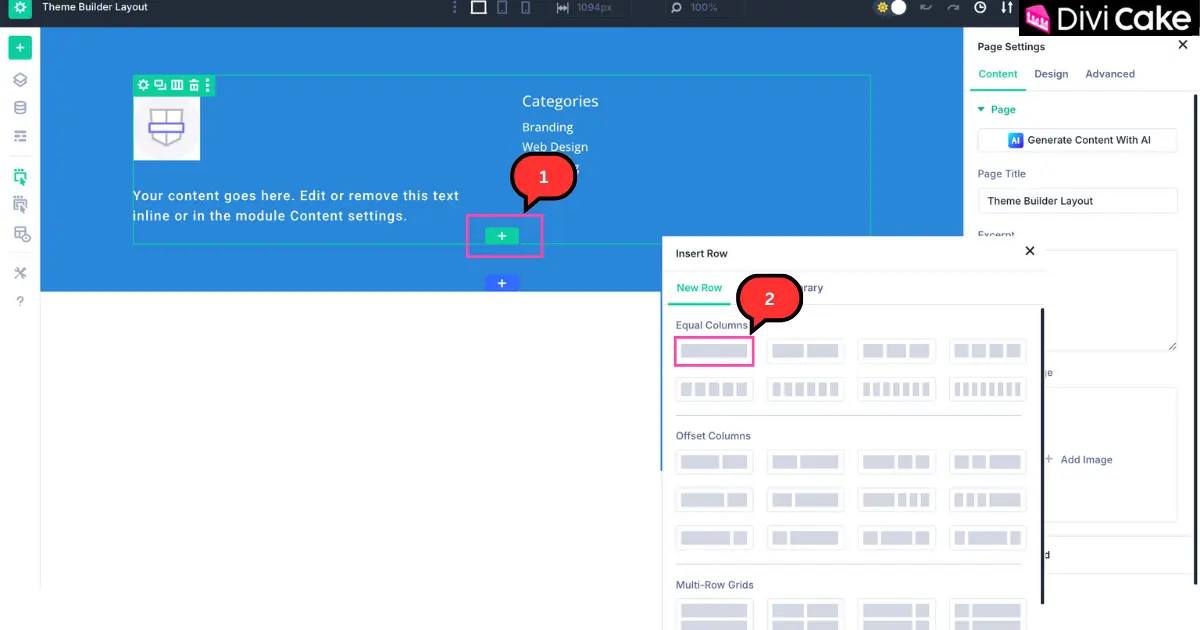
Follow these steps:
- Click on the Plus (+) icon.
- Add a single row with a single column.
Insert a Text Module for Dynamic Footer Credits
Now we need to add a Text Module to display the dynamic footer credits. This module will hold the dynamic copyright year in your Divi 5 footer.
Follow these steps:
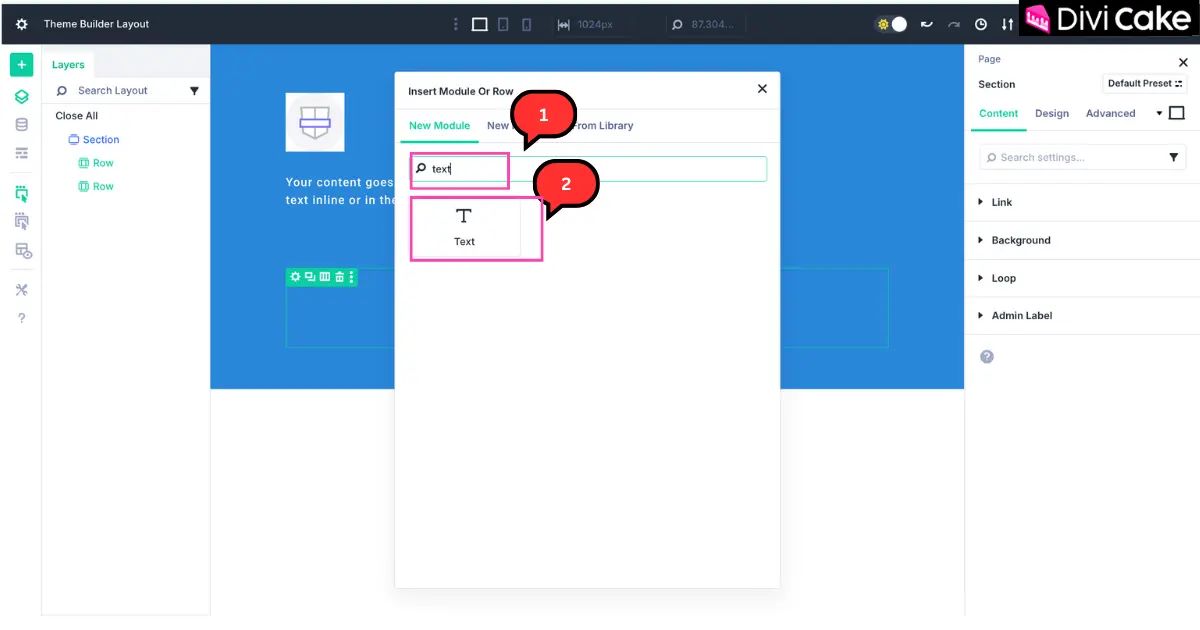
- Search for the Text Module in the module options.
- Insert it into your footer section (see screenshot below).
Change Text Color in Divi 5 Footer
Next, we will change the text color so it matches the Divi 5 footer background. This makes the footer credits look clean and professional.
Follow these steps:
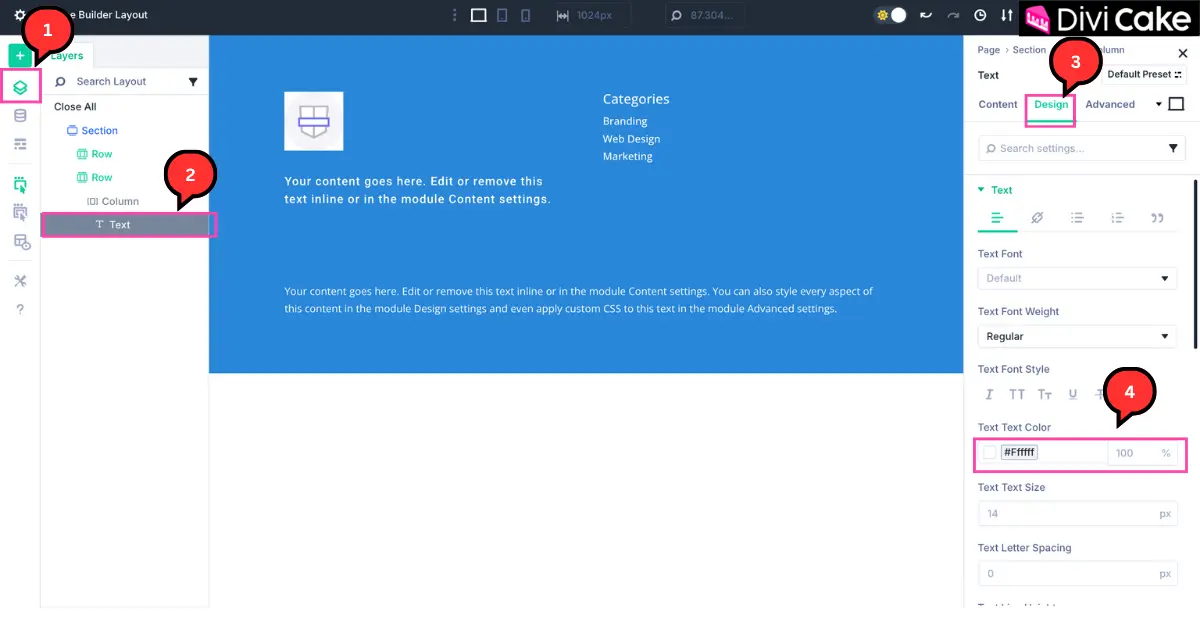
- Click on the Layer button.
- Select the Text Module.
- Open the Design tab.
- Change the text color. For example, we changed it to White because it looks clear against our footer background.
Learn More: Divi Footer Design: 6 Best-Practicing Tips for a User-Friendly Design
Add Current Date in Divi 5 Footer Without Plugins
Now, we will remove the default dummy text from the Text Module and replace it with the Current Date. Divi 5 already has this feature, so you don’t need any extra plugin or custom code.
Follow these steps:
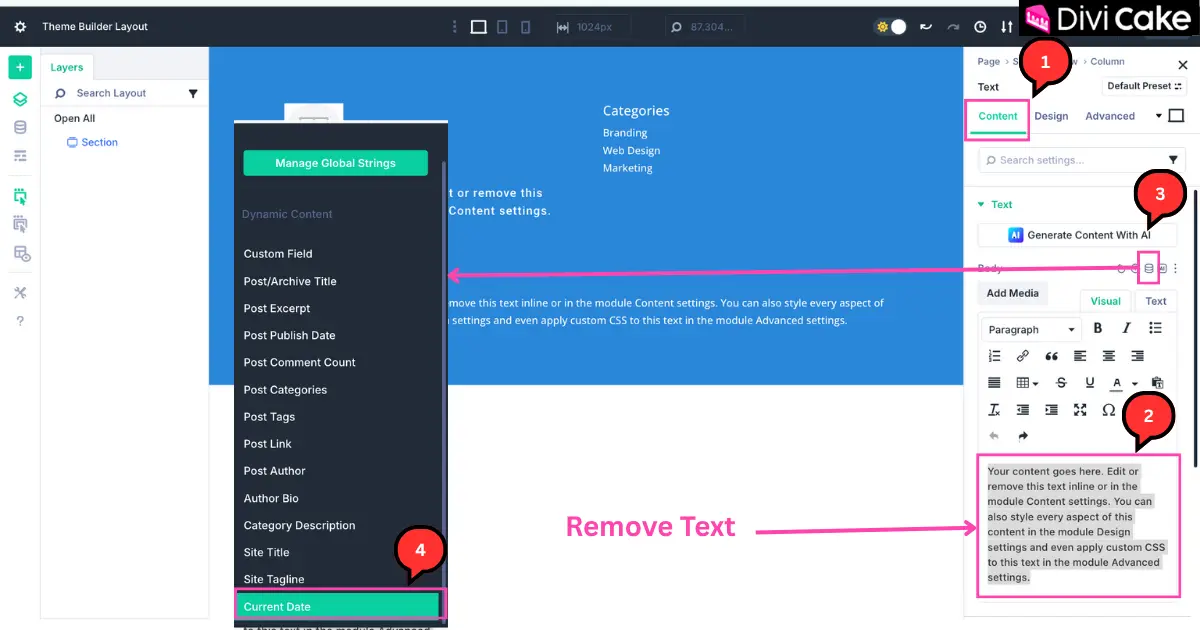
- Click on the Content tab.
- Delete the dummy text.
- Click on the dynamic content button (as shown in the screenshot).
- Select the last option, Current Date.
Customize Current Date for Dynamic Copyright in Divi 5
Your Text Module is now set to display the Current Date. This feature allows you to add text before and after the dynamic year. The date will update automatically every year.
Important Note:
- If you use a small “y,” it will only show two digits (for example, 25 instead of 2025).
- Always use a capital “Y” for the full year format.
- Add a space before and after “Y” so the date looks clean in your footer.
Follow these steps to customize your Divi 5 footer credits:
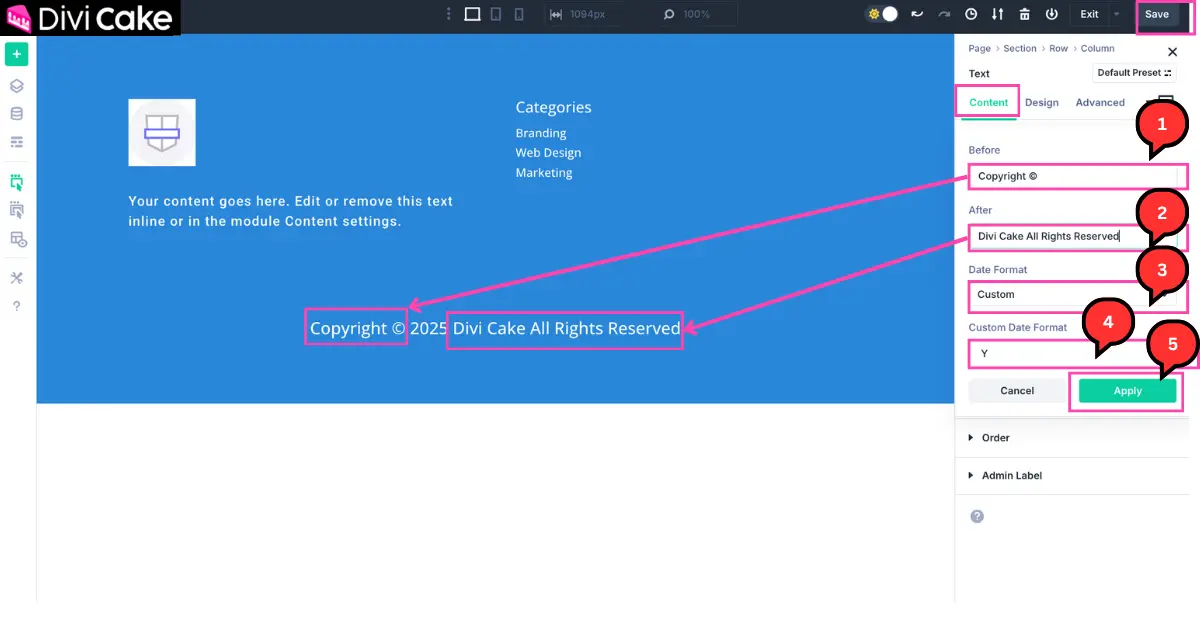
- In the Before box, write your website credit (example: Copyright ©).
- In the After box, write your website name (example: Divi Cake All Rights Reserved).
- Change the date format to Custom.
- Enter a capital Y in the Current Date format.
- Click on the Apply button to save changes.
Click on Save button.
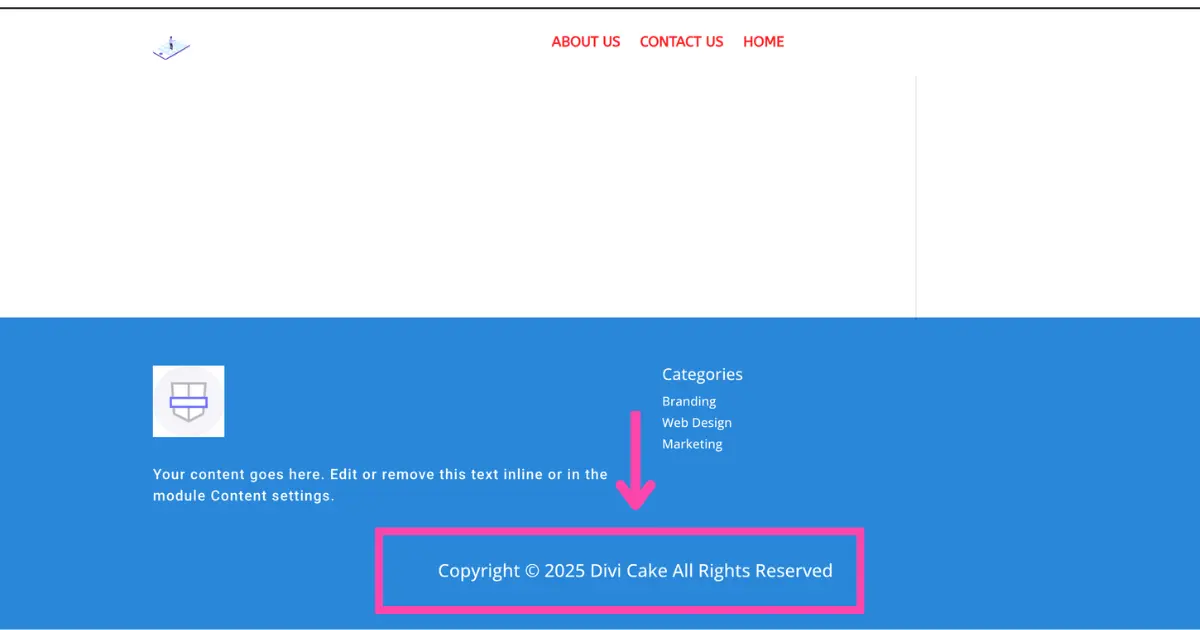
Final Result: Dynamic Copyright in Divi 5 Footer
The screenshot below shows the final result of adding a dynamic copyright credit in Divi 5. We used Divi’s own module without adding any custom code or installing extra plugins. This method is clean, lightweight, and much better than relying on third-party plugins.
Now, your Divi 5 footer will always display the correct copyright year automatically.
Conclusion
Adding a dynamic copyright year in Divi 5 is one of the easiest ways to keep your website footer professional and up to date. Instead of manually editing the year every January, Divi’s built-in Current Date module does the job for you automatically.
The best part is that you don’t need any plugins or custom code everything is handled inside the Divi Theme Builder. This keeps your site lightweight, secure, and future-proof.By following the simple steps in this guide, your Divi 5 footer will always display the correct copyright year along with your website name, making your site look more polished and trustworthy to visitors.
Learn More: How to Change the Footer Credits in Divi Builder
Submit a comment
Comments are read before they appear. Your email is not published.
Thanks. Your comment is waiting for review and will appear here once it is approved.