Often, you might find yourself wanting to put two Divi buttons next to each other i.e. side by side, but it’s not always straightforward. Sure, you can attempt to place button modules in different columns, but that’s not always practical. Sometimes, you just need them side by side in the same column. The good news is, there’s a simple solution: a tiny bit of CSS. In this quick Divi tutorial, I’ll walk you through how to do it step by step. So, if you’ve ever struggled with getting those buttons aligned just right, you’re in the right place! Let’s dive in and learn how to do it together.
Step 1: Open Divi Builder
Log in to your WordPress dashboard and navigate to the page or post where you want to add the Divi Button Modules. Click on the “Enable Divi Builder” button to launch the Divi Builder.

Enabling Divi Visual Builder
Step 2: Add Row
Once in the Divi Builder, click on the green “+” button to add a new row. Choose the number of columns you want for your buttons. For side-by-side buttons, select the 2-column layout.

Adding a row
Step 3: Add Button Modules
In each column, click the black “+” button to add a new module. From the module list, select the “Button” module, and add two button modules.
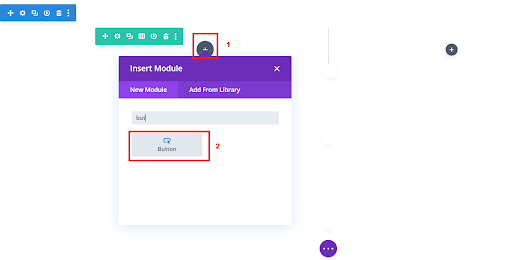
Adding the Button Module
Read More: How to Fix Divi Builder Not Loading Issue: Troubleshooting Tips
Step 4: Adding The CSS Code Snippet
To arrange the buttons side by side in Divi, we’ll focus on tweaking the column they’re in, rather than messing with the buttons themselves. Here’s what you need to do:
First, locate the row and column where your buttons are placed. Then, open up the settings for that column. Look for the “Advanced” tab and find the box where you can add custom CSS classes. In there, type in “dc-inline-buttons” without the quotes and save your changes.
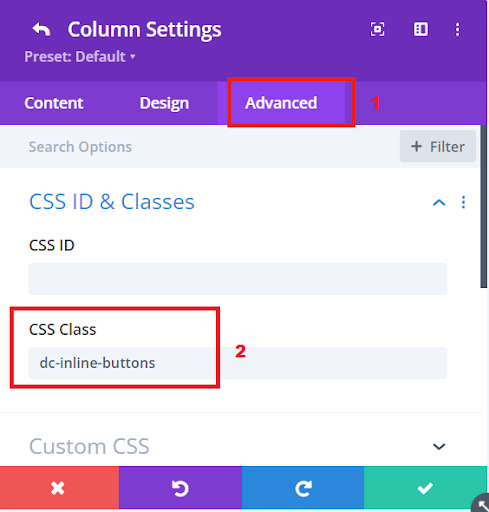
Advanced Column Settings
Now, you’ll need to add a bit of code to your website. Don’t worry, it’s simple. Just copy the following snippet. Paste the given css code into your Divi>Theme Options>Custom CSS code box as shown in the picture below.
.dc-inline-buttons .et_pb_button {
 display: inline-block;
 margin-right: 10px;
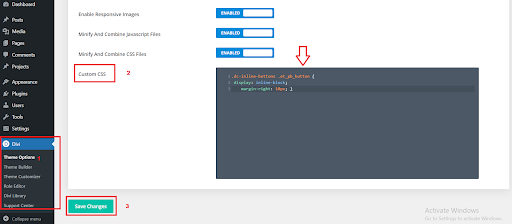
Adding Custom CSS Code to the Divi Dashboard
What this code does is it targets the buttons inside columns with the “pa-inline-buttons” class and makes them display side by side instead of stacking on top of each other. It also adds a bit of space between them for a clean look. Feel free to adjust the margin-right value to change the spacing between buttons according to your preference. And that’s it! Your buttons should now be nicely lined up next to each other.
Read More: How to Use a Dynamic Logo in Divi Website
Final Look:
At the end of the process, you’ll see two button modules positioned right next to each other. These modules serve as buttons that users can click on. They’ll be displayed side by side on your webpage. This setup makes it easy for visitors to your site to see and interact with both buttons without having to scroll or search for them. It’s a clean and organized way to present multiple calls-to-action or options to your audience. Whether you’re prompting them to sign up for a newsletter, explore more content, or make a purchase, having these buttons side by side enhances user experience and makes your website more user-friendly.
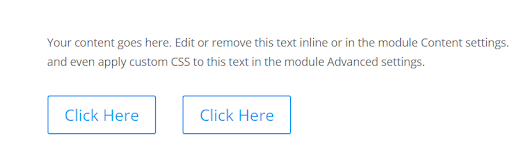
Divi Button Modules after placing them side by side
Conclusion:
In conclusion, mastering the art of placing Divi Button Modules side by side can greatly enhance the aesthetics and functionality of your website. By following the simple steps outlined in this tutorial, you can effortlessly align your buttons without the need for complicated coding or layout adjustments.
This technique not only improves the visual appeal of your site but also enhances user experience by making important calls-to-action easily accessible to your visitors. Whether you’re aiming to increase engagement, drive conversions, or simply streamline navigation, having neatly arranged buttons side by side is a valuable asset. So, next time you’re faced with the challenge of aligning Divi buttons, remember this quick and effective solution to achieve the desired results with ease.
Read More: How To Create A Promo Bar in Divi Theme


0 Comments