Usually, when you’re using the Divi blurb module, you can only put the image or icon on the left or at the top. Not everyone goes for these choices, but we’ve seen other WordPress builders make some cool designs using them. It’s about trying things out and finding what suits your design style.
So, come along with us in this guide where we will take you through each step to move the icon to the right in the Blurb module. It’s a problem many of us have faced, but don’t worry – we’re about to figure it out together! Let’s jump into the steps and give your design a little boost with a right-aligned icon in the Blurb module.
What are the Default Choices?
Before we go any further, let’s check out the basic options in the Divi blurb module for putting the icon or image in place.
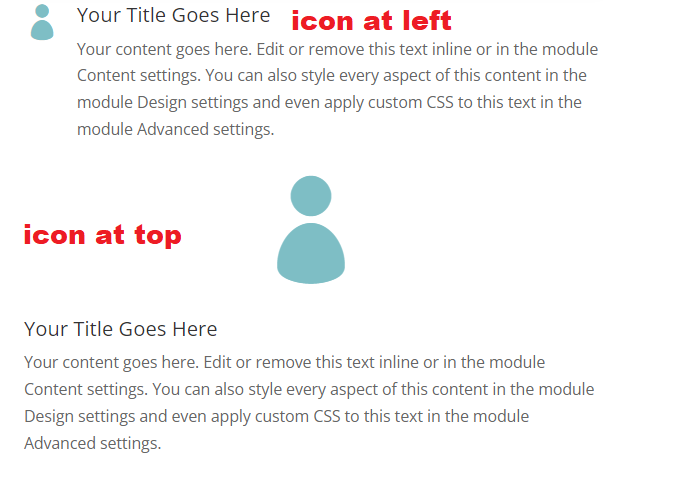
Default options for putting the icon or image in place
Now, in the next part, we’re going to walk you through each step, showing you exactly how to align your Divi blurb image or icon to the right. Ready to make it happen? Stick around for the simple steps ahead!
Step 1: Tweaking the Blurb Module Settings
To begin, click on the Blurb Module settings. Next, navigate to Design, then Icon, and select Alignment. Set it to Left. We have included a screenshot to guide you on exactly where to find this option.
Blurb Settings> Design > Icon > Alignment
Tweaking the Blurb Module Settings
Read More: Replace the Divi Blurb Icon With a Font Awesome Icon
Step 2: Adding CSS Class To The Blurb Module
Open the blurb module settings, then head to the Advanced tab. In the Custom CSS IDs & Classes toggle, add a custom CSS class named ‘blurb-right’. If you are not sure where to add the class then please check the screenshot below:
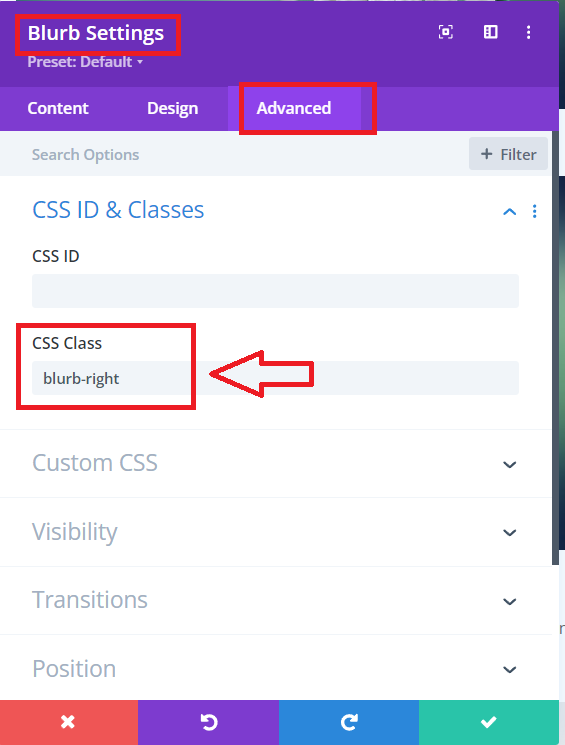
Adding custom CSS class named ‘blurb-right’
We’re assigning a special class to make sure our code only changes one blurb module, not all of them on your site. If you’re planning to shift the icon to the right for more than one blurb, just tag each of them with the class “blurb-right.” It’s like giving each blurb a little instruction so they all know to move their icons to the right.
Step 3: Adding CSS Code Snippets To The Blurb Module
Now that your module is all set up, the last step is adding the CSS code to shift the icon to the right. Head over to your Dashboard, click on Divi, then Theme Options, and finally, Custom CSS. Once you’re there, simply paste in the following CSS code. It’s like giving your website a little instruction manual for moving those icons where you want them. Let’s make it happen!
.blurb-right.et_pb_blurb_position_left .et_pb_blurb_content {
    display: flex;
    flex-direction: row-reverse;
}

.blurb-right.et_pb_blurb_position_left .et_pb_main_blurb_image {
    width: auto;
}

.blurb-right.et_pb_blurb_position_left .et_pb_blurb_container {
    padding-left: 0px;
    padding-right: 15px;
}
Here is a screenshot to show you exactly where to add the CSS code.
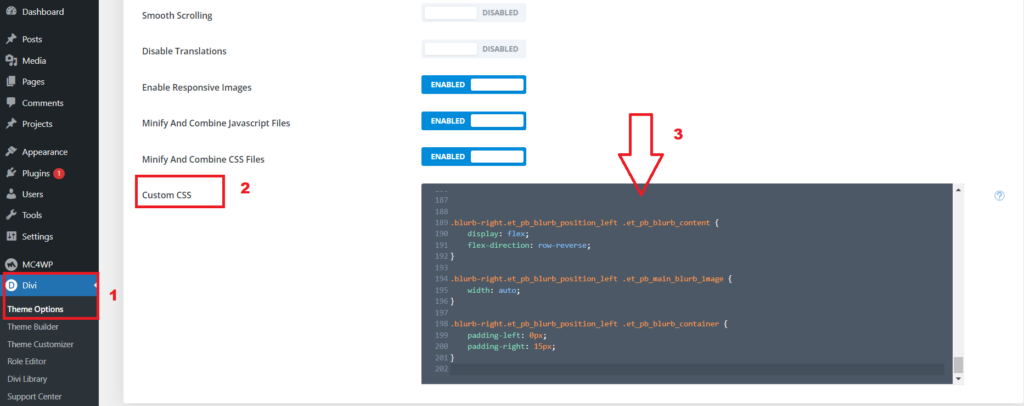
Adding CSS Code Snippet to the Divi Dashboard
Final Result:
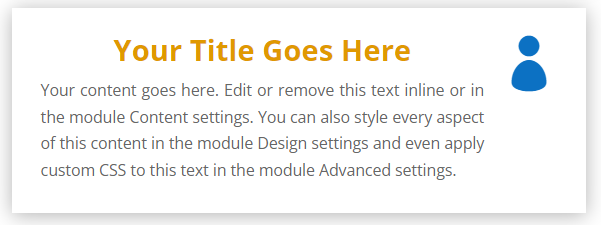
Alignment of the Divi icon to the right
Read More: Adding a Scroll Down Hover Effect in Divi Website – Step-by-Step Guide
Final Thoughts:
Wrapping up our guide, you’ve successfully gone through the steps to move the Blurb icon to the right in Divi. Now, you have the power to break away from the usual options and give your website a unique look in the world of web design.
By exploring the Blurb module settings, adding a special CSS class, and applying the provided CSS code, you can adjust where your icons sit on the page. This small change can really boost the overall appearance of your website.
Keep in mind, web design is all about trying things out. Feel free to play with these tricks, whether you’re working on your own blog or helping someone else with their site. Being able to tweak details like icon placement adds a professional touch to your work.
If you found this guide useful, share it with others who love working with Divi. Happy designing!
Read More: Mastering Divi: Tips and Tricks for a More Efficient Web Design Experience


0 Comments