Within the world of Divi website building, a common query that arises is how to automate the updating of the copyright year in footers. Divi has evolved considerably, boasting features like Dynamic Content. Surprisingly, we’ll leverage this to automate the copyright year without delving into complex code. No need for additional plugins or intricate coding – just Divi’s innate capabilities.
You’ve likely come across countless tutorials and plugins offering solutions to this issue. However, we’re taking a straightforward approach, utilizing Divi’s built-in tools. Say goodbye to scouring through lines of code or relying on external solutions – Divi has it covered.
If you’re tired of manually updating your copyright year or searching for the perfect plugin, you’re in the right place. Let’s explore how Divi’s Dynamic Content feature can effortlessly keep your copyright year current. It’s time to take charge of your website’s footer and maintain a fresh look effortlessly. Ready to dive in and see just how simple it can be? Let’s get started!
1. Add A Text Module
Let’s start by placing a Text Module into your layout wherever it fits best. If you’re thinking about updating your footer, that’s a good place to start. You can do this either within your Theme Builder or directly on your page layout.
2. Choose Dynamic Content Icon
Continuing to the second step, we’re now tasked with selecting the dynamic content, as depicted in the image below:
Read More: How to Use a Dynamic Logo in Divi Website
3. Choose the Current Date
Next, we’re tasked with selecting the current date. This step ensures that our copyright notice reflects the current year accurately.
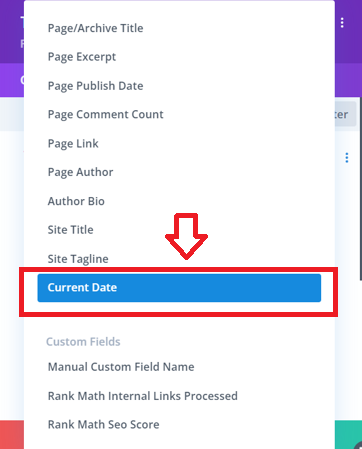
Choose the current date
4. Fill in the Fields
In setting up our website’s copyright information, attention to detail is key. We begin with the “Before” field, which includes “Copyright ©” followed by a space for clear formatting. Next, the “After” field prompts us to replace placeholder text with our website’s name, adding a personal touch. We then select “Custom” from the “Date Format” dropdown menu, granting control over the date format. Finally, in the “Custom Date Format” section, we input a capital “Y” to denote the year format.
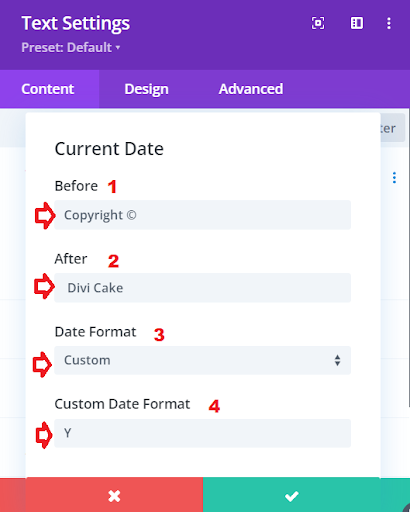
Fill in the Current Date Fields
Before: Copyright © (notice the space after the symbol)
After: Type your website name here
Date Format: Choose “Custom” from the dropdown listCustom Date Format: Here you need to type a capital “Y”
Read More: How to Backup Your Divi/WordPress Site
Wrapping Up:
Well done on completing the process of adding an auto-updating footer copyright in Divi without any coding! By utilizing Divi’s Dynamic Content feature, you’ve made the task of keeping your website’s copyright year a breeze. Gone are the days of manual updates or relying on external plugins – now, Divi’s built-in capabilities have you covered.
Throughout each step, from adding a Text Module to choosing the dynamic content icon and customizing the date format, you’ve taken charge of your website’s footer with simplicity and clarity. With attention to detail and following the provided instructions, you’ve crafted a copyright notice that reflects your website’s character and professionalism.
Now, as visitors explore your website, they’ll encounter a footer that not only looks sharp and up-to-date but also reinforces your dedication to quality and precision. Thanks for joining us on this journey through the world of Divi website building. Here’s to your ongoing success in creating captivating online experiences for your audience. Keep innovating, keep creating, and keep shining with Divi!
Read More: How to troubleshoot Your Save Has Failed error in Divi


0 Comments