In the digital landscape, where engagement with your website’s visitors is paramount, email marketing stands as a tried-and-true strategy for building lasting connections.
It’s the bridge that allows you to stay in touch, share valuable content, and nurture your audience over time. At the heart of effective email marketing lies a simple yet powerful tool: the email opt-in form.
Bloom, an exceptional email opt-in plugin, seamlessly integrates with the versatile Divi theme. In this article, we’ll embark on a journey to explore how Bloom in Divi can elevate your email marketing game.
We’ll delve into its features, functionalities, and practical implementation, giving you the keys to unlock the potential of email marketing within your Divi-powered website.
But first, let’s set the stage by understanding the significance of email opt-in forms and why they play a vital role in your online success.
The Significance of Email Opt-In Forms

Email Opt-Ins
Email marketing isn’t just about sending messages to a list of contacts; it’s about building a community of engaged individuals who value what you have to offer. And the foundation of this community starts with collecting email addresses through opt-in forms.
Why are email opt-in forms so essential?
Audience Building:
They allow you to gather a list of subscribers who have expressed genuine interest in your content, products, or services.
Personalization:
With email addresses in hand, you can tailor your messages to individual preferences, providing a more personalized experience.
Direct Communication:
Email provides a direct line of communication with your audience, free from the noise of social media algorithms
Conversion Power:
Subscribers are more likely to convert into customers or loyal followers, making email marketing one of the most effective conversion channels.
In the upcoming sections, we’ll take a deep dive into the realm of Bloom. You’ll gain insights into how this formidable plugin seamlessly integrates with Divi, revolutionizing the way you create and manage email opt-in forms.
Whether your goal is to expand your subscriber base, amplify audience engagement, or transform casual visitors into devoted patrons, Bloom in Divi offers a comprehensive solution for your needs.
Getting Started with Bloom
Getting Started with Bloom
Now that you understand the significance of email opt-in forms and their pivotal role in your online presence, it’s time to embark on your journey with Bloom in Divi. In this section, we’ll guide you through the initial steps, ensuring a seamless start in integrating this powerful email opt-in plugin into your website.
Installation and Activation
Setting up Bloom in your Divi-powered website is a straightforward process. Follow these steps to get started:
1. Access Your WordPress Dashboard
Begin by logging in to your WordPress dashboard, the central hub for managing your website.
2. Navigate to the Plugins Section
In the left-hand menu, locate and click on “Plugins.” This is where you can manage your website’s plugins.
3. Add New Plugin
At the top of the Plugins page, you’ll find the “Add New” button. Click on it to access the plugin installation page.
4. Search for “Bloom”
In the search bar in the top-right corner, type “Bloom” and press “Enter.” The Bloom plugin should appear in the search results.
5. Install the Plugin
Click the “Install Now” button next to the Bloom plugin. WordPress will automatically download and install the plugin for you.
6. Activate Bloom
Once the installation is complete, click the “Activate” button. Your Bloom plugin is now active and ready for use.
Configuring Your First Opt-In Form
Setting Up Bloom in Divi
With Bloom installed and activated, you’re well on your way to creating your first email opt-in form. Here’s how to get started:
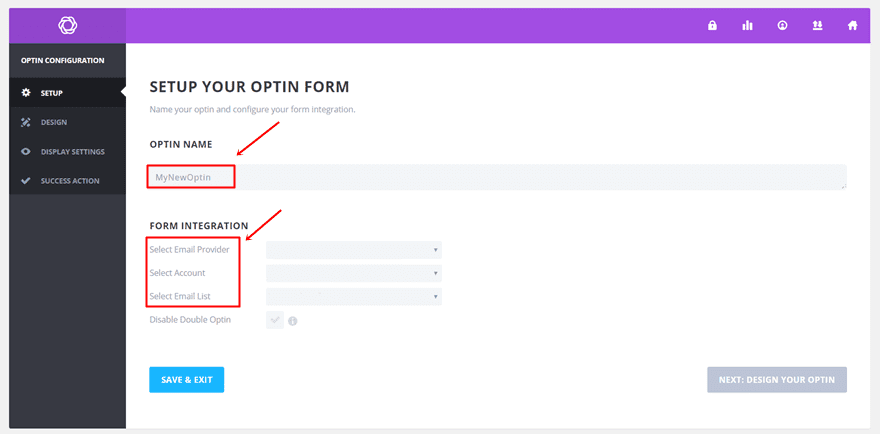
1. Access the Bloom Settings
In your WordPress dashboard, look for the “Bloom” menu item, typically located on the left-hand side. Hover your cursor over it to reveal the submenu options. Click on “Settings.”
2. Choose Your Email Marketing Service
Bloom offers seamless integration with popular email marketing services, such as Mailchimp, AWeber, and more. Select your preferred service and follow the prompts to connect your account.
3. Select Your Opt-In Form Type
Bloom provides various opt-in form types to suit your needs, including pop-ups, fly-ins, and inline forms. Choose the type that aligns with your website’s design and engagement strategy.
4. Design Your Opt-In Form
Customize the appearance of your opt-in form to match your Divi theme. Adjust colors, fonts, and layout to create a visually appealing and cohesive design.
5. Set Display Triggers
Bloom offers several triggers for displaying your opt-in forms, such as time delay, scroll percentage, and exit intent. Configure these triggers to engage your visitors effectively.
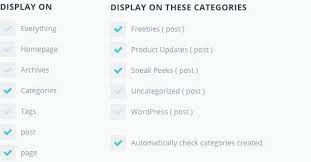
6. Define Targeting Options
Tailor your opt-in form’s visibility by specifying where and when it should appear. You can target specific posts, pages, or categories, ensuring your form reaches the right audience.
7. Integrate with Divi
Bloom seamlessly integrates with Divi, allowing you to place opt-in forms within Divi Builder modules. This integration ensures your forms align with your overall website design.
8. Save and Activate Your Form
Once you’ve customized your opt-in form to your satisfaction, save your settings and activate the form. It’s now live on your website, ready to capture valuable email addresses
Conclusion of This Section
You’ve successfully installed, configured, and activated Bloom in your Divi-powered website. You’ve taken the first step in enhancing your email marketing strategy, and in the following sections, we’ll explore advanced features and strategies to maximize your results.
In the upcoming sections, we’ll delve deeper into creating stunning opt-in forms, utilizing targeted display options, conducting A/B testing for optimization, and seamlessly integrating Bloom with your email marketing service. Stay with us on this journey to supercharge your email marketing efforts with Bloom in Divi.
Creating Stunning Opt-In Forms
Now that you’ve successfully set up Bloom in Divi and taken your first steps towards building a thriving email subscriber list, it’s time to focus on creating visually stunning and effective opt-in forms.
In this section, we’ll explore the various types of opt-in forms that Bloom offers and provide insights into designing forms that seamlessly integrate with your Divi website’s aesthetics
Exploring Opt-In Form Types

Explore the Different Opt-in Forms
Bloom offers a versatile range of opt-in form types, each catering to different engagement strategies and website layouts. Here are the key types of opt-in forms you can utilize:
1. Pop-Up Forms
Purpose: Pop-up forms appear as overlays on your website, grabbing the visitor’s attention.
Use Cases: Effective for promoting time-sensitive offers, lead magnets, or capturing attention on exit intent.
Design Tips: Design pop-ups that align with your website’s color scheme and branding. Keep them visually appealing without overwhelming the visitor.
2. Fly-In Forms
Purpose: Fly-in forms slide in from the corners or sides of the screen, providing a less intrusive way to capture emails.
Use Cases: Suitable for subtle engagement, newsletter sign-ups, or offering additional resources.
Design Tips: Ensure that fly-in forms are noticeable but not obtrusive. Use eye-catching colors and consider animation effects for added engagement.
3. Inline Forms
Purpose: Inline forms are embedded directly within your website’s content, seamlessly blending with your content.
Use Cases: Ideal for newsletter sign-ups within blog posts, articles, or as part of your page’s natural flow.
Design Tips: Make inline forms visually appealing but unobtrusive. Ensure they complement your content rather than disrupt it.
4. Widget Area Forms
Purpose: These forms are placed in designated widget areas on your website, such as the sidebar or footer.
Use Cases: Great for consistent visibility on all pages, often used for newsletter subscriptions.
Design Tips: Ensure widget forms are well-integrated into your overall website design. Match their appearance to your theme’s aesthetics.
Designing Visually Appealing Forms

Design Opt-In Forms
Effective opt-in forms should not only capture emails but also enhance your website’s overall user experience. Here are some design tips to consider:
1. Consistent Branding
Ensure that the colors, fonts, and branding elements of your opt-in forms match your Divi website’s overall design.
2. Clear and Compelling Copy
Use concise and compelling copy in your forms that clearly communicates the value of subscribing.
3. Eye-Catching Imagery
Incorporate relevant and visually appealing images or icons that reinforce your message.
4. Responsive Design
Test your opt-in forms on various devices to ensure they are responsive and display correctly.
5. Minimalism
Avoid clutter and distractions in your forms. Keep them clean and focused on the email capture goal.
In the next section, we’ll explore how to strategically display your opt-in forms to maximize their effectiveness and engage your website visitors effectively. Stay tuned for insights into targeting display options with Bloom in Divi.
Targeted Display Options
Bloom’s Targeted Display Options
Now that you’ve learned how to create visually stunning opt-in forms with Bloom in Divi, it’s time to explore the importance of strategically displaying these forms to engage your website visitors effectively.
In this section, we’ll take a look into various display options offered by Bloom and how to utilize them to maximize your email list growth.
The Importance of Display Strategy
Relevance: Displaying the right form at the right time ensures that your message is relevant to the visitor’s context.
User Experience: A well-timed form doesn’t disrupt the user experience but enhances it by offering valuable content or offers.
Conversion Rates: Properly targeted forms tend to have higher conversion rates, resulting in more subscribers.
Key Display Triggers in Bloom
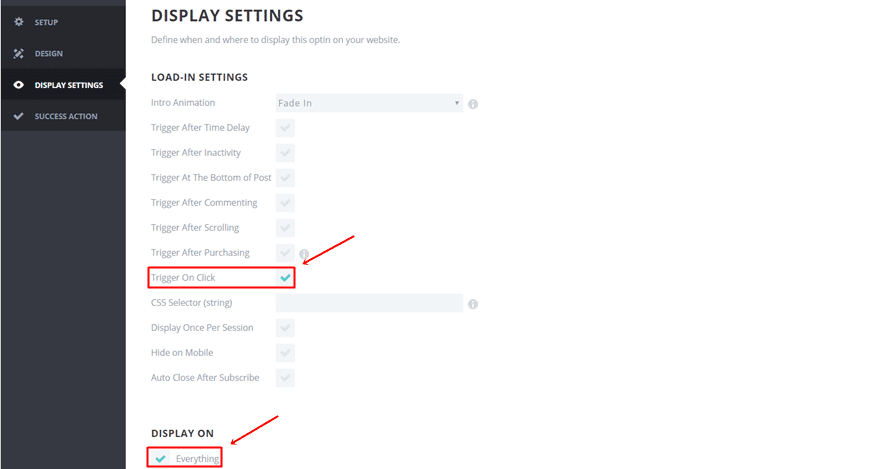
Display Triggers in Bloom
Bloom offers a variety of display triggers that determine when and how your opt-in forms appear. Let’s explore some of the key triggers:
1. Time Delay
Purpose: Set a specific time delay after a visitor arrives on your site before the form appears.
Use Cases: Ideal for offering a newsletter subscription or a special promotion to engage visitors after they’ve explored your content.
2. Scroll Trigger
Purpose: Display the opt-in form when the visitor scrolls down a certain percentage of the page.
Use Cases: Effective for showing forms to engaged visitors who are interested in your content.
3. Exit-Intent
Purpose: Trigger the form when a visitor shows exit intent, such as moving the mouse cursor towards the browser’s close button.
Use Cases: Great for preventing bounce rates by offering a last-minute incentive or valuable content.
4. User Inactivity
Purpose: Show the form when a visitor remains inactive on your site for a defined period.
Use Cases: Useful for re-engaging visitors who may have forgotten about your site or lost interest.
5. After Content
Purpose: Display the form after the visitor has consumed a portion of your content.
Use Cases: Ideal for offering related resources or encouraging readers to subscribe after they’ve found value in your content.
Crafting Effective Display Rules
To make the most of these triggers, consider these tips for crafting effective display rules:
Understand Your Audience: Tailor your display triggers to match your audience’s behavior and preferences.
Testing: A/B testing different triggers can help you determine which ones yield the best results.
Frequency: Avoid overwhelming visitors with too many forms. Set rules to limit how often forms appear to the same user.
By strategically using these display triggers, you can engage your website visitors at the right moment, increasing the chances of them subscribing and becoming part of your email list.
In the next section, we’ll explore the power of A/B testing in optimizing your opt-in forms for even better results. Stay with us to discover how to fine-tune your email capture strategy with Bloom in Divi.
A/B Testing for Optimal Performance

Use A/B Testing to Find Out What Works
A/B testing is a powerful tool for optimizing your opt-in forms and improving conversion rates. With Bloom in Divi, you can easily conduct A/B tests to determine which form designs and strategies resonate best with your audience.
The Benefits of A/B Testing
A/B testing involves creating two (or more) versions of an opt-in form and then comparing their performance to identify which one performs better. Here’s why it’s crucial:
Data-Driven Decisions: A/B testing provides concrete data on what works and what doesn’t, allowing you to make informed decisions.
Continuous Improvement: It fosters a culture of continuous improvement, helping you refine your email capture strategy over time.
Increased Conversions: By identifying the most effective form variations, you can significantly boost your conversion rates.
Conducting A/B Tests with Bloom
Bloom simplifies the A/B testing process, enabling you to fine-tune your opt-in forms effortlessly. Here’s how to get started:
Form Variation: Create two different versions of your opt-in form with variations in design, copy, or display triggers.
Testing Parameters: Define the testing parameters, such as the percentage of visitors to be included in the test and the duration of the test.
Monitor Results: Bloom will automatically track the performance of each form variation, providing insights into which one is more effective.
Optimize: Based on the test results, select the winning form variation and make it your default form. You can continue to refine and test new variations to further optimize your email capture strategy.
Remember to focus on testing one element at a time, whether it’s the headline, button color, or display trigger. This systematic approach will help you pinpoint the most impactful changes and continually enhance your opt-in forms’ performance.
By leveraging A/B testing with Bloom, you can ensure that your email opt-in forms are finely tuned to resonate with your audience, resulting in a more substantial and engaged subscriber base.
In the upcoming section, we’ll explore how Bloom seamlessly integrates with popular email marketing services, streamlining your email list management and ensuring a cohesive email marketing strategy. Stay tuned for insights into the world of email service integration with Bloom in Divi.
Seamless Integration with Email Marketing Services
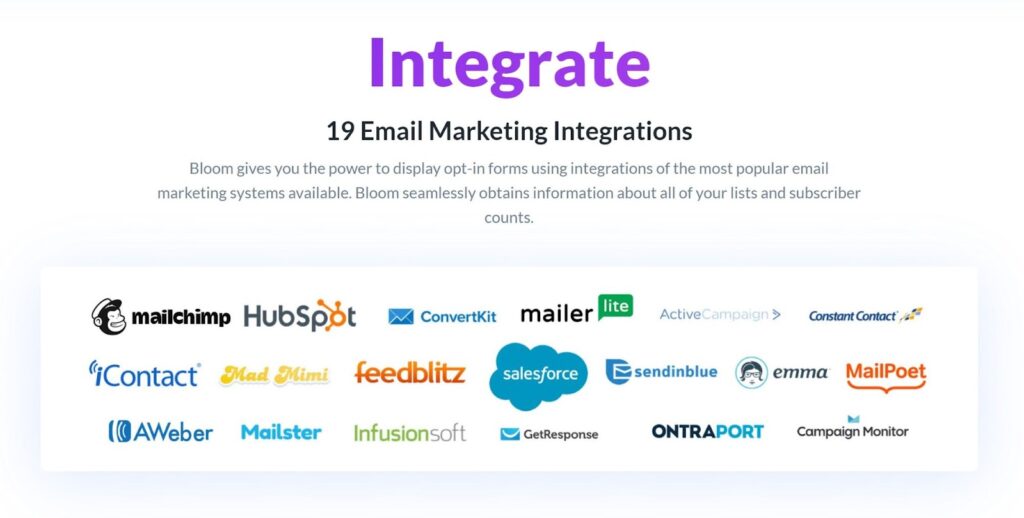
Flawless Integration with Email Tools
Bloom not only excels at creating visually appealing and strategically displayed opt-in forms but also seamlessly integrates with popular email marketing services. In this section, we’ll explore the importance of this integration and guide you on how to connect Bloom with your chosen email platform.
The Role of Email Marketing Service Integration
List Management: Integration enables automatic list management, ensuring that subscribers are added to your email lists effortlessly.
Automation: You can set up automated email campaigns triggered by user interactions with your opt-in forms.
Personalization: Integration allows for more personalized email content, enhancing the user experience.
Connecting Bloom with Your Email Marketing Service
Bloom offers integration with a wide range of email marketing services, including Mailchimp, AWeber, ConvertKit, and more. Here’s a general guide on how to connect Bloom with your chosen service:
Access Bloom Settings: In your WordPress dashboard, navigate to “Bloom” and click on “Settings.”
Email Accounts: In the settings, look for the “Email Accounts” tab. Here, you’ll find options to connect various email marketing services.
Select Your Service: Choose your email marketing service provider from the list. You’ll typically need to provide your API key or other authentication details.
Authenticate: Follow the prompts to authenticate your Bloom plugin with your email marketing account. This step may involve logging in to your email service and granting permissions.
List Selection: After authentication, select the email list(s) where you want new subscribers to be added.
Customization: Customize the integration settings according to your preferences, such as specifying the form fields and tags to be used.
Save and Test: Save your integration settings and conduct a test by subscribing to your opt-in form. Ensure that the data flows seamlessly to your email marketing platform.
Elegant Design Integration
Bloom not only excels in email opt-in functionality but also seamlessly integrates with Divi’s design capabilities. This synergy enables you to create opt-in forms that seamlessly blend with your website’s aesthetics.
Harmonious Design Alignment
Bloom ensures that your opt-in forms align perfectly with your Divi theme, maintaining a consistent and visually pleasing design across your website. Here’s how it achieves this:
Color Coordination: Easily customize form colors to match your website’s palette, ensuring a cohesive look.
Font Consistency: Choose fonts that mirror your site’s typography, preserving design uniformity.
Layout Flexibility: Adjust the form layout to fit your Divi page’s structure seamlessly.
Responsive Design: Bloom forms adapt flawlessly to different screen sizes and devices, maintaining a polished appearance.
Streamlined Form Placement
Bloom integrates effortlessly with Divi’s layout, allowing you to place opt-in forms within Divi Builder modules. This placement ensures that your forms not only look great but also fit naturally within your website’s content flow.
The Bottom Line
In this journey through the world of Bloom in Divi, you’ve uncovered the transformative power of this email opt-in plugin. From creating stunning opt-in forms that seamlessly integrate with your Divi website’s design to strategically displaying them to engage your audience effectively, Bloom empowers you to supercharge your email marketing efforts
.
By harnessing the potential of A/B testing, you can fine-tune your opt-in forms for optimal performance, ensuring that each email capture is a step toward building a robust subscriber base.
Bloom’s seamless integration with popular email marketing services simplifies list management, automation, and personalization, providing a streamlined path to nurturing your audience and delivering tailored content.
Moreover, Bloom’s elegant design integration ensures that your opt-in forms harmoniously blend with your Divi theme, enhancing user experience and maintaining design consistency.
As you embark on your email marketing journey with Bloom in Divi, remember that success lies in continuous improvement. Analyze the effectiveness of your opt-in forms through Bloom’s analytics and reporting features, and refine your strategies based on data-driven insights.
In closing, Bloom in Divi offers you a powerful tool to not only capture email addresses but also build lasting connections with your audience. Whether you’re a blogger, business owner, or creative professional, the synergy of Bloom and Divi empowers you to create engaging email marketing campaigns that resonate with your subscribers.
Embrace this opportunity to elevate your email marketing game, and may your Divi-powered website thrive with a growing and engaged community of subscribers.


0 Comments