Having a strong Call to Action (CTA) button in your website’s navigation menu can make a huge difference in guiding visitors towards the actions you want them to take. Whether it’s signing up for a newsletter, getting in touch, or making a purchase, a CTA button that’s easy to find can significantly improve user experience and conversion rates.
If you’re using the Divi theme, you’re in a great position. Divi offers a lot of flexibility, letting you customize your site without needing to dive deep into code. In this tutorial, I’m going to walk you through the steps to add a CTA button to your Divi menu. This will work for both the default Divi theme menu and the menu module, so you can follow along no matter how your site is set up.
By the end of this guide, you’ll have a CTA button in your menu that stands out and draws your visitors’ attention, making it easier for them to take action. So let’s jump in and get that button added to your Divi menu!
1. Add Custom CSS Class to the Menu Item
The first step in transforming a menu item into a CTA button is to add a custom CSS class to it. Here’s how you can do that:
Head over to your WordPress Dashboard and navigate to Appearance > Menus. Locate the menu item you want to style as a button and click on the arrow to expand its options. In the CSS Classes (optional) field, type in dc-menu-button. If you’re unsure where to find this field, don’t worry—there’s a helpful screenshot below to guide you through the process.
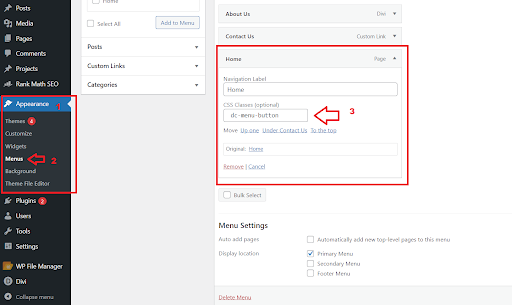
Adding a Custom CSS Class to the Menu Item
Read More: How to Create Anchor Links in Divi
2. Add Custom CSS Code
Next, go to your WordPress Dashboard and navigate to Divi > Theme Options. Under the General tab, find the Custom CSS section. Copy and paste the following code into this box to apply the necessary styles.
@media (min-width: 981px) {
    .dc-menu-button a {
        line-height: 9px;
        font-weight: 600;
        padding: 18px 16px!important;
        text-transform: uppercase;
        display: block;
        padding-left: 32px!important;
        padding-right: 32px!important;
        border-radius: 50px;
        -webkit-border-radius: 50px;
        -moz-border-radius: 50px;
        text-align: center;
        border: 0px;
        font-size: initial!important;
        color: #fff!important;
        background-color: #f92c8b;
    }

    .dc-menu-button a:hover {
        opacity: 1!important;
        color: #fff!important;
        background-color: #21c9e2
    }

    /*Removing padding from the menu module to fix the size of the button*/
    .et_pb_menu--with-logo .et_pb_menu__menu>nav>ul>li>a {
        padding-top: 0px;
        padding-bottom: 0px;
    }

    /*vertically center the menu items in menu module*/
    .et_pb_menu .et_pb_menu__menu>nav>ul>li {
        align-items: center;
    }
}
If you’re unsure where to add the CSS code in the Theme Options, don’t worry. Below is a screenshot to guide you through the process. This will help you locate the right spot to paste your custom CSS, ensuring your menu item is styled correctly as a button.
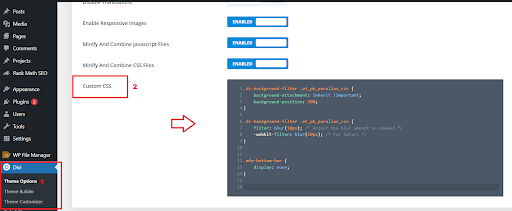
Adding Custom CSS Code to the Divi Dashboard
To customize the button’s appearance, you can adjust the font size, text color, and background color in the CSS on lines 15, 16, and 17. For the hover effect, modify the text color and background color on lines 22 and 23. This will help you achieve the desired look for your CTA button.
Before:

Default Divi Menu
After:

Divi Menu after CTA button
Read More: How to Add Divi Button Modules Side by Side
Final Thoughts:
Adding a Call to Action (CTA) button to your Divi menu is a simple yet powerful way to enhance your website’s functionality and user experience. By making important actions like signing up for a newsletter, contacting your team, or making a purchase easily accessible, you can guide your visitors more effectively and increase your conversion rates.
Throughout this tutorial, we’ve walked through the process of adding a custom CSS class to a menu item, applying the necessary styles, and customizing the appearance to match your site’s design. Divi’s flexibility makes these customizations straightforward, even if you’re not a coding expert.
Remember, a well-designed CTA button should stand out without overwhelming your site’s design. Use contrasting colors for the button and text to ensure it catches the eye, and make sure it’s large enough to be easily clickable. Additionally, consider testing different text, colors, and placements to see what resonates best with your audience.
By following these steps, you’ll create a visually appealing and functional CTA button that can significantly boost user engagement and conversions. Keep refining and optimizing your CTA to ensure it continues to meet your goals.
Read More: How To Apply A Blur and Filter Effects To Divi Section Background Image


0 Comments